BigIP Next - Health Monitors / Template
Just getting feet wet on BigIP Next. Q: Where are the heath monitor (node/pool) created and reconfiguration. Do they support versioning? Q: In the Classic LTM, there was a iAPP for VMWARE Horizon. I know iApps are not supported. Appear the template have replace them. I found a default list of template, but that appeared a little light in vendor application. Are there more template like the VMWARE published somewhere else.7Views0likes0CommentsGetting Started with BIG-IP Next: Backing Up and Restoring Central Manager
Backing up BIG-IP Next Instances is possible in the Central Manager GUI. Backing up Central Manager, however, requires you to break out those made CLI skilz of yours. And take a backup you shall! You can snapshot your Central Manager virtual machine and restore that as well, but if you want system level backup instead of device level in the event things go south, you need an option currently as high availability, though coming soon to a release near you, is not yet an option for Central Manager. As there will be no screenshots required, most of this is already covered onClouddocs how to on this topic, but in this article, I'll walk through the process by executing the steps and sharing the output. Creating the Central Manager Backup Login to the Central Manager CLI by SSHing to your fqdn or IP address. If you configured the external storage when you set up Central Manager you can do a full backup, which includes all the analytics from Central Manager and your instances. If you only have local storage, you'll need to do a partial. The command to perform the backup and the restore is /opt/cm-bundle/cm. You use the backup subcommand for a backup operation, and as you can probably guess, the restore subcommand for a restore operation. I don't have the external storage in my lab, so I ran a partial backup. admin@cm1:~$ /opt/cm-bundle/cm backup 2024-03-09T00:04:15+00:00 Executing /opt/cm-bundle/cm backup Encryption password: Reenter encryption password: 2024-03-09T00:04:21+00:00 info: Backing up Vault... Created vault backup: /tmp/vault-backup.tgz tar: removing leading '/' from member names var/run/vault-init/ var/run/vault-init/linkerd.csr var/run/vault-init/linkerd.crt var/run/vault-init/vault-client-intermediate-ca.csr var/run/vault-init/vault-client-intermediate-ca.crt var/run/vault-init/unsealkeys var/run/vault-init/ca.crt var/run/vault-init/ingress-intermediate-ca.crt var/run/vault-init/unsealkeys.sha256 var/run/vault-init/linkerd-ca.crt var/run/vault-init/ingress-intermediate-ca.csr var/run/vault-init/linkerd-webhook.csr var/run/vault-init/linkerd-webhook.crt 2024-03-09T00:04:22+00:00 info: Vault backup successful! 2024-03-09T00:04:22+00:00 info: Backing up PostgreSQL... 2024-03-09T00:04:23+00:00 info: PostgreSQL backup successful! 2024-03-09T00:04:23+00:00 info: Performing Prometheus backup... 2024-03-09T00:04:55+00:00 info: Creating Prometheus database snapshot... 2024-03-09T00:05:09+00:00 info: Verifying the Prometheus database snapshot... 2024-03-09T00:05:09+00:00 info: Successfully created Prometheus database snapshot 20240309T000505Z-4c5c8cab103961be 2024-03-09T00:05:09+00:00 info: Copying Prometheus snapshot locally... 2024-03-09T00:05:22+00:00 info: Cleanup the Prometheus snapshot in the pod 2024-03-09T00:05:28+00:00 info: Prometheus backup succeeded! 2024-03-09T00:05:28+00:00 info: Performing Elasticsearch backup... 2024-03-09T00:05:28+00:00 info: Creating Elasticsearch snapshot [elasticsearch-snapshot]... 2024-03-09T00:05:28+00:00 info: Elasticsearch backup succeeded! 2024-03-09T00:05:28+00:00 info: Backing up SQLite... 2024-03-09T00:05:29+00:00 info: SQLite backup successful! 2024-03-09T00:05:29+00:00 info: Creating backup bundle backup.20240309-000421.tgz... 2024-03-09T00:08:26+00:00 info: Encrypting backup bundle... 2024-03-09T00:08:40+00:00 info: Backup bundle created at /opt/cm-backup/backup.20240309-000421.tgz.enc Restoring the Central Manager Backup Sometime after my backup, suppose AubreyKingF5 logged into to my Central Manager and deleted user jrahm and my backup-test certificate (BAD Aubrey!) Maybe he deleted all the resources. Here's the backup script execution on my Central Manager instance. Note the immediate ask for that backup password. Seriously, vault those passwords, don't lose them! admin@cm1:~$ /opt/cm-bundle/cm restore /opt/cm-backup/backup.20240309-000421.tgz.enc 2024-03-09T00:12:40+00:00 Executing /opt/cm-bundle/cm restore /opt/cm-backup/backup.20240309-000421.tgz.enc 2024-03-09T00:12:40+00:00 info: Restoring from backup file /opt/cm-backup/backup.20240309-000421.tgz.enc... Enter decryption password: 2024-03-09T00:12:43+00:00 info: Decrypting backup file... 2024-03-09T00:12:46+00:00 info: Checking available disk space... 2024-03-09T00:13:55+00:00 info: Extracting backup to /opt/cm-backup... 2024-03-09T00:14:35+00:00 info: Validating backup contains all required components 2024-03-09T00:14:35+00:00 info: Restoring Vault... var/run/vault-init/ var/run/vault-init/linkerd.csr var/run/vault-init/linkerd.crt var/run/vault-init/vault-client-intermediate-ca.csr var/run/vault-init/vault-client-intermediate-ca.crt var/run/vault-init/unsealkeys var/run/vault-init/ca.crt var/run/vault-init/ingress-intermediate-ca.crt var/run/vault-init/unsealkeys.sha256 var/run/vault-init/linkerd-ca.crt var/run/vault-init/ingress-intermediate-ca.csr var/run/vault-init/linkerd-webhook.csr var/run/vault-init/linkerd-webhook.crt Vault restored using /tmp/vault-backup.tgz 2024-03-09T00:14:47+00:00 info: Vault data has been successfully restored. 2024-03-09T00:14:47+00:00 info: Renewing all certificates. Manually triggered issuance of Certificate default/mbiq-ingress-nginx-root-cert Manually triggered issuance of Certificate default/mbiq-ado-vault-server-cert Manually triggered issuance of Certificate default/mbiq-ado-vault-client-cert Manually triggered issuance of Certificate default/gateway-feature-ingress-cert Manually triggered issuance of Certificate default/central-manager-ui-ingress-cert Manually triggered issuance of Certificate default/mbiq-apm-vault-client-cert Manually triggered issuance of Certificate default/mbiq-certificate-vault-client-cert Manually triggered issuance of Certificate default/mbiq-gateway-vault-client-cert Manually triggered issuance of Certificate default/mbiq-sslo-vault-client-cert Manually triggered issuance of Certificate default/mbiq-system-vault-client-cert Manually triggered issuance of Certificate default/mbiq-ingress-nginx-admission Manually triggered issuance of Certificate default/mbiq-instance-vault-client-cert Manually triggered issuance of Certificate default/mbiq-journeys-vault-client-cert Manually triggered issuance of Certificate default/mbiq-llm-vault-client-cert Manually triggered issuance of Certificate default/mbiq-qkview-vault-client-cert Manually triggered issuance of Certificate default/mbiq-upgrade-manager-vault-client-cert Manually triggered issuance of Certificate default/node-exporter-server-cert 2024-03-09T00:14:50+00:00 info: Waiting for certificates to be renewed. 2024-03-09T00:14:50+00:00 info: Certificate mbiq-ingress-nginx-root-cert renewed. 2024-03-09T00:14:50+00:00 info: Certificate mbiq-ado-vault-server-cert renewed. 2024-03-09T00:14:51+00:00 info: Certificate mbiq-ado-vault-client-cert renewed. 2024-03-09T00:14:56+00:00 info: Certificate gateway-feature-ingress-cert renewed. 2024-03-09T00:15:01+00:00 info: Certificate central-manager-ui-ingress-cert renewed. 2024-03-09T00:15:02+00:00 info: Certificate mbiq-apm-vault-client-cert renewed. 2024-03-09T00:15:02+00:00 info: Certificate mbiq-certificate-vault-client-cert renewed. 2024-03-09T00:15:02+00:00 info: Certificate mbiq-gateway-vault-client-cert renewed. 2024-03-09T00:15:02+00:00 info: Certificate mbiq-sslo-vault-client-cert renewed. 2024-03-09T00:15:02+00:00 info: Certificate mbiq-system-vault-client-cert renewed. 2024-03-09T00:15:03+00:00 info: Certificate mbiq-ingress-nginx-admission renewed. 2024-03-09T00:15:03+00:00 info: Certificate mbiq-instance-vault-client-cert renewed. 2024-03-09T00:15:03+00:00 info: Certificate mbiq-journeys-vault-client-cert renewed. 2024-03-09T00:15:03+00:00 info: Certificate mbiq-llm-vault-client-cert renewed. 2024-03-09T00:15:03+00:00 info: Certificate mbiq-qkview-vault-client-cert renewed. 2024-03-09T00:15:09+00:00 info: Certificate mbiq-upgrade-manager-vault-client-cert renewed. 2024-03-09T00:15:09+00:00 info: Certificate node-exporter-server-cert renewed. 2024-03-09T00:15:09+00:00 info: Successfully renewed all certificates. 2024-03-09T00:15:09+00:00 info: Restoring PostgreSQL database... 2024-03-09T00:15:12+00:00 info: Restarting init jobs. W0309 00:16:07.005788 2472134 warnings.go:70] path /(mgmt/shared/.*) cannot be used with pathType Prefix 2024-03-09T00:17:03+00:00 info: Successfully restarted init jobs. 2024-03-09T00:17:05+00:00 info: PostgreSQL database has been successfully restored. 2024-03-09T00:17:05+00:00 info: Restarting mbiq-sslo-feature... 2024-03-09T00:17:09+00:00 info: mbiq-sslo-feature has restarted. 2024-03-09T00:17:09+00:00 info: Restarting mbiq-qkview-feature... 2024-03-09T00:17:13+00:00 info: mbiq-qkview-feature has restarted. 2024-03-09T00:17:13+00:00 info: Restarting mbiq-device-feature... 2024-03-09T00:17:17+00:00 info: mbiq-device-feature has restarted. 2024-03-09T00:17:17+00:00 info: Restarting mbiq-certificate-feature... 2024-03-09T00:17:20+00:00 info: mbiq-certificate-feature has restarted. 2024-03-09T00:17:20+00:00 info: Restarting mbiq-gateway-feature... 2024-03-09T00:17:24+00:00 info: mbiq-gateway-feature has restarted. 2024-03-09T00:17:24+00:00 info: Restarting mbiq-proxy-service... 2024-03-09T00:17:28+00:00 info: mbiq-proxy-service has restarted. 2024-03-09T00:17:28+00:00 info: Restarting mbiq-system-feature... 2024-03-09T00:17:35+00:00 info: mbiq-system-feature has restarted. 2024-03-09T00:17:35+00:00 info: Restarting mbiq-apm-feature... 2024-03-09T00:17:46+00:00 info: mbiq-apm-feature has restarted. 2024-03-09T00:17:46+00:00 info: Restarting mbiq-upgrade-manager-feature... 2024-03-09T00:17:49+00:00 info: mbiq-upgrade-manager-feature has restarted. 2024-03-09T00:17:49+00:00 info: Restoring Prometheus... 2024-03-09T00:17:50+00:00 info: Deleting the current Prometheus data... 2024-03-09T00:17:50+00:00 info: Copying Prometheus data from backup... 2024-03-09T00:18:11+00:00 info: Prometheus data has been successfully restored. It may take a few minutes for Prometheus to be available. 2024-03-09T00:18:11+00:00 warning: Only restoring log indexes of ES 2024-03-09T00:18:11+00:00 info: Restoring Elasticsearch... {"acknowledged":true,"persistent":{"action":{"destructive_requires_name":"false"}},"transient":{}}2024-03-09T00:18:11+00:00 info: Closing all indices... 2024-03-09T00:18:12+00:00 info: Deleting all indices... {"acknowledged":true} {"acknowledged":true,"persistent":{"action":{"destructive_requires_name":"true"}},"transient":{}}2024-03-09T00:18:12+00:00 info: Elasticsearch data has been successfully restored. 2024-03-09T00:18:12+00:00 info: Restoring SQLite database... 2024-03-09T00:18:14+00:00 info: Restarting LLM POD 2024-03-09T00:18:18+00:00 info: SQLite database has been successfully restored. 2024-03-09T00:18:18+00:00 info: Migrating old apps to new schema... 2024-03-09T00:18:18+00:00 info: Waiting for migration job to finish... 2024-03-09T00:18:23+00:00 info: Migration job succeeded 2024-03-09T00:18:23+00:00 info: Post-restore updates started... 2024-03-09T00:18:25+00:00 info: Post-restore updates completed successfully 2024-03-09T00:18:25+00:00 info: Restore completed successfully. In this quick video, you can see the video evidence of his alleged shenanigans removing those resources, them me restoring the backup and validating the resources indeed were restored. And that's a wrap! Get your backups going and your processes documented.94Views1like0CommentsGetting Started with BIG-IP Next: Migrating an Application Workload
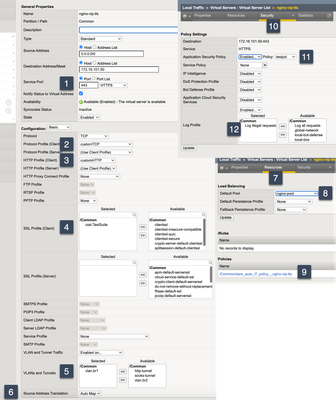
So far in this article series, the focus has been completely on the operational readiness of BIG-IP Next as a system. In this article, I'll walk through migrating an application currently supported by my classic BIG-IP running TMOS version 15.1.x. The application is just a simple instance of an NGINX web server fronted on LTM with basic load balancing, TLS offloading, and a basic WAF policy. There are a lot of screenshots in this article, which might seem overwhelming. Doing your own walkthrough, however, will put your mind at ease; it actually moves pretty quickly in realtime. Existing Application Workload on TMOS We'll start with the GUI representation of the application workload. It is secured with TLS, which is offloaded at the BIG-IP with a clientssl profile and not re-encrypted to the server. There are custom TCP and HTTP profiles defined as well as the aforementioned custom clientssl profile. Snat automap is enabled, and a specific VLAN is configured to allow connections. On the security tab, an application security policy is enabled, and the log illegal requests log profile is enabled as well. Finally, under resources, the default pool is defined and a policy is in place to map requests to the applied security policy. On the CLI, that virtual server along with all the other referenced BIG-IP objects are defined in the tmsh version of that configuration. ltm virtual nginx-vip-tls { destination 172.16.101.50:https ip-protocol tcp mask 255.255.255.255 policies { asm_auto_l7_policy__nginx-vip-tls { } } pool nginx-pool profiles { ASM_testpol { } cssl.TestSuite { context clientside } customHTTP { } customTCP { } websecurity { } } security-log-profiles { "Log illegal requests" } source-address-translation { type automap } vlans { vlan.br1 } vlans-enabled } ltm policy asm_auto_l7_policy__nginx-vip-tls { controls { asm } last-modified 2024-03-20:13:25:13 requires { http } rules { default { actions { 1 { asm enable policy /Common/testpol } } ordinal 1 } } status legacy strategy first-match } ltm pool nginx-pool { members { 172.16.102.5:http { address 172.16.102.5 session monitor-enabled state up } } monitor http } security bot-defense asm-profile ASM_testpol { app-service none clientside-in-use disabled flags 0 inject-javascript disabled persistent-data-validity-period 0 send-brute-force-challenge disabled send-javascript-challenge disabled send-javascript-efoxy disabled send-javascript-fingerprint disabled } ltm profile client-ssl cssl.TestSuite { app-service none cert-key-chain { default { cert default.crt key default.key } } cipher-group cg_TLSv1.3 ciphers none defaults-from clientssl inherit-ca-certkeychain true inherit-certkeychain true options { dont-insert-empty-fragments } } ltm cipher group cg_TLSv1.3 { allow { cr_TLSv1.3 { } } } ltm cipher rule cr_TLSv1.3 { cipher TLSv1_3 dh-groups DEFAULT signature-algorithms DEFAULT } ltm profile http customHTTP { app-service none defaults-from http enforcement { known-methods { PATCH DELETE GET POST PUT } max-header-count 32 max-header-size 16384 rfc-compliance enabled } hsts { mode enabled } insert-xforwarded-for enabled proxy-type reverse } ltm profile tcp customTCP { app-service none congestion-control bbr defaults-from f5-tcp-progressive idle-timeout 600 ip-tos-to-client pass-through keep-alive-interval 2100 pkt-loss-ignore-burst 3 pkt-loss-ignore-rate 10 proxy-options enabled } ltm profile web-security websecurity { } You can see that I have some non-standard options in some of that configuration, such as specifying the congestion-control algorithm algorithm in the TCP profile, enabling HSTS in the HTTP profile, and setting cipher rules and groups for use in my SSL profile. Now that we have an idea of the workload we're going to migrate, let's create a UCS of the system for use in the migration. If you are already comfortable with this part on classic BIG-IP systems, you can skip down to the next section header. First, login to your classic BIG-IP and navigate to System->Archives and click Create. Give it a name and click Finished. I named mine next-migration. Click OK after the UCS has been generated and saved. In the archive list, click the name of the UCS you created. Click the Download button. Migrating the Workload in Central Manager Upload UCS and Analyze the Workloads Armed with your UCS, login to Central Manager and on the welcome screen, click Go to Application Workspace. If you have not added any applications yet, you'll see a screen like this with a Start Adding Apps button. If you already have something defined, you'll see a list of applications. Click the + Add Application button instead. On this screen, we'll bypass creating a new application service and select New Migration. Name your session as you'll be able to come back to it to migrate other applications later if your intent is to just migrate a single application for now (as is the case with this walkthrough.) I added a description but it is not necessary. Click Next. Here you'll select your UCS archive and group your application services by IP addresses OR by virtual server. I stuck with the recommended default. Click Next. Your UCS will now upload and then Central Manager will analyze and group the package. An enhanced version of the JOURNEYS tool available in the f5devcentral organization on GitHub is used here. Select Add Application. Application 5 is the one we are interested in analyzing and migrating for this walkthrough, so I selected that one. Notice in the status column the applications that have warnings, and that ours is one of them. Hovering over the triangle icon it indicates the app can be migrated, but without some of the functionality from our classic iteration of this workload. Next, click Analyze at the top right so we can see what can't be migrated. In the Configuration Analyzer screen, there are 3 files with areas of concern. First, that the websecurity profile is not supported. This is ok, the mechanisms to support attaching policies in Next are slightly different. Next from what was the bigip_base.conf file, it's not supporting the vlan as defined. This is included in the migration analysis as the vlans are specified in my virtual server, but the mechanisms for doing so are different in Next. (Note: I don't fully grok this change yet. This article will be updated once I have confidence I'm communicating the functionality accurately.) And finally, from the bigip.conf file, there are few areas of concern, shown in the animated gif below. Standalone bot-defense is not a thing in BIG-IP Next, it's part of the overall policy, so that object is not supported. Also not supported yet are local traffic policies and cipher groups. Note that even though these objects aren't supported, I can still migrate the application, and it should "just work." I guess we'll see later in this article, right? :) At this point, select the </> Preview AS3 and copy that to a file. We'll compare that to the classic BIG-IP version of AS3 in a later section. Add an Application Service After closing the AS3 preview, select the application again and click Add. Click Next For this particular application, we need a couple shared objects: the certificate/key pair for the SSL profile and the WAF policy. Click Import. After those are imported, click the numbered icon (2 in my case) under the Shared Objects column, which will open a listing of those objects that you imported. Review the objects (optional) and click Exit. At this step, if your existing application migration is accurate to the object level, you can deploy to an instance directly. But I have some changes to make to the IPs so I'm going to deploy as a draft instead. After seeing that my deployment was successfully deployed as a draft in Central Manager, I click Finish. Update the Draft and Deploy In My Application Services, click the application we just migrated. Here we can tweak the AS3 declaration. I need to update the vlan as my vlan.br1 from my TMOS BIG-IP system is not defined on my Next instance. I also have different client/server address ranges, so I updated the virtual server and pool member addresses as well. You will likely want to change your application name from the generically-migrated "application_5" but I left it as is for this exercise. Once I completed those changes, I clicked Save & Deploy. I was then asked to select an instance to deploy the application server. I only have one currently, so I selected that. This failed due to my vlan configuration. As I mentioned during the migration process, I don't yet fully grok the vlan referencing requirements in Next, so this is a point for me to be educated on and follow up with updates here in this article. Instead, I removed the allowVlans attributed altogether (after another attempt) and then clicked Save & Deploy again and (after re-selecting the deploy location as shown above) found success. Clicking on the application, you get a visual representation of the application objects. Testing and Observing the Migrated Application Now that we have an honest to goodness deployed application on BIG-IP Next (WOO HOO!!) let's test it to make sure things are working as expected. I have a ubuntu test server with connections into my external and internal traffic networks for my Next instance so it can be the client (curl) and the server (NGINX). First, a request that should work: curl -sk https://10.0.2.50/ <!DOCTYPE html> <html> <head> <title>Welcome to nginx!</title> <style> body { width: 35em; margin: 0 auto; font-family: Tahoma, Verdana, Arial, sans-serif; } </style> </head> <body> <h1>Welcome to nginx!</h1> <p>If you see this page, the nginx web server is successfully installed and working. Further configuration is required.</p> <p>For online documentation and support please refer to <a href="http://nginx.org/">nginx.org</a>.<br/> Commercial support is available at <a href="http://nginx.com/">nginx.com</a>.</p> <p><em>Thank you for using nginx.</em></p> Huzzah! That's a successful test. I ran a simple bash script with repetitive wget calls to push just a little load to populate the instance traffic graph: Now let's test the WAF policy by sending some nefarious traffic: curl -sk --config requests.txt https://10.0.2.50/ <html> <head> <title>Request Rejected</title> </head> <body>The requested URL was rejected. Please consult with your administrator.<br><br> Your support ID is: 16177875355615369771<br><br> <a href='javascript:history.back();'>[Go Back]</a> </body> </html> Sweet! Exactly what we wanted to see. Now let's take a look at the WAF Dashboard for blocks. Ok, that's a wrap on migrating the application. Functionally, it is a success! Comparing BIG-IP classic AS3 with BIG-IP Next AS3 If you are moving from classic BIG-IP configuration to BIG-IP Next, you likely will not have any context for comparing AS3 and so you might miss that some of the features you configured in classic are not present in Next. Some of those features aren't there at all yet, and some of them are just not exposed yet. Under the hood, TMM is still TMM with BIG-IP Next, and all of that core functionality is there, it's just a matter of prioritizing what gets exposed and tested and ready to support. Despite a myriad of features in classic BIG-IP, a surprising number of features went either unused or under-used and maintaining support for those will depend on future use requirements. Anyway, one way to build context for AS3 is to useVisual Studio Code and the F5 Extension to take your classic configuration and convert that to AS3 declarations with the AS3 configuration converter. In this section, I'm going to look at a few snippets to compare between classic and Next. Declaration Header The header for classic is a essentially a wrapper (lines 2-4) that isn't necessary in Next at all. That's because in classic, AS3 is not the only declaration class, you also have declarative onboarding and telemetry streaming. Classic: { "$schema": "https://raw.githubusercontent.com/F5Networks/f5-appsvcs-extension/master/schema/latest/as3-schema.json", "class": "AS3", "declaration": { "class": "ADC", "schemaVersion": "3.37.0", "id": "urn:uuid:4339ea7d-094b-4950-b029-ac6344b03a2b", "label": "Converted Declaration", } } Next: { "class": "ADC", "schemaVersion": "3.0.0", "id": "urn:uuid:715aa8d8-c2b0-4890-9e77-5f6131ee9efd", "label": "Converted Declaration", } Profiles One thing to keep in mind with migration is that the migration assistant currently provides detailed analysis to the class level, not the class attribute level. This means that some of the attributes that are supported in classic that are not supported in Next will fly under the radar and be removed with no notification. There is work underway in this regard, but you'll need to evaluate each of your applications as you migrate and plan accordingly. For the app I migrated here, this was evident in the following profiles. ClientSSL Here, the cipher groups and rules from classic are not yet available, and the ability to establish only TLSv1.3 seems to not be configurable at this time. Classic: "cssl.TestSuite": { "certificates": [ { "certificate": "foo.acmelabs.com" } ], "cipherGroup": { "use": "cg_TLSv1.3" }, "class": "TLS_Server", "tls1_0Enabled": true, "tls1_1Enabled": true, "tls1_2Enabled": true, "tls1_3Enabled": true, "singleUseDhEnabled": false, "insertEmptyFragmentsEnabled": false }, Next: "cssl.TestSuite": { "authenticationFrequency": "one-time", "certificates": [ { "certificate": "/tenant87f7bd9913a51/application_5/foo.acmelabs.com" } ], "class": "TLS_Server" }, TCP In the TCP profile, the most notable changes are the loss of QoS settings and the ability to select the congestion control algorithm. Classic: "customTCP": { "congestionControl": "bbr", "idleTimeout": 600, "ipTosToClient": "pass-through", "keepAliveInterval": 2100, "pktLossIgnoreBurst": 3, "pktLossIgnoreRate": 10, "proxyOptions": true, "class": "TCP_Profile" } Next: "customTCP": { "idleTimeout": 600, "pktLossIgnoreBurst": 3, "pktLossIgnoreRate": 10, "proxyBufferHigh": 262144, "proxyBufferLow": 196608, "proxyOptions": true, "sendBufferSize": 262144, "class": "TCP_Profile" }, HTTP In my HTTP profile, it seems I lost all my personally-selected options, such that I'd likely be fine with the default profile. Also, since I'm using the WAF, I can manage the allowed request methods there, and whereas I can't auto-insert strict transport security in the profile directly yet, I can manage that in an iRule as well, so I do have a path to workarounds for both cases. Classic: "customHTTP": { "knownMethods": [ "PATCH", "DELETE", "GET", "POST", "PUT" ], "maxHeaderCount": 32, "maxHeaderSize": 16384, "hstsInsert": true, "xForwardedFor": true, "proxyType": "reverse", "class": "HTTP_Profile" }, Next: "customHTTP": { "requestChunking": "sustain", "responseChunking": "sustain", "class": "HTTP_Profile" } Final Thoughts I point out the differences in my before and after to show a complete picture of the migration process. Some things changed, some went away, but the bottom line is I have a working application service. Before working on this article, I've done a migration in a couple step-by-step controlled labs and have played with but not finished deploying a working, tested, functional application in my own lab. Don't make that same mistake. Get your classic configurations migrated ASAP even if only as a draft in Central Manager, so you can start to evaluate and analyze What work you have on your end to tweak and tune where features have changed Where you need to start engaging your account team to inquire about your MUST HAVE features that may or may not be scoped currently. Next time out, we'll take a look at creating a net-new application service. Until then, stay active out there community and start digging into BIG-IP Next!1KViews4likes1CommentGetting Started with BIG-IP Next: Installing Instances on VMware Fusion
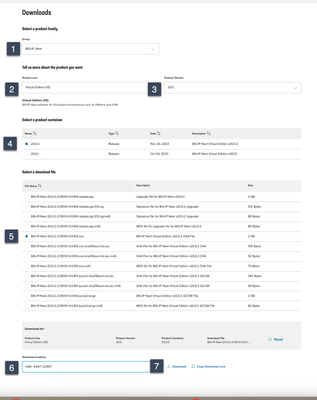
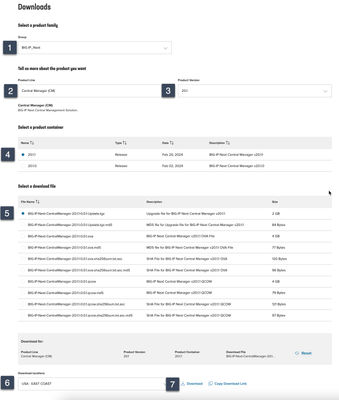
Introductionshave been made,fundamentals have been shared, and NOW it's time to make stuff happen! In this article, I'll show you how to get a BIG-IP Next Instance installed on VMware Fusion. Note:Fusion is not a supported installation target, but if you're working on discovery and/or using it for lab purposes, it'll work just fine. Download the bits... Login to MyF5 and head to thedownloads section. Select the BIG-IP_Next group, the Virtual Edition (VE) product line, and your choice of the product version (20.0 in my case for this article, the rest of the values in parentheses follow suit, but you might choose different versions/locations). Next, select a product container (20.0.2). Select the OVA file (BIG-IP-Next-20.0.2-2.139.10+0.0.165.ova), select the download location (USA - EAST COAST) and then click download. My selections as stated are shown below. Install Next Instance Launch VMware Fusion, and make sure you have 2 VCPus, 8GB RAM, and 80GB of disk handy for the installation! Right-click on the VIRTUAL MACHINES icon and click new. On the select the installation method screen, select import an existing virtual machine and then click continue. Next, select choose file and select the bits you downloaded, then click continue. In my case, I already had the file in my recent items. Name your virtual machine and then click save. I named mine Next-VM1 (so I can add Next-VM(x) instances later for HA and other purposes) By default, the instance will be configured with a single NIC, 8 vCPUs, and 16GB of RAM. I'm going to scale that down in my lab, so I hit Customize Settings. If you hit finish accidentally and it powers on, just kill the power and go to settings for the virtual machine to continue. In settings, click on the Processors & Memory icon. On this screen I changed from 8 processor cores to 2, and 16GB of RAM to 8GB, then I clicked Show All at the top of the dialog. Next, in the upper right of the dialog, I clicked Add Device... Then I highlighted Network Adapter and then clicked Add... In the NIC settings, I set the network to vmnet2, which is a host-only network in my Fusion setup that I use as the client-side network for BIG-IP devices. After selecting your network, click Show All and then add another Network Adapter for your server-side network following the previous two steps. Afterward, your virtual machine settings should reflect three NICs. Close out the settings window and navigate to your virtual machine's configuration file. Mine is /Users/notsofastmyfriend/Virtual Machines.localized/Next-VM1.vmwarevm/Next-VM1.vmx. Open that file in your favorite editor and validate that the network interface virtualDev settings are all vmxnet3. By default on my Fusion installation, any added network adapters are set to type e1000 and that is not a setting I could find to change in the GUI client. notsofastmyfriend@mymac Next-VM1.vmwarevm % cat Next-VM1.vmx | grep ethernet..virtualDev ethernet0.virtualDev = "vmxnet3" ethernet1.virtualDev = "vmxnet3" ethernet2.virtualDev = "vmxnet3" Save if you made changes and exit that file. Now, start up your new BIG-IP Next Instance! At power-on, you might notice a message to update tools. I click yes here and then acknowledge the side channel mitigations notice. Set Up BIG-IP Next Instance After the virtual machine boots up, log in to the instance with admin/admin. I noticed with my instance that the management interface was bound to my 2nd network adapter instead of my first, so I had to move the networks they were attached to in settings in order to get my management interface to pick up a DHCP address in the correct network with my Central Manager. At the command line, type setup. I did not set a static IP, choosing to leave this on DHCP in my lab. I named my vlans v102 and v103 for internal/external (note: vlan name max length is 15 characters!), and assigned an address to each self. I didn't assign a static route as my lab is intentionally isolated, and I skipped the license for now, I'll do that part from Central Manager when I onboard the instances. Grab a cup of coffee or take a bio break, the configuration can take several minutes for the API to be ready. You should see that the setup completed successfully. And that's a wrap! Now the instance is ready to be onboarded in Central Manager! Resources Create a BIG-IP Next Instance Locally on VMware149Views0likes1CommentF5 Academy Virtual Roadshow: BIG-IP Next
Last fall, we took BIG-IP Next on the road for a series of events all over North America. Join Jason on March 28 at 9am Pacific as he welcomes Nasir Hasan to walk through the BIG-IP Next story. Stick around after the first part to kick the tires yourself in a BIG-IP Next introductory lab. You must register here 24hrs in advance to do the lab, but you can just join the crowd and watch below if you prefer.413Views0likes0CommentsBuild It Live! Establishing a BIG-IP Next Lab
Hi everyone...now that I'm through almost all the system aspects of getting BIG-IP Next established in my article series, I'm going to attempt to do it all in one stream. Come join me March 19th at 8:30am PDT (it's daylight time already!!)27Views0likes0Comments
Prepare BIG-IP Central Manager for Automation
This guide describes the process of setting up F5 BIG-IP Central Manager (CM) via Postman to manage BIG-IP instances with automation templates. It is essential to note that this information is specific to the current version of CM/BIG-IP NEXT (v20) and may change in the future. Introduction Beginning with BIG-IP version 20, F5 has implemented significant changes in managing the new BIG-IP OS, now referred to as BIG-IP Next. BIG-IP NEXT leverages a modern, highly scalable software architecture to support vast, dynamic application service deployment. This new iteration adopts an API-first approach to management, offering enhanced automation capabilities and improved scalability for service expansion. Learn more about BIG-IP Next here. BIG-IP NEXT Central Manager (also known as BIG-IP CM) represents the next-generation management suite for the new BIG-IP OS across hardware and software instances. It provides simplified lifecycle and configuration management tasks across F5 BIG-IP NEXT fleets. There are two primary methods for managing BIG-IP NEXT instances via Central Manager software: through a web browser-based portal or via API-based templates. Notably, BIG-IP NEXT no longer supports individual management through the CLI (tmsh). Before managing Central Manager via postman, it is highly recommended to start with essential components such as managing license and deploying BIG-IP NEXT instance via Central Manager via Web GUI. Detailed instructions for adding and managing BIG-IP NEXT instances and configurations can be found in this KB library https://community.f5.com/kb/technicalarticles/prepare-big-ip-central-manager-for-automation/327785. Getting Started with API-Based Management In addition to the web-based portal, BIG-IP CM provides APIs for orchestration, facilitating instance and configuration management using RestAPI. Authentication to the API requires a token for access and control. To interact with BIG-IP CM, clients must utilize token-based authentication instead of basic authentication. By default, BIG-IP CM rejects API requests made without proper token value. To obtain an access token, we need to send a token request to API login URL with a pre-set username/password for administration, the combination could be changed via WebGUI. To get access token, use a post request to following URL: POST https://<big-ip_next_cm_mgmt_ip>/api/login Include the following syntax in the request body: { "username": "admin", "password": "Welcome123!" } Upon successful authentication, the response body will contain an access token. This token can be utilized in future API calls to manage CM configuration and settings. Let's try injecting an access token from the preceding response and use it as the bearer token of a request to get the current config. Now, we can proceed with a simple get request to test the token by sending a get request without body to the URL https://<big-ip-cm-hostname>/api/v1/spaces/default/appsvcs/blueprints Now let's automate token refresh in Postman and store the access token in a variable, so the request can always use the latest access token. Within the "test" section in Postman, add the following syntax: pm.test("Login status code is 200", function () { pm.response.to.have.status(200); }); var resp = pm.response.json(); pm.globals.set("bigip_next_cm_token", resp.access_token); pm.environment.set("bigip_next_rf_token", resp.refresh_token); The above script will trigger an access token refresh and store the token into a variable named "big-ip_next_cm_token" in the global set when Postman sends a successful login request with a 200 response code. To include the stored access token variable in future requests, you can simply use {{bigip_next_cm_token}} as bearer token value for API requests or as an environment variable. This approach ensures that the token will be automatically attached to each request without requiring manual intervention to get and setting token value. Now let's try creating a sample App via postman using access token bearer: To Create the application service by sending a Post to the /api/v1/spaces/default/appsvcs endpoint. POST https://<big-ip_next_cm_mgmt_ip>POST /api/v1/spaces/default/appsvcs Following is an example of an application service template as API body: { "name": "HelloWorld", "set_name": "Examples", "template_name": "http", "parameters": { "pools": [ { "loadBalancingMode": "round-robin", "loadBalancingRatio": 10, "monitorType": [ "http" ], "servicePort": 80, "application_name": "App3", "poolName": "pool1" }, { "loadBalancingMode": "round-robin", "loadBalancingRatio": 10, "monitorType": [ "https" ], "servicePort": 443, "application_name": "App3", "poolName": "pool2" } ], "virtuals": [ { "FastL4_idleTimeout": 600, "FastL4_looseClose": true, "FastL4_looseInitialization": true, "FastL4_resetOnTimeout": true, "FastL4_tcpCloseTimeout": 43200, "FastL4_tcpHandshakeTimeout": 43200, "TCP_idle_timeout": 60, "UDP_idle_timeout": 60, "accessAdditionalConfigurations": " ", "enable_FastL4": false, "enable_HTTP2_Profile": true, "enable_TCP_Profile": false, "enable_TLS_Client": false, "enable_TLS_Server": true, "enable_UDP_Profile": false, "enable_snat": true, "snat_addresses": [], "snat_automap": true, "enable_WAF": true, "enable_Access": false, "enable_iRules": false, "virtualPort": 80, "pool": "pool1", "virtualName": "vs1", "certificatesEnum": "test11", "WAFPolicyName": "test1" }, { "FastL4_idleTimeout": 600, "FastL4_looseClose": true, "FastL4_looseInitialization": true, "FastL4_resetOnTimeout": true, "FastL4_tcpCloseTimeout": 43200, "FastL4_tcpHandshakeTimeout": 43200, "TCP_idle_timeout": 60, "UDP_idle_timeout": 60, "accessAdditionalConfigurations": " ", "enable_FastL4": false, "enable_HTTP2_Profile": true, "enable_TCP_Profile": false, "enable_TLS_Client": false, "enable_TLS_Server": true, "enable_UDP_Profile": false, "enable_snat": true, "snat_addresses": [], "snat_automap": true, "enable_WAF": true, "enable_Access": false, "enable_iRules": false, "virtualPort": 80, "pool": "pool2", "virtualName": "vs2", "certificatesEnum": "test12", "WAFPolicyName": "test2" } ], "application_name": "App3", "application_description": "TestApp" } } You could further verify the application service status via BIG-IP Central Manager WebGUI.220Views1like0CommentsGetting Started with BIG-IP Next: Upgrading Central Manager
Upgrades are one of the major improvements in moving from BIG-IP classic to Next. Whereas there is no direct analog for Central Manager in BIG-IP classic, the improvements from the BIG-IP/BIG-IQ upgrade experience will be noticeable. Simplification is the goal, and in my first Central Manager upgrade experience, I'd say that bar has been reached. In this article, I'll walk you through performing an upgrade to a standalone Central Manager. When HA for Central Manager is released, I'll update this article with those details. The installation steps on Clouddocs (links in the resources at the end of this article) make note that you should upgrade your instances before Central Manager, so keep that in mind as you build out your procedure sets for BIG-IP Next operations. For production I'd also recommend taking a backup of Central Manager as well (I'll do a walkthrough of that process in the coming weeks) but for discovery on my BIG-IP Next journey, I'll skip that step and nuke/pave if I have an issue. The first step in the upgrade process is to download the BIG-IP Next Central Manager upgrade package. After you have the upgraded package, login to your Central Manager. Click in the upper left on the tic-tac-toe board. Then in the dropdown menu that appears, select the System option. There's only one option here currently, and that's the upgrade button. Go ahead and click it. There will be a couple notes on the new window about resources and information on the unavailability to perform tasks during the upgrade. Go ahead and click next. If you didn't grab the package yet, the link to do so is included on this menu page. I selected the upload file option, selected the package from my downloads, and uploaded the file. You'll get the "green means go" checkbox when it's ready, at which point you can click the upgrade button. On the "Are you sure?" alert dialog, go ahead and click yes, upgrade. At this point, the upgrade will begin. On my upgrade, session was grayed out and I could not interact with the Central Manager interface, so my session timed out. I had trouble getting back in for several minutes, but when I got back in, I was presented with this alert dialog. You can click close here. And with that, you can see the new version of code. Congratulations on your first upgrade of Central Manager. Resources Upgrade BIG-IP Next Central Manager197Views2likes0Comments