F5 BIG-IP iRule based TCL DNS server
Short Description This code is for the purpose if there is a need to return a custom DNS reply not from the main DNS server but from the F5 Virtual Server. Problem solved by this Code Snippet The code is meant for small lab or dev environments as F5 has F5 DNS/GTM for replying to DNS requests with Intelligent Load Balancing, DNS Express Memory cache etc. How to use this Code Snippet Modify the irule code to configure the custom domain you want replies from the irule code and not the real DNS server. Add the irule to a DNS UDP LB Code Snippet Meta Information Version: 17.1 Coding Language: TCL Code You can find the code and further documentation in my GitHub repository: irule_dns/irule1 at main · Nikoolayy1/irule_dns (github.com)35Views0likes0Comments
BIG-IP DNS iRule issue with static variable
I am trying to develop an iRule bypassing DNS processing when a DNS request matching a wide ip comes via a specific listener on our BIG-IP DNS. Code is below: when RULE_INIT { set static::ul_ip "10.X.Y.Z" set static::ul_debug true } when DNS_REQUEST priority 100 { if { [IP::addr [IP::local_addr]/32 equals $static::ul_ip]} { DNS::disable all #apparently event disable is no longer accepted? #event disable if { [$static::ul_debug]} { log local0. "DNS Request [DNS::question name] triggered bypass" } } } This rule is meant to be applied to specific wide ip's (for reasons). When this rule is applied and tested, I am seeing the message below in /var/log/gtm: Apr 30 12:06:37 somebigipdns.nope.com err slot1 tmm[18454]: 011a7001:3: TCL error: Rule /Common/ul-bypass-rule <DNS_REQUEST> - can't read "static::ul_ip": no such variable while executing "IP::addr [IP::local_addr]/32 equals $static::ul_ip" I'm completely unclear on why the TCL error is occurring. For bonus points, any idea why 'event disable' isn't working in the DNS_REQUEST event? This message shows up in /var/log/ltm unless 'event disable' is commented out: Apr 30 11:11:27 somebigipdns.nope.com err slot1 mcpd[6981]: 01070151:3: Rule [/Common/ul-bypass-rule] error: /Common/ul-bypass-rule:23: error: [undefined procedure: event][event disable] Thanks in advance for any assistance provided. - R39Views0likes3CommentsUsing Distributed Cloud DNS Load Balancer with Geo-Proximity and failover scenarios
Introduction To have both high performance and responsive apps available on the Internet, you need a cloud DNS that’s both scalable and one that operates at a global level to effectively connect users to the nearest point of presence. The F5 Distributed Cloud DNS Load Balancer positions the best features used with GSLB DNS to enable the delivery of hybrid and multi-cloud applications with compute positioned right at the edge, closest to users. With Global Server Load Balancing (GSLB) features available in a cloud-based SaaS format, the Distributed Cloud DNS Load Balancer has a number distinct advantages: Speed and simplicity: Integrate with DevOps pipelines, with an automation focus and a rich and intuitive user interface Flexibility and scale: Global auto-scale keeps up with demand as the number of apps increases and traffic patterns change Security: Built-in DDoS protection, automatic failover, and DNSSEC features help ensure your apps are effectively protected. Disaster recovery: With automatic detection of site failures, apps dynamically fail over to individual recovery-designated locations without intervention. Adding user-location proximity policies to DNS load balancing rules allows the steering of users to specific instances of an app. This not only improves the overall experience but it guarantees and safeguards data, effectively silo’ing user data keeping it region-specific. In the case of disaster recovery, catch-all rules can be created to send users to alternate destinations where restrictions to data don’t apply. Integrated Solution This solution uses a cloud-based Distributed Cloud DNS to load balance traffic to VIP’s that connect to region-specific pools of servers. When data privacy isn’t a requirement, catch-all rules can further distribute traffic should a preferred pool of origin servers become unhealthy or unreachable. The following solution covers the following three DNS LB scenarios: Geo-IP Proximity Active/Standby failover within a region Disaster Recovery for manually activated failovers Autonomous System Number (ASN) Lists Fallback pool for automated failovers The configuration for this solution assumes the following: The app is in multiple regions Users are from different regions Distributed Cloud hosts/manages/is delegated the DNS domain or subdomain (optional) Failover to another region is allowed Prerequisite Steps Distributed Cloud must be providing primary DNS for the domain. Your domain must be registered with a public domain name registrar with the nameservers ns1.f5clouddns.com and ns2.f5clouddns.com. F5 XC automatically validates the domain registration when configured to be the primary nameserver. Navigate to DNS Management > domain > Manage Configuration > Edit Configuration >> DNS Zone Configuration: Primary DNZ Configuration > Edit Configuration. Select “Add Item”, with Record Set type “DNS Load Balancer” Enter the Record Name and then select Add Item to create a new load balancer record. This opens the submenu to create DNS Load Balancer rules. DNS LB for Geo-Proximity Name the rule “app-dns-rule” then go to Load Balancing Rules > Configure. Select “Add Item” then under the Load Balancing Rule, within the default Geo Location Selection, expand the “Selector Expression” and select “geoip.ves.io/continent”. Select Operator “In” and then the value “EU”. Click Apply. Under the Action “Use DNS Load Balancer pool”, click “Add Item”. Name the pool “eu-pool”, and under Pool Type (A) > Pool Members, click “Add Item”. Enter a “Public IP”, then click “Apply”. Repeat this process to have a second IP Endpoint in the pool. Scroll down to Load Balancing Method and select “Static-Persist”. Now click Continue, and then Apply to the Load Balancing Rule, and then “Add Item” to add a second rule. In the new rule, choose Geo Location Selection value “Geo Location Set selector”, and use the default “system/global-users”. Click “Add Item”. Name this new pool “global-pool” and add then select “Add Item” with the following pool member: 54.208.44.177. Change the Load Balancing Mode to “Static-Persist”, then click Continue. Click “Continue”. Now set the Load Balancing Rule Score to 90. This allows the first load balancing rule, specific to EU users, to be returned as the only answer for users of that region unless the regional servers are unhealthy. Note: The rule with the highest score is returned. When two or more rules match and have the same score, answers for each rule is returned. Although there are legitimate reasons for doing this, matching more than one rule with the same score may provide an unanticipated outcome. Now click "Apply", “Apply”, and “Continue”. Click the final “Apply” to create the new DNS Zone Resource Record Set. Now click “Apply” to the DNS Zone configuration to commit the new Resource Record. Click “Save and Exit” to finalize everything and complete the DNS Zone configuration! To view the status of the services that were just created, navigate to DNS Management > Overview > DNS Load Balancers > app-dns-rule. Clicking on the rule “eu-pool”, you can find the status for each individual IP endpoint, showing the overall health of each pool’s service that has been configured. With the DNS Load Balancing rule configured to connect two separate regions, when one of the primary sites goes down in the eu-pool users will instead be directed to the global-pool. This provides reliability in the context of site failover that spans regions. If data privacy is also a requirement, additional rules can be configured to support more sites in the same region. DNS LB for Active-Passive Sites In the previous scenario, two members are configured to be equally active for a single location. We can change the weight of the pool members so that of the two only one is used when the other is unhealthy or disabled. This creates a backup/passive scenario within a region. Navigate to DNS Load Balancer Management > DNS Load Balancers. Go to the service name "app-dns-rule", then under Actions, select Manage Configuration. Click Edit Configuration for the DNS rule. Go to the Load Balancing Rules section, and Edit Configuration. On the Load Balancing Rules order menu, go to Actions > Edit for the eu-pool Rule Action. In the Load Balancing Rule menu for eu-pool, under the section Action, click Edit Configuration. In the rule for eu-pool, under Pool Type (A) > Pool Members click the Edit action In the IP Endpoint section, change the Load Balancing Priority to 1, then click Apply. Change the Load Balancing Mode to Priority, then exit and save all changes by clicking Continue, Apply, Apply, and then Save and Exit. DNS LB for Disaster Recovery Unlike with backup/standby where failover can happen automatically depending on the status of a service's health, disaster recovery (DR) can either happen automatically or be configured to require manual intervention. In the following two scenarios, I'll show how to configure manual DR failover within a region, and also how to manual failover outside the region. To support east/west manual DR failover within the EU region, use the steps above to create a new Load Balancing Rule with the same label selector as the EU rule (eu-pool) above, then create a new DNS LB pool (name it something like eu-dr-pool) and add new designated DR IP pool endpoints. Change the DR Load Balancing Rule Score to 80, and then click Apply. On the Load Balanacing Rules page, change the order of the rules and confirm that the score is such that it aligns to the following image, then click Apply, and then Save and Exit. In the previous active/standby scenario the Global rule functions as a backup for EU users when all sites in EU are down. To force a non-regional failover, you can change F5 XC DNS to send all EU users to the Global DNS rule by disabling each of the two EU DNS rule(s) above. To disable the EU DNS rules, Navigate to DNS Load Balancer Management > DNS Load Balancers, and then under Actions, select Manage Configuration. Click Edit Configuration for the DNS rule. Go to the Load Balancing Rules section, and Edit Configuration. On the Load Balancing Rules order menu, go to Actions > Edit for the eu-pool Rule Action. In the Load Balance Rule menu for eu-pool, under the section Action, click Edit Configuration. In the top section labeled Metadata, check the box to Disable the rule. Then click Continue, Apply, Apply, and then Save and Exit. With the EU DNS LB rules disabled, all requests in the EU regionare served by the Global Pool. When it's time to restore regional services, all that's needed is to re-enter the configuration rule and uncheck the Disable box to each rule. DNS LB with ASN Lists ASN stands for Autonomous System Number. It is a unique identifier assigned to networks on the internet that operate under a single administration or entity. By mapping IP addresses to their corresponding ASN, DNS LB administrators can manage some traffic more effectively. To configure Distributed Cloud DNS LB to use ASN lists, navigate toDNS Management > DNS Load Balancer Management, then "Managed Configuration" for a DNS LB service. Choose "Add Item", and on the next page, select "ASN List", and enter one or more ASN's that apply to this rule, select a DNS LB pool, and optionally configure the score (weight). When the same ASN exists in multiple DNS LB rules, the rule having the highest score is used. Note: F5 XC uses ASPlain (4-byte) formatted AS numbers. Multiple numbers are configured one per item line. DNS LB Fallback Pool (Failsafe) The scenarios above illustrate how to designate alternate pools both regional and global when an individual pool fails. However, in the event of a catastrophic failure that brings all service pools are down, F5 XC provides one final mechanism, the fallback pool. Ideally, when implemented, the fallback pool should be independent from all existing pool-related infrastructure and services to deliver a failsafe service. To configure the Fallback Pool, navigate to DNS Management > DNS Load Balancer Management, then "Managed Configuration" of your DNS LB service. Click "Edit Configuration", navigate to the "Fallback Pool" box and choose an existing pool. If no qualified pool exists, the option is available to add a new pool. In my case, I've desginated "global-poolx" as my failsafe fallback pool which already functions as a regional backup. Best practice for the fallback pool is that it should be a pool not referenced elsewhere in the DNSLB configuration, a pool that exists on completely independent resources not regionally-bound. DNS LB Health Checks and Observability For sake of simplicity the above scenarios do not have DNS LB health checks configured and it's assumed that each pool's IP members are always reachable and healthy. My next article shows how to configure health checks to enable automatic failovers and ensure that users always reach a working server. Conclusion Using the Distributed Cloud DNS Load Balancer enables better performance of your apps while also providing greater uptime. With scaling and security automatically built into the service, responding to large volumes of queries without manual intervention is seamless. Layers of security deliver protection and automatic failover. Built-in DDoS protection, DNSSEC, and more make the Distributed Cloud DNS Load Balancer an ideal do-it-all GSLB distributor for multi-cloud and hybrid apps. To see a walkthrough where I configure first scenario above for Geo-IP proximity, watch the following accompanying video. Additional Resources Next article: Using Distributed Cloud DNS Load Balancer health checks and DNS observability More information about Distributed Cloud DNS Load Balancer available at: https://www.f5.com/cloud/products/dns-load-balancer Product Documentation: DNS LB Product Documentation DNS Zone Management5.6KViews3likes0CommentsNIC on Server points Default Gateway to Big-IP's Self IP and does not see domain.
I have a load balancing situation that requires a strange setup for me. The Nodes that the VIP points to are Windows servers and they require a nic that has the default gateway point back to the Self IP of the Big-IP. The issue is the Network Location Awareness is seeing the network as a public network instead of a domain network. I am unsure of how-to setup the Bio-IP to make the server see the domain. The link below is a PDF with the instructions for the setup. Direct Link to pdf. https://www.kofaxdemocenter.com/IManager/Download/886/71293/17858/2017725/EN/17858_2017725_Jfij_03841bv1.TechTips_F5_DNAT_AutoStore_PCC5.1.pdf The website the pdf is located. High Availability using Network Load Balancers (kofaxdemocenter.com) All servers and clients are internal and on the same domain. All other VIPs work correctly. The Self IP and the servers are on the same VLAN.35Views0likes0CommentsUsing BIG-IP GTM to Integrate with Amazon Web Services
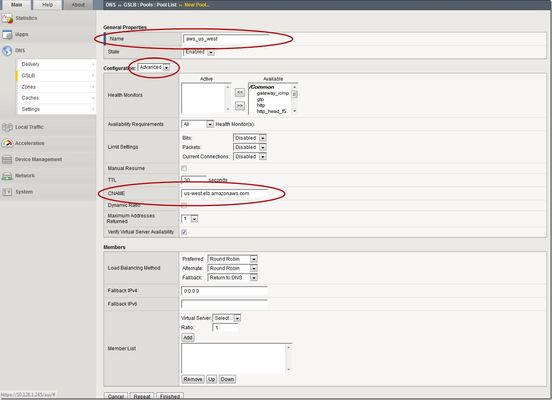
This is the latest in a series of DNS articles that I've been writing over the past couple of months. This article is taken from a fantastic solution that Joe Cassidy developed. So, thanks to Joe for developing this solution, and thanks for the opportunity to write about it here on DevCentral. As a quick reminder, my first six articles are: Let's Talk DNS on DevCentral DNS The F5 Way: A Paradigm Shift DNS Express and Zone Transfers The BIG-IP GTM: Configuring DNSSEC DNS on the BIG-IP: IPv6 to IPv4 Translation DNS Caching The Scenario Let's say you are an F5 customer who has external GTMs and LTMs in your environment, but you are not leveraging them for your main website (example.com). Your website is a zone sitting on your windows DNS servers in your DMZ that round robin load balance to some backend webservers. You've heard all about the benefits of the cloud (and rightfully so), and you want to move your web content to the Amazon Cloud. Nice choice! As you were making the move to Amazon, you were given instructions by Amazon to just CNAME your domain to two unique Amazon Elastic Load Balanced (ELB) domains. Amazon’s requests were not feasible for a few reasons...one of which is that it breaks the RFC. So, you engage in a series of architecture meetings to figure all this stuff out. Amazon told your Active Directory/DNS team to CNAME www.example.com and example.com to two AWS clusters: us-east.elb.amazonaws.com and us-west.elb.amazonaws.com. You couldn't use Microsoft DNS to perform a basic CNAME of these records because of the BIND limitation of CNAME'ing a single A record to multiple aliases. Additionally, you couldn't point to IPs because Amazon said they will be using dynamic IPs for your platform. So, what to do, right? The Solution The good news is that you can use the functionality and flexibility of your F5 technology to easily solve this problem. Here are a few steps that will guide you through this specific scenario: Redirect requests for http://example.com to http://www.example.com and apply it to your Virtual Server (1.2.3.4:80). You can redirect using HTTP Class profiles (v11.3 and prior) or using a policy with Centralized Policy Matching (v11.4 and newer) or you can always write an iRule to redirect! Make www.example.com a CNAME record to example.lb.example.com; where *.lb.example.com is a sub-delegated zone of example.com that resides on your BIG-IP GTM. Create a global traffic pool “aws_us_east” that contains no members but rather a CNAME to us-east.elb.amazonaws.com. Create another global traffic pool “aws_us_west” that contains no members but rather a CNAME to us-west.elb.amazonaws.com. The following screenshot shows the details of creating the global traffic pools (using v11.5). Notice you have to select the "Advanced" configuration to add the CNAME. Create a global traffic Wide IP example.lb.example.com with two pool members “aws_us_east” and “aws_us_west”. The following screenshot shows the details. Create two global traffic regions: “eastern” and “western”. The screenshot below shows the details of creating the traffic regions. Create global traffic topology records using "Request Source: Region is eastern" and "Destination Pool is aws_us_east". Repeat this for the western region using the aws_us_west pool. The screenshot below shows the details of creating these records. Modify Pool settings under Wide IP www.example.com to use "Topology" as load balancing method. See the screenshot below for details. How it all works... Here's the flow of events that take place as a user types in the web address and ultimately receives the correct IP address. External client types http://example.com into their web browser Internet DNS resolution takes place and maps example.com to your Virtual Server address: IN A 1.2.3.4 An HTTP request is directed to 1.2.3.4:80 Your LTM checks for a profile, the HTTP profile is enabled, the redirect request is applied, and redirect user request with 301 response code is executed External client receives 301 response code and their browser makes a new request to http://www.example.com Internet DNS resolution takes place and maps www.example.com to IN CNAME example.lb.example.com Internet DNS resolution continues mapping example.lb.example.com to your GTM configured Wide IP The Wide IP load balances the request to one of the pools based on the configured logic: Round Robin, Global Availability, Topology or Ratio (we chose "Topology" for our solution) The GTM-configured pool contains a CNAME to either us_east or us_west AWS data centers Internet DNS resolution takes place mapping the request to the ELB hostname (i.e. us-west.elb.amazonaws.com) and gives two A records External client http request is mapped to one of the returned IP addresses And, there you have it. With this solution, you can integrate AWS using your existing LTM and GTM technology! I hope this helps, and I hope you can implement this and other solutions using all the flexibility and power of your F5 technology.2.7KViews1like11Comments
GTM as a Forwarder to multiple ADs
Hi I have gone through the community articles and F5 docs as well before posting this question. There are some information related to this query but I am still confused to how simply achieve this use case I want to deploy my GTM as a forwarder for internal queries to my ADs, ADs will still handle all the resolution and return the response to client via GTM. GTM will check the health, load balance etc for client request to AD and provide availability incase any primary AD fail. So do I need to configure anything specific on the GTM apart from SELF IPs, Listeners , Pools ( AD members ). and my understanding is correct regarding the traffic path User -> GTM -> AD and AD -> GTM -> User User will have GTM Listener as DNS server on the client machine. I have 2 GTM, one on Primary and other in DR Two AD servers in primary, one in DR37Views0likes1CommentUse F5 Distributed Cloud to control Primary and Secondary DNS
Overview "Nature is a mutable cloud, which is always and never the same." - Ralph Waldo Emerson We might not wax that philosophically around here, but our heads are in the cloud nonetheless! Join the F5 Distributed Cloud user group today and learn more with your peers and other F5 experts. Scenario 1 – F5 Distributed Cloud DNS: Primary Nameserver Scenario 1.2 - Migrate an Existing Primary DNS Zone to F5 Distributed Cloud DNS Scenario 2 - F5 Distributed Cloud DNS: Primary with Delegated Subdomains Scenario 3 – F5 Distributed Cloud DNS: Secondary Nameserver Conclusion Additional Resources Overview Domain Name Service (DNS); it's how humans and machines discover where to connect. DNS on the Internet is the universal directory of addresses to names. If you need to get support for the product Acme, you go to support.acme.com. Looking for the latest headlines in News, try www.aonn.com or www.npr.org. DNS is the underlying feature that nearly every service on the Internet depends on. Having a robust and reliable DNS provider is critical to keeping your organization online and working, and especially so during a DDoS attack. "Nature is a mutable cloud, which is always and never the same." - Ralph Waldo Emerson We might not wax that philosophically around here, but our heads are in the cloud nonetheless! Join the F5 Distributed Cloud user group today and learn more with your peers and other F5 experts. F5 Distributed Cloud DNS (F5 XC DNS) can function as both Primary or Secondary nameservers, and it natively includes DDoS protection. Using F5 XC DNS, it’s possible to provision and configure primary or secondary DNS securely in minutes. Additionally, the service uses a global anycast network and is built to scale automatically to respond to large query volumes. Dynamic security is included and adds automatic failover, DDoS protection, TSIG authentication support, and when used as a secondary DNS—DNSSEC support. F5 Distributed Cloud allows you to manage all of your sites as a single “logical cloud” providing: - A portable platform that spans multiple sites/clouds - A private backbone connects all sites - Connectivity to sites through its nodes (F5 Distributed Cloud Mesh and F5 Distributed Cloud App Stack) - Node flexibility, allowing it to be virtual machines, live on hardware within data centers, sites, or in cloud instances (e.g. EC2) - Nodes provide vK8s (virtual K8s), network and security services - Services managed through F5 Distributed Cloud’s SaaS base console Scenario 1 – F5 Distributed Cloud DNS: Primary Nameserver Consider the following; you're looking to improve the response time of your app with a geo-distributed solution, including DNS and app distribution. With F5 XC DNS configured as the primary nameserver, you’ll automatically get DNS DDoS protection, and will see an improvement in the response the time to resolve DNS just by using Anycast with F5’s global network’s regional point of presence. To configure F5 XC DNS to be the Primary nameserver for your domain, access the F5 XC Console, go to DNS Management, and then Add Zone. Alternately, if you're migrating from another DNS server or DNS service to F5 XC DNS, you can import this zone directly from your DNS server. Scenario 1.2 below illustrates how to import and migrate your existing DNS zones to F5 XC DNS. Here, you’ll write in the domain name (your DNS zone), and then View Configuration for the Primary DNS. On the next screen, you may change any of the default SOA parameters for the zone, and any type of resource record (RR) or record sets which the DNS server will use to respond to queries. For example, you may want to return more than one A record (IP address) for the frontend to your app when it has multiple points of presence. To do this, enter as many IP addresses of record type A as needed to send traffic to all the points of ingress to your app. Additional Resource Record Sets allows the DNS server to return more than a single type of RR. For example, the following configurations, returns two A (IPv4 address) records and one TXT record to the query of type ANY for “al.demo.internal”. Optionally, if your root DNS zone has been configured for DNSSEC, then enabling it for the zone is just a matter of toggling the default setting in the F5 XC Console. Scenario 1.2 - Migrate an Existing Primary DNS Zone to F5 Distributed Cloud DNS F5 XC DNS can use AXFR DNS zone transfers to import an existing DNS zone. Navigate to DNS Management > DNS Zone Management, then click Import DNS Zone. Enter the zone name and the externally accessible IP of the primary DNS server. ➡️ Note: You'll need to configure your DNS server and any firewall policies to allow zone transfers from F5. A current list of public IP's that F5 uses can be found in the following F5 tech doc. Optionally, configure a transaction signature (TSIG) to secure the DNS zone transfer. When you save and exit, F5 XC DNS executes a secondary nameserver zone AXFR and then transitions itself to be the zone's primary DNS server. To finish the process, you'll need to change the NS records for the zone at your domain name registrar. In the registrar, change the name servers to the following F5 XC DNS servers: ns1.f5clouddns.com ns2.f5clouddns.com Scenario 2 - F5 Distributed Cloud DNS: Primary with Delegated Subdomains An enhanced capability when using Distributed Cloud (F5 XC) as the primary DNS server for your domains or subdomains, is to have services in F5 XC dynamically create their own DNS records, and this can be done either directly in the primary domain or the subdomains. Note thatbeforeJuly 2023, the delegated DNS feature in F5 XC required the exclusive use of subdomains to dynamically manage DNS records. As of July 2023, organizations are allowed to have both F5 XC managed and user-managed DNS resource records in the same domain or subdomain. When "Allow HTTP Load Balancer Managed Records" is checked, DNS records automatically added by F5 XC appear in a new RR set group called x-ves-io-managed which is read-only. In the following example, I've created an HTTP Load Balanacer with the domain "www.example.f5-cloud-demo.com" and F5 XC automatically created the A resource record (RR) in the group x-ves-io-managed. Scenario 3 – F5 Distributed Cloud DNS: Secondary Nameserver In this scenario, say you already have a primary DNS server in your on-prem datacenter, but due to security reasons, you don’t want it to be directly accessible to queries from the Internet. F5 XC DNS can be configured as a secondary DNS server and will both zone transfer (AXFR, IXFR) and receive (NOTIFY) updates from your primary DNS server as needed. To configure F5 XC DNS to be a secondary DNS server, go to Add Zone, then choose Secondary DNS Configuration. Next, View Configuration for it, and add your primary DNS server IP’s. To enhance the security of zone transfers and updates, F5 XC DNS supports TSIG encrypted transfers from the primary DNS server. To support TSIG, ensure your primary DNS server supports encryption, and enable it by entering the pre-shared key (PSK) name and its value. The PSK itself can be blindfold-encrypted in the F5 XC Console to prevent other Console admins from being able to view it. If encryption is desired, simply plug in the remaining details for your TSIG PSK and Apply. Once you’ve saved your new secondary DNS configuration, the F5 XC DNS will immediately transfer your zone details and begin resolving queries on the F5 XC Global Network with its pool of Anycast-reachable DNS servers. Conclusion You’ve just seen how to configure F5 XC DNS both as a primary DNS as well as a secondary DNS service. Ensure the reachability of your company with a robust, secure, and optimized DNS service by F5. A service that delivers the lowest resolution latency with its global Anycast network of nameservers, and one that automatically includes DDoS protection, DNSSEC, TSIG support for secondary DNS. Watch the following demo video to see how to configure F5 XC DNS for scenarios #1 and #3 above. Additional Resources For more information about using F5 Distributed Cloud DNS: https://www.f5.com/cloud/products/dns For technical documentation: https://docs.cloud.f5.com/docs/how-to/app-networking/manage-dns-zones DNS Management FAQ: https://f5cloud.zendesk.com/hc/en-us/sections/7057223802519-DNS-Management DNS Demo Guide and step-by-step walkthrough: https://github.com/f5devcentral/f5xc-dns8.1KViews6likes0Comments
prober pool Round Robin with multi health monitors and with multi prober pool members
I have a question about The GTM monitors and prober pools: In my case, I have three datacenters, three gtm(one in each DC), and one prober pool, the prober pool include all three GTM, and the prober pool was set to use Round Robin. And two vs, vs1 and vs2 in different DC, each vs was configured two health monitors(each monitor with different porbe interval, eg. vs1's monitors have interval 5s and 7s, vs2's monitors have interval 9s and 11s). so, my questions is, how does the porber pool Round Robin work? Looking forward to your help, thank you.284Views0likes2Comments
LTM with DNS - logging query answers DNS_RESPONSE clientside
Hi All We have our DNS services behind LTM VIPs. We have the DNS license and are using DNS_QUERY and DNS_RESPONSE events for logging queries and answers. We are not using Express, BIGIP Bind, nor GTM configurations - straight LB work. Last week I was investigating some optimizations and wanted to add Answer header information, specifically the truncate flag. This will allow us to gather some stats on the amount of UDP to TCP based queries occuring. I added[DNS::headertc] to the log message on DNS_RESPONSE and proceeded to test from a client system using DIG for a test SRV record that exceeded 512bytes using UDP. DIG did the expected things and sent a UDP query, got a response with truncate on, and re-queried with TCP. All good. However, when I looked at the logs,[DNS::headertc] was always returning 0. From network trace, I see client to VIP, SNAT to service, service to SNAT, VIP to client. The client side traffic is as expected - no EDNS0, buffer set to 512bytes, etc. As well the answer in UDP shows the truncate flag set to 1. Further examination showed that while the client had specified no EDNS0, buffer 512bytes, etc., the SNAT to DNS service traffic showed EDNS0 on and buffer of 4096bytes. I asked our F5 account rep if he had any insights and he agreed that DNS_RESPONSE seems to be pulling from server-side. I tried using [clientside {DNS::header tc}] in the logging statement, but got the same results - truncate still shows 0. Questions: 1. Is there a way to tell LTM to respect the client settings for the server side communications? 2. Can I get the client-side info in the DNS_RESPONSE event? Thanks517Views0likes6Comments