AS3 Monitoring multiple ports selectively
Hi, I have nodes listening on port 80, 81, 82, 83. the port 80 is mandatory and at least one out of the other 3 ports is mandatory. with manual configuration, I put the port 80 monitor at the node level and the other 3 ports at pool member level. with AS3, the node level monitoring does not exist. what are the other options given that all my deployments are based on AS3. thanks. OM12Views0likes0CommentsBIG-IP Orchestrate in private Data Center using Terraform Cloud Agent
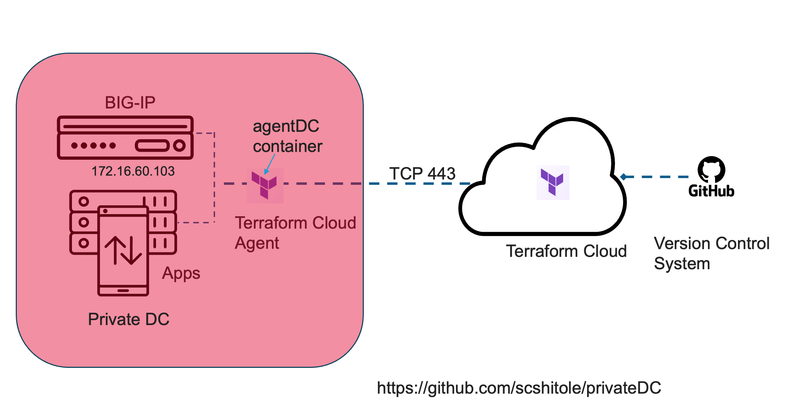
What is Terraform Cloud? Terraform Cloud offers organizations a unified workflow for provisioning their cloud, private data center, and SaaS infrastructure, ensuring continuous infrastructure management throughout its entire lifecycle. What is F5 BIG-IP? BIG-IP is a collection of hardware platforms and software solutions providing services focused on security, reliability, and performance. It helps in doing Application delivery server load balancing of applications securely and at scale. BIG-IP can be deployed in private or public clouds. BIG-IP in private Data Center When BIG-IP is in a private data center, it has a private IP, making it tricky to reach with tools like Terraform Cloud from the outside. However, if you're dealing with both private and public clouds using Terraform Cloud, you can use Terraform Cloud agents. These agents help control BIG-IP in private data centers, even when the IP isn't accessible externally. BIG-IP supports Application Services 3 (AS3) and FAST templates, presenting a highly synergistic relationship with Terraform. This synergy is particularly pronounced due to the availability of the BIG-IP Terraform provider, coupled with dedicated resources designed specifically for the deployment of AS3 and FAST templates. AS3 and FAST templates serve as powerful tools for configuring and managing BIG-IP application services. AS3 simplifies the process of defining, managing, and deploying application-related configurations, providing a declarative model for specifying how applications should be set up on BIG-IP devices. FAST, on the other hand, extends automation capabilities by incorporating telemetry functionalities, and enhancing monitoring and reporting capabilities. The integration with Terraform is pivotal in this context, as the BIG-IP Terraform provider facilitates the seamless incorporation of AS3 and FAST templates into infrastructure-as-code (IaC) workflows. The example Terraform configuration is at https://github.com/scshitole/privateDC How to orchestrate BIG-IP in a private Data Center? In this illustrative scenario, the BIG-IP system is operational within a private Data Center. A Virtual Machine has been configured to host the Terraform Cloud agent, encapsulated within a container. The Terraform configuration pertinent to our deployment resides in the GitHub repository: https://github.com/scshitole/privateDC. Let us now turn our attention to the Terraform Agent—an agile and lightweight component capable of executing within a container on a Virtual Machine. Its primary function is to establish and maintain a secure connection with Terraform Cloud, perpetually polling for instructions. Notably, this agent not only retrieves directives from Terraform Cloud but also acquires essential information regarding the Terraform workspace and the TF configuration. What distinguishes this agent is its seamless operation without necessitating alterations to existing firewall rules. Its communication with Terraform Cloud transpires over HTTPS and only demands appropriately configured DNS settings. Upon queuing a Terraform plan, the control plane initiates the dispatch of the configuration to the agent. Subsequently, the agent diligently retrieves the workspace and orchestrates the deployment of the configuration onto the BIG-IP infrastructure. What advantages does this solution offer? Automation Workflows with Terraform Cloud: By leveraging Terraform Cloud, we gain the capability to establish automated workflows for configuring BIG-IP. This not only streamlines the configuration process but also enhances efficiency through the power of automation. Additionally, Terraform Cloud enables the orchestration of BIG-IP Web Application Firewall (WAF) configurations in a Hybrid Cloud environment, providing a comprehensive solution for managing security across diverse infrastructures. Enhanced Security with Maintained Private IPs and Credentials: The solution ensures a robust security posture by maintaining the confidentiality of the infrastructure's private IP addresses and credentials. This practice prevents security sprawls and unauthorized access attempts, fortifying the integrity of the entire system. Seamless BIG-IP Configuration Migration: The flexibility of BIG-IP configuration migration is a notable advantage, allowing for a smooth transition between private and public cloud environments. This bidirectional migration capability ensures adaptability to evolving infrastructure needs, facilitating a seamless shift of BIG-IP configurations as organizational requirements dictate. Whether moving configurations from a private cloud to a public cloud or vice versa, this capability provides agility and scalability in infrastructure management. How to set up configuration on Terraform Cloud? o Once logged into Terraform Cloud, choose your organization from the available options. o Go to the Projects & Workspaces section and opt for the Version Control Workflow. o The BIG-IP Terraform configuration template resides in the GitHub repository; please choose the relevant repository. o Choose the correct GitHub repository; it should be visible here. o Now, provide a name for the workspace; feel free to select something relevant, but it must be unique. o Enter the variables here, including details such as the BIG-IP's IP address, username, and password. Ensure to choose the HCL option, and if needed, you can set it as invisible. o Then, go to the established workspace and click on "New run. o Go to the Agents section and select Create Agent Pool. o Enter a fitting name for the Agent Pool, as illustrated. You can opt for a unique name matching the workspace for easy identification, although it's not mandatory. o Provide a suitable description for the Agent Pool, explaining its specific purpose or activities. Then, proceed to click on "Generate Token"; you will require this token when running the agent. o Copy the newly generated token and follow the outlined steps to configure your agents. Run the provided docker command, including essential environment variables like TFC_AGENT_TOKEN and TFC_AGENT_NAME. If desired, you can also run the docker in the background using the appropriate docker command option. Key Take Away Terraform Cloud streamlines infrastructure provisioning and management across various environments for consistent lifecycle control. Terraform Cloud agents enable effective orchestration of BIG-IP configurations in private data centers, addressing challenges associated with private IPs. The seamless integration of BIG-IP, AS3, FAST templates, and Terraform supports efficient infrastructure-as-code workflows, especially beneficial in multi-cloud setups. Terraform Cloud facilitates automated workflows, simplifies BIG-IP configurations, and supports orchestrating Web Application Firewall (WAF) setups in Hybrid Cloud environments. Emphasizing security, the solution maintains the confidentiality of private IPs and credentials, preventing security sprawl and unauthorized access. The solution offers flexibility by allowing seamless BIG-IP configuration migration between private and public cloud environments, ensuring adaptability and scalability. For more details, please watch the accompanying video https://youtu.be/RgCqnDxpf3E180Views1like0CommentsGetting Started with BIG-IP Next: Migrating an Application Workload
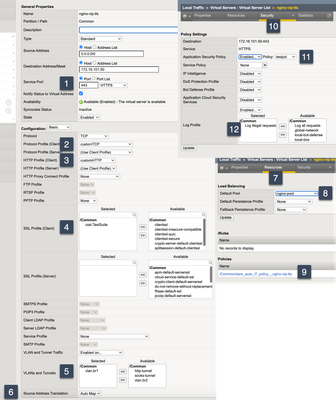
So far in this article series, the focus has been completely on the operational readiness of BIG-IP Next as a system. In this article, I'll walk through migrating an application currently supported by my classic BIG-IP running TMOS version 15.1.x. The application is just a simple instance of an NGINX web server fronted on LTM with basic load balancing, TLS offloading, and a basic WAF policy. There are a lot of screenshots in this article, which might seem overwhelming. Doing your own walkthrough, however, will put your mind at ease; it actually moves pretty quickly in realtime. Existing Application Workload on TMOS We'll start with the GUI representation of the application workload. It is secured with TLS, which is offloaded at the BIG-IP with a clientssl profile and not re-encrypted to the server. There are custom TCP and HTTP profiles defined as well as the aforementioned custom clientssl profile. Snat automap is enabled, and a specific VLAN is configured to allow connections. On the security tab, an application security policy is enabled, and the log illegal requests log profile is enabled as well. Finally, under resources, the default pool is defined and a policy is in place to map requests to the applied security policy. On the CLI, that virtual server along with all the other referenced BIG-IP objects are defined in the tmsh version of that configuration. ltm virtual nginx-vip-tls { destination 172.16.101.50:https ip-protocol tcp mask 255.255.255.255 policies { asm_auto_l7_policy__nginx-vip-tls { } } pool nginx-pool profiles { ASM_testpol { } cssl.TestSuite { context clientside } customHTTP { } customTCP { } websecurity { } } security-log-profiles { "Log illegal requests" } source-address-translation { type automap } vlans { vlan.br1 } vlans-enabled } ltm policy asm_auto_l7_policy__nginx-vip-tls { controls { asm } last-modified 2024-03-20:13:25:13 requires { http } rules { default { actions { 1 { asm enable policy /Common/testpol } } ordinal 1 } } status legacy strategy first-match } ltm pool nginx-pool { members { 172.16.102.5:http { address 172.16.102.5 session monitor-enabled state up } } monitor http } security bot-defense asm-profile ASM_testpol { app-service none clientside-in-use disabled flags 0 inject-javascript disabled persistent-data-validity-period 0 send-brute-force-challenge disabled send-javascript-challenge disabled send-javascript-efoxy disabled send-javascript-fingerprint disabled } ltm profile client-ssl cssl.TestSuite { app-service none cert-key-chain { default { cert default.crt key default.key } } cipher-group cg_TLSv1.3 ciphers none defaults-from clientssl inherit-ca-certkeychain true inherit-certkeychain true options { dont-insert-empty-fragments } } ltm cipher group cg_TLSv1.3 { allow { cr_TLSv1.3 { } } } ltm cipher rule cr_TLSv1.3 { cipher TLSv1_3 dh-groups DEFAULT signature-algorithms DEFAULT } ltm profile http customHTTP { app-service none defaults-from http enforcement { known-methods { PATCH DELETE GET POST PUT } max-header-count 32 max-header-size 16384 rfc-compliance enabled } hsts { mode enabled } insert-xforwarded-for enabled proxy-type reverse } ltm profile tcp customTCP { app-service none congestion-control bbr defaults-from f5-tcp-progressive idle-timeout 600 ip-tos-to-client pass-through keep-alive-interval 2100 pkt-loss-ignore-burst 3 pkt-loss-ignore-rate 10 proxy-options enabled } ltm profile web-security websecurity { } You can see that I have some non-standard options in some of that configuration, such as specifying the congestion-control algorithm algorithm in the TCP profile, enabling HSTS in the HTTP profile, and setting cipher rules and groups for use in my SSL profile. Now that we have an idea of the workload we're going to migrate, let's create a UCS of the system for use in the migration. If you are already comfortable with this part on classic BIG-IP systems, you can skip down to the next section header. First, login to your classic BIG-IP and navigate to System->Archives and click Create. Give it a name and click Finished. I named mine next-migration. Click OK after the UCS has been generated and saved. In the archive list, click the name of the UCS you created. Click the Download button. Migrating the Workload in Central Manager Upload UCS and Analyze the Workloads Armed with your UCS, login to Central Manager and on the welcome screen, click Go to Application Workspace. If you have not added any applications yet, you'll see a screen like this with a Start Adding Apps button. If you already have something defined, you'll see a list of applications. Click the + Add Application button instead. On this screen, we'll bypass creating a new application service and select New Migration. Name your session as you'll be able to come back to it to migrate other applications later if your intent is to just migrate a single application for now (as is the case with this walkthrough.) I added a description but it is not necessary. Click Next. Here you'll select your UCS archive and group your application services by IP addresses OR by virtual server. I stuck with the recommended default. Click Next. Your UCS will now upload and then Central Manager will analyze and group the package. An enhanced version of the JOURNEYS tool available in the f5devcentral organization on GitHub is used here. Select Add Application. Application 5 is the one we are interested in analyzing and migrating for this walkthrough, so I selected that one. Notice in the status column the applications that have warnings, and that ours is one of them. Hovering over the triangle icon it indicates the app can be migrated, but without some of the functionality from our classic iteration of this workload. Next, click Analyze at the top right so we can see what can't be migrated. In the Configuration Analyzer screen, there are 3 files with areas of concern. First, that the websecurity profile is not supported. This is ok, the mechanisms to support attaching policies in Next are slightly different. Next from what was the bigip_base.conf file, it's not supporting the vlan as defined. This is included in the migration analysis as the vlans are specified in my virtual server, but the mechanisms for doing so are different in Next. (Note: I don't fully grok this change yet. This article will be updated once I have confidence I'm communicating the functionality accurately.) And finally, from the bigip.conf file, there are few areas of concern, shown in the animated gif below. Standalone bot-defense is not a thing in BIG-IP Next, it's part of the overall policy, so that object is not supported. Also not supported yet are local traffic policies and cipher groups. Note that even though these objects aren't supported, I can still migrate the application, and it should "just work." I guess we'll see later in this article, right? :) At this point, select the </> Preview AS3 and copy that to a file. We'll compare that to the classic BIG-IP version of AS3 in a later section. Add an Application Service After closing the AS3 preview, select the application again and click Add. Click Next For this particular application, we need a couple shared objects: the certificate/key pair for the SSL profile and the WAF policy. Click Import. After those are imported, click the numbered icon (2 in my case) under the Shared Objects column, which will open a listing of those objects that you imported. Review the objects (optional) and click Exit. At this step, if your existing application migration is accurate to the object level, you can deploy to an instance directly. But I have some changes to make to the IPs so I'm going to deploy as a draft instead. After seeing that my deployment was successfully deployed as a draft in Central Manager, I click Finish. Update the Draft and Deploy In My Application Services, click the application we just migrated. Here we can tweak the AS3 declaration. I need to update the vlan as my vlan.br1 from my TMOS BIG-IP system is not defined on my Next instance. I also have different client/server address ranges, so I updated the virtual server and pool member addresses as well. You will likely want to change your application name from the generically-migrated "application_5" but I left it as is for this exercise. Once I completed those changes, I clicked Save & Deploy. I was then asked to select an instance to deploy the application server. I only have one currently, so I selected that. This failed due to my vlan configuration. As I mentioned during the migration process, I don't yet fully grok the vlan referencing requirements in Next, so this is a point for me to be educated on and follow up with updates here in this article. Instead, I removed the allowVlans attributed altogether (after another attempt) and then clicked Save & Deploy again and (after re-selecting the deploy location as shown above) found success. Clicking on the application, you get a visual representation of the application objects. Testing and Observing the Migrated Application Now that we have an honest to goodness deployed application on BIG-IP Next (WOO HOO!!) let's test it to make sure things are working as expected. I have a ubuntu test server with connections into my external and internal traffic networks for my Next instance so it can be the client (curl) and the server (NGINX). First, a request that should work: curl -sk https://10.0.2.50/ <!DOCTYPE html> <html> <head> <title>Welcome to nginx!</title> <style> body { width: 35em; margin: 0 auto; font-family: Tahoma, Verdana, Arial, sans-serif; } </style> </head> <body> <h1>Welcome to nginx!</h1> <p>If you see this page, the nginx web server is successfully installed and working. Further configuration is required.</p> <p>For online documentation and support please refer to <a href="http://nginx.org/">nginx.org</a>.<br/> Commercial support is available at <a href="http://nginx.com/">nginx.com</a>.</p> <p><em>Thank you for using nginx.</em></p> Huzzah! That's a successful test. I ran a simple bash script with repetitive wget calls to push just a little load to populate the instance traffic graph: Now let's test the WAF policy by sending some nefarious traffic: curl -sk --config requests.txt https://10.0.2.50/ <html> <head> <title>Request Rejected</title> </head> <body>The requested URL was rejected. Please consult with your administrator.<br><br> Your support ID is: 16177875355615369771<br><br> <a href='javascript:history.back();'>[Go Back]</a> </body> </html> Sweet! Exactly what we wanted to see. Now let's take a look at the WAF Dashboard for blocks. Ok, that's a wrap on migrating the application. Functionally, it is a success! Comparing BIG-IP classic AS3 with BIG-IP Next AS3 If you are moving from classic BIG-IP configuration to BIG-IP Next, you likely will not have any context for comparing AS3 and so you might miss that some of the features you configured in classic are not present in Next. Some of those features aren't there at all yet, and some of them are just not exposed yet. Under the hood, TMM is still TMM with BIG-IP Next, and all of that core functionality is there, it's just a matter of prioritizing what gets exposed and tested and ready to support. Despite a myriad of features in classic BIG-IP, a surprising number of features went either unused or under-used and maintaining support for those will depend on future use requirements. Anyway, one way to build context for AS3 is to useVisual Studio Code and the F5 Extension to take your classic configuration and convert that to AS3 declarations with the AS3 configuration converter. In this section, I'm going to look at a few snippets to compare between classic and Next. Declaration Header The header for classic is a essentially a wrapper (lines 2-4) that isn't necessary in Next at all. That's because in classic, AS3 is not the only declaration class, you also have declarative onboarding and telemetry streaming. Classic: { "$schema": "https://raw.githubusercontent.com/F5Networks/f5-appsvcs-extension/master/schema/latest/as3-schema.json", "class": "AS3", "declaration": { "class": "ADC", "schemaVersion": "3.37.0", "id": "urn:uuid:4339ea7d-094b-4950-b029-ac6344b03a2b", "label": "Converted Declaration", } } Next: { "class": "ADC", "schemaVersion": "3.0.0", "id": "urn:uuid:715aa8d8-c2b0-4890-9e77-5f6131ee9efd", "label": "Converted Declaration", } Profiles One thing to keep in mind with migration is that the migration assistant currently provides detailed analysis to the class level, not the class attribute level. This means that some of the attributes that are supported in classic that are not supported in Next will fly under the radar and be removed with no notification. There is work underway in this regard, but you'll need to evaluate each of your applications as you migrate and plan accordingly. For the app I migrated here, this was evident in the following profiles. ClientSSL Here, the cipher groups and rules from classic are not yet available, and the ability to establish only TLSv1.3 seems to not be configurable at this time. Classic: "cssl.TestSuite": { "certificates": [ { "certificate": "foo.acmelabs.com" } ], "cipherGroup": { "use": "cg_TLSv1.3" }, "class": "TLS_Server", "tls1_0Enabled": true, "tls1_1Enabled": true, "tls1_2Enabled": true, "tls1_3Enabled": true, "singleUseDhEnabled": false, "insertEmptyFragmentsEnabled": false }, Next: "cssl.TestSuite": { "authenticationFrequency": "one-time", "certificates": [ { "certificate": "/tenant87f7bd9913a51/application_5/foo.acmelabs.com" } ], "class": "TLS_Server" }, TCP In the TCP profile, the most notable changes are the loss of QoS settings and the ability to select the congestion control algorithm. Classic: "customTCP": { "congestionControl": "bbr", "idleTimeout": 600, "ipTosToClient": "pass-through", "keepAliveInterval": 2100, "pktLossIgnoreBurst": 3, "pktLossIgnoreRate": 10, "proxyOptions": true, "class": "TCP_Profile" } Next: "customTCP": { "idleTimeout": 600, "pktLossIgnoreBurst": 3, "pktLossIgnoreRate": 10, "proxyBufferHigh": 262144, "proxyBufferLow": 196608, "proxyOptions": true, "sendBufferSize": 262144, "class": "TCP_Profile" }, HTTP In my HTTP profile, it seems I lost all my personally-selected options, such that I'd likely be fine with the default profile. Also, since I'm using the WAF, I can manage the allowed request methods there, and whereas I can't auto-insert strict transport security in the profile directly yet, I can manage that in an iRule as well, so I do have a path to workarounds for both cases. Classic: "customHTTP": { "knownMethods": [ "PATCH", "DELETE", "GET", "POST", "PUT" ], "maxHeaderCount": 32, "maxHeaderSize": 16384, "hstsInsert": true, "xForwardedFor": true, "proxyType": "reverse", "class": "HTTP_Profile" }, Next: "customHTTP": { "requestChunking": "sustain", "responseChunking": "sustain", "class": "HTTP_Profile" } Final Thoughts I point out the differences in my before and after to show a complete picture of the migration process. Some things changed, some went away, but the bottom line is I have a working application service. Before working on this article, I've done a migration in a couple step-by-step controlled labs and have played with but not finished deploying a working, tested, functional application in my own lab. Don't make that same mistake. Get your classic configurations migrated ASAP even if only as a draft in Central Manager, so you can start to evaluate and analyze What work you have on your end to tweak and tune where features have changed Where you need to start engaging your account team to inquire about your MUST HAVE features that may or may not be scoped currently. Next time out, we'll take a look at creating a net-new application service. Until then, stay active out there community and start digging into BIG-IP Next!1KViews4likes1CommentAS3 ACC Conversion
hi, I have a qkview extracted from a bigip r5600 running 17.1.1 version. I have imported the qkview to vscode and converted it to as3 using ACC. When I try to post the declaration, I have errors about ssl certificate not being found even though the certificates are in place. the fact is, when the configuration has been created in the first place on F5 via the GUI, there is no concept of PATH under domain partition, and now with AS3 I have this Shared App that has been added to the configuration. What is exactly the right process of converting to AS3 via ACC when the original configuration qkview file does not have any Application subfolder just Admin partition (i.e Tenant) ? here is the error I am getting right now { "id": "82530133-0b46-46c3-97a5-68766a5a663f", "results": [ { "code": 422, "message": "declaration failed", "response": "01070277:3: The requested key (/TENANT1/Mycert-2024) was not found.", "host": "localhost", "tenant": "TENANT1", "runTime": 2739, "declarationId": "urn:uuid:bdc310a7-31ad-4f07-bf96-2566912cd989" } ], "declaration": { "class": "ADC", "schemaVersion": "3.37.0", "id": "urn:uuid:bdc310a7-31ad-4f07-bf96-2566912cd989", "label": "Converted Declaration", "remark": "Generated by Automation Config Converter", "controls": { "class": "Controls", "userAgent": "vscode-f5/3.16.1", "archiveTimestamp": "2024-03-06T15:36:02.267Z" }, "updateMode": "selective" } } thanks.31Views0likes0CommentsAS3 Foundations: Beyond Imperatives - What the Heck is AS3?
I joined in on the fun at several stops on the F5 Academy BIG-IP Next roadshow tour this fall, and in talking to customers, everyone is at various stages of their F5 automation journey, and some aren't automating at all yet. I'm kicking off a six-part series to set some foundational understanding of what AS3 is, how it works, what tools you might use to interact with it, and we'll finish it off with some best practices. If you want to learn or if you want to share your own experience with the class, join me over the next three weeks to finish 2023 in style! Episode One - Dec 4th@ 9AM PST BIG-IP Automation History Imperative vs Declarative AS3 Architecture570Views0likes0Comments
Enabling Package Management in v12 Removed iApps AWS Item
So I'm working in an old lab environment (v12) that isn't currently being used, and under the iApps menu, there was an AWS option listed but Package Management was missing. From the AS3 documentation, I ran the following command to enable Package Management from the CLI -touch/var/config/rest/iapps/enable - and rebooted the BIG-IP. The Package Management option now shows up but the AWS option is gone. Any idea why? The lab environment was set up years ago, so no one knows what the AWS option was used for or who added/enabled it, so it's not really a loss that it's now gone. However, that it's missing after enabling Package Management is weird. Any thoughts on what happened would be great to hear. Thanks!Solved250Views0likes2CommentsAS3 Foundations: Creating New Apps and Using Shared Objects
I joined in on the fun at several stops on the F5 Academy BIG-IP Next roadshow tour this fall, and in talking to customers, everyone is at various stages of their F5 automation journey, and some aren't automating at all yet. I'm kicking off a six-part series to set some foundational understanding of what AS3 is, how it works, what tools you might use to interact with it, and we'll finish it off with some best practices. If you want to learn or if you want to share your own experience with the class, join me over the next three weeks to finish 2023 in style! Episode Five - Dec 18th@ 9AM PST Demonstrate snippet templates and grab examples from CloudDocs Demonstrate iRule/Cert strings to base 64 encoding Demonstrate cert management options Demonstrate use cases for shared objects, and make clear any gotchas with such approaches427Views2likes1CommentAS3 Foundations: Migrating and Deploying Applications in VSCode
I joined in on the fun at several stops on the F5 Academy BIG-IP Next roadshow tour this fall, and in talking to customers, everyone is at various stages of their F5 automation journey, and some aren't automating at all yet. I'm kicking off a six-part series to set some foundational understanding of what AS3 is, how it works, what tools you might use to interact with it, and we'll finish it off with some best practices. If you want to learn or if you want to share your own experience with the class, join me over the next three weeks to finish 2023 in style! Episode Four - Dec 14th@ 10AM PST Installing VSCode Install the F5 extension for VSCode Install the ACC extension for VSCode Installing AS3 Adding and connecting to a BIG-IP Use config explorer to explore the existing configuration Select a few apps and review the diagnostics Use ACC to convert a few different types of applications Deploy these apps311Views0likes0CommentsEmbracing AS3: Foundations
Many F5 teams are on the North American leg of the F5 Academy BIG-IP Next Roadshow, where we are sharing the BIG-IP story, where we're going with it, and then diving into some hands-on labs with the attendees. I got to attend in person in Kansas City, St. Louis, Cincinnati, and Columbus, and talked with customers at all stages of the automation journey. Some haven't automated much of anything. Some have been using a variety of on-/off-box scripts, and some are all-in, baby! AS3 is a critical component of BIG-IP Next, but it has also been around for several years for BIG-IP and can be learned and implemented ahead of your transition to BIG-IP Next. So over the next three weeks, I'm going to host a five-part live-stream series on AS3 Foundations. There are a lot of resources I'll link to and key in on during the event for reference and further study. Here are the shows I'm doing with descriptions: Beyond Imperatives—What the heck is AS3? (Dec 4@ 9am PST) In this first episode, I'll cover the history of automation on BIG-IP, the differences between imperative and declarative models, and the basics of AS3 from data structure and systems architecture perspectives. Top 10 Features to Know in the VSCode F5 Extension (Dec 7@ 12pm PST) Next, special guest Ben Novak, author of the F5 Extension for VSCode, will join me to dig into the features most important to know and learn to use for understanding how to take stock BIG-IP configurations and turn applications into declarations. Migrating and Deploying Applications in VSCode (Dec 14@ 12pm PST) In this episode, armed with the knowledge I learned from Ben in the last episode, I'll finally get to the brass tacks of AS3! I'll review diagnostics and migrate several applications from standard configuration to AS3 declarations and deploy a few. For migrating active workloads, I'll discuss the steps necessary to reduce transition impact. Creating New Apps and Using Shared Objects (Dec 18@ 9am PST) I've always tried to alter existing things before creating new things with tech, and this is no different. Now that I have a few migrations under my belt, I'll attack a net-new application and I'll look at shared objects and how and when to use them. Best Practices (Dec 21@ 12pm PST) Finally, I'll close this series with a look at several best practices when working with AS3. The conclusion to this series, though, is hopefully just the stepping off point for everyone new to AS3, and we'll be able to continue the conversation right here on DevCentral.1.9KViews6likes0CommentsAS3 Foundations: Best Practices
I joined in on the fun at several stops on the F5 Academy BIG-IP Next roadshow tour this fall, and in talking to customers, everyone is at various stages of their F5 automation journey, and some aren't automating at all yet. I'm kicking off a six-part series to set some foundational understanding of what AS3 is, how it works, what tools you might use to interact with it, and we'll finish it off with some best practices. If you want to learn or if you want to share your own experience with the class, join me over the next three weeks to finish 2023 in style! Episode Six - Dec 21st@ 10AM PST Tips for System Tweaking Tips for Structuring Declarations FAST - Well, hello there!361Views0likes0Comments