From ASM to Advanced WAF: Advancing your Application Security
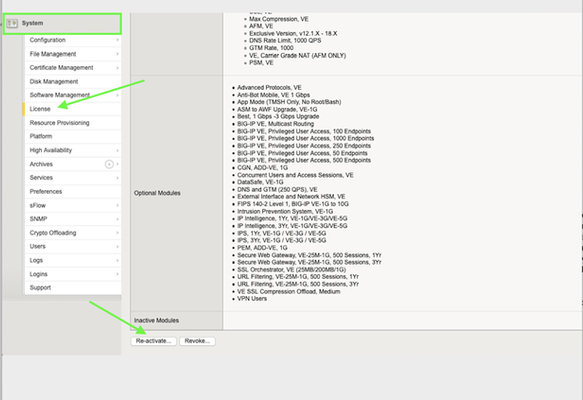
TL;DR: As of April 01, 2021, F5 has officially placed Application Security Manager (ASM) into End of Sale (EoS) status, signifying the eventual retirement of the product. (F5 Support Announcement - K72212499 ) Existing ASM,or BEST bundle customers, under a valid support contract running BIG-IP version 14.1 or greater can simply reactivate their licenses to instantly upgrade to Advanced WAF (AdvWAF) completely free of charge. Introduction Protecting your applications is becoming more challenging every day; applications are getting more complex, and attackers are getting more advanced. Over the years we have heard your feedback that managing a Web Application Firewall (WAF) can be cumbersome and you needed new solutions to protect against the latest generation of attacks. Advanced Web Application Firewall, or AdvWAF, is an enhanced version of the Application Security Manager (ASM) product that introduces new attack mitigation techniques and many quality-of-life features designed to reduce operational overhead. On April 01, 2021 – F5 started providing free upgrades for existing Application Security Manager customers to the Advanced WAF license. Keep on reading for: A brief history of ASM and AdvWAF How the AdvWAF license differs from ASM (ASM vs AdvWAF How to determine if your BIG-IPs are eligible for this free upgrade Performing the license upgrade How did we get here? For many years, ASM has been the gold standard Web Application Firewall (WAF) used by thousands of organizations to help secure their most mission-critical web applications from would-be attackers. F5 acquired the technology behind ASM in 2004 and subsequently ‘baked’ it into the BIG-IP product, immediately becoming the leading WAF product on the market. In 2018, after nearly 14 years of ASM development, F5 released the new, Advanced WAF license to address the latest threats. Since that release, both ASM and AdvWAF have coexisted, granting customers the flexibility to choose between the traditional or enhanced versions of the BIG-IP WAF product.As new features were released, they were almost always unique to AdvWAF, creating further divergence as time went on, and often sparking a few common questions (all of which we will inevitably answer in this very article) such as: Is ASM going away? What is the difference between ASM and AdvWAF? Will feature X come to ASM too? I need it! How do I upgrade from ASM to AdvWAF? Is the BEST bundle no longer really the BEST? To simplify things for our customers (and us too!), we decided to announce ASM as End of Sale (EoS), starting on April 01, 2021. This milestone, for those unfamiliar, means that the ASM product can no longer be purchased after April 01 of this year – it is in the first of 4 stages of product retirement. An important note is that no new features will be added to ASM going forward. So, what’s the difference? A common question we get often is “How do I migrate my policy from ASM to AdvWAF?” The good news is that the policies are functionally identical, running on BIG-IP, with the same web interface, and have the same learning engine and underlying behavior. In fact, our base policies can be shared across ASM, AdvWAF, and NGINX App Protect (NAP). The AdvWAF license simply unlocks additional features beyond what ASM has, that is it – all the core behaviors of the two products are identical otherwise. So, if an engineer is certified in ASM and has managed ASM security policies previously, they will be delighted to find that nothing has changed except for the addition of new features. This article does not aim to provide an exhaustive list of every feature difference between ASM and AdvWAF. Instead, below is a list of the most popular features introduced in the AdvWAF license that we hope you can take advantage of. At the end of the article, we provide more details on some of these features: Secure Guided Configurations Unlimited L7 Behavioral DoS DataSafe (Client-side encryption) OWASP Compliance Dashboard Threat Campaigns (includes Bot Signature updates) Additional ADC Functionality Micro-services protection Declarative WAF Automation I’m interested, what’s the catch? There is none! F5 is a security company first and foremost, with a mission to provide the technology necessary to secure our digital world. By providing important useability enhancements like Secure Guided Config and OWASP Compliance Dashboard for free to existing ASM customers, we aim to reduce the operational overhead associated with managing a WAF and help make applications safer than they were yesterday - it’s a win-win. If you currently own a STANDALONE, ADD-ON or BEST Bundle ASM product running version 14.1 or later with an active support contract, you are eligible to take advantage of this free upgrade. This upgrade does not apply to customers running ELA licensing or standalone ASM subscription licenses at this time. If you are running a BIG-IP Virtual Edition you must be running at least a V13 license. To perform the upgrade, all you need to do is simply REACTIVATE your license, THAT IS IT! There is no time limit to perform the license reactivation and this free upgrade offer does not expire. *Please keep in mind that re-activating your license does trigger a configuration load event which will cause a brief interruption in traffic processing; thus, it is always recommended to perform this in a maintenance window. Step 1: Step 2: Choose “Automatic” if your BIG-IP can communicate outbound to the Internet and talk to the F5 Licensing Server. Choose Manual if your BIG-IP cannot reach the F5 Licensing Server directly through the Internet. Click Next and the system will re-activate your license. After you’ve completed the license reactivation, the quickest way to know if you now have AdvWAF is by looking under the Security menu. If you see "Guided Configuration”, the license upgrade was completed successfully. You can also login to the console and look for the following feature flags in the /config/bigip.license file to confirm it was completed successfully by running: grep -e waf_gc -e mod_waf -e mod_datasafe bigip.license You should see the following flags set to enabled: Waf_gc: enabled Mod_waf: enabled Mod_datasafe: enabled *Please note that the GUI will still reference ASM in certain locations such as on the resource provisioning page; this is not an indication of any failure to upgrade to the AdvWAF license. *Under Resource Provisioning you should now see that FPS is licensed. This will need to be provisioned if you plan on utilizing the new AdvWAF DataSafe feature explained in more detail in the Appendix below. For customers with a large install base, you can perform license reactivation through the CLI. Please refer to the following article for instructions: https://support.f5.com/csp/article/K2595 Conclusion F5 Advanced WAF is an enhanced WAF license now available for free to all existing ASM customers running BIG-IP version 14.1 or greater, only requiring a simple license reactivation. The AdvWAF license will provide immediate value to your organization by delivering visibility into the OWASP Top 10 compliance of your applications, configuration wizards designed to build robust security policies quickly, enhanced automation capabilities, and more. If you are running ASM with BIG-IP version 14.1 or greater, what are you waiting for? (Please DO wait for your change window though 😊) Acknowledgments Thanks to Brad Scherer , John Marecki , Michael Everett , and Peter Scheffler for contributing to this article! Appendix: More details on select AdvWAF features Guided Configurations One of the most common requests we hear is, “can you make WAF easier?” If there was such a thing as an easy button for WAF configurations, Guided Configs are that button. Guided Configurations easily take you through complex configurations for various use-cases such as Web Apps, OWASP top 10, API Protection, DoS, and Bot Protection. L7DoS – Behavioral DoS Unlimited Behavioral DoS - (BaDoS) provides automatic protection against DoS attacks by analyzing traffic behavior using machine learning and data analysis. With ASM you were limited to applying this type of DoS profile to a maximum of 2 Virtual Servers. The AdvWAF license completely unlocks this capability, removing the 2 virtual server limitation from ASM. Working together with other BIG-IP DoS protections, Behavioral DoS examines traffic flowing between clients and application servers in data centers, and automatically establishes the baseline traffic/flow profiles for Layer 7 (HTTP) and Layers 3 and 4. DataSafe *FPS must be provisioned DataSafe is best explained as real-time L7 Data Encryption. Designed to protect websites from Trojan attacks by encrypting data at the application layer on the client side. Encryption is performed on the client-side using a public key generated by the BIG-IP system and provided uniquely per session. When the encrypted information is received by the BIG-IP system, it is decrypted using a private key that is kept on the server-side. Intended to protect, passwords, pins, PII, and PHI so that if any information is compromised via MITB or MITM it is useless to the attacker. DataSafe is included with the AdvWAF license, but the Fraud Protection Service (FPS) must be provisioned by going to System > Resource Provisioning: OWASP Compliance Dashboard Think your policy is air-tight? The OWASP Compliance Dashboard details the coverage of each security policy for the top 10 most critical web application security risks as well as the changes needed to meet OWASP compliance. Using the dashboard, you can quickly improve security risk coverage and perform security policy configuration changes. Threat Campaigns (includes Bot Signature updates) Threat campaigns allow you to do more with fewer resources. This feature is unlocked with the AdvWAF license, it, however, does require an additional paid subscription above and beyond that. This paid subscription does NOT come with the free AdvWAF license upgrade. F5’s Security Research Team (SRT) discovers attacks with honeypots – performs analysis and creates attack signatures you can use with your security policies. These signatures come with an extremely low false-positive rate, as they are strictly based on REAL attacks observed in the wild. The Threat Campaign subscription also adds bot signature updates as part of the solution. Additional ADC Functionality The AdvWAF license comes with all of the Application Delivery Controller (ADC) functionality required to both deliver and protect a web application. An ASM standalone license came with only a very limited subset of ADC functionality – a limit to the number of pool members, zero persistence profiles, and very few load balancing methods, just to name a few. This meant that you almost certainly required a Local Traffic Manager (LTM) license in addition to ASM, to successfully deliver an application. The AdvWAF license removes many of those limitations; Unlimited pool members, all HTTP/web pertinent persistence profiles, and most load balancing methods, for example.12KViews8likes8CommentsAutomation of F5 Distributed Cloud Platform Client-Side Defense feature - Part I
Objective: The purpose of this article is to automate F5 Distributed Cloud Platform Client-Side Defense feature (F5 XC CSD) detection of malicious 3rd party domains and integrating code in GitHub. This article shows how we can use the Github available Actions workflow to provide the flexibility of updating existing infrastructure after every change using CI/CD event triggers. In this article we showed a small use case of CI/CD deployment using GitHub Actions, Terraform and Python developed in a generic way where users can bring up the complete setup within a few clicks. For more details about this feature please refer: https://community.f5.com/t5/technical-articles/javascript-supply-chains-magecart-and-f5-xc-client-side-defense/ta-p/296612 Overview: Client-Side Defense (CSD) feature provides a web application protection solution against Magecart style and similar malicious JavaScript attacks. This solution supports below features: Detection: A continuously evolving signal set allows CSD to understand when scripts on web pages exhibit signs of exfiltration. CSD detects network requests made by malicious scripts that attempt to exfiltrate PII data. Alerting: CSD generates timely alerts on the behavior of malicious scripts, provided by a continuously improving Analysis Engine. Mitigation: CSD detects threats in real-time and provides enforcement with one-click mitigation. Automation Design: As part of this automation, we are deploying a demo application in AWS and NGINX web service which hosts a simple web login page. The demo application has a malicious 3rd party Java script which captures the provided username and passwords during the login and sends these details to a malicious control server which keeps recording these credentials. Once the demo app is deployed, we are then configuring the origin pool and load balancer in F5 XC and generating web login traffic using Selenium script. Once traffic is logged in F5 XC platform, CSD feature will detect malicious domain network and will display domain in client-Side defense dashboard. After researching the 3rd party domain details customers can either approve or mitigate these network requests. Above workflow is integrated using GitHub Actions file which ensures dynamic deployment of the demo app and F5 XC load balancer which can be exposed using public domain name. Note: Currently this repo code covers automation till CSD malicious domain detection only and will cover mitigation part in the upcoming article of this series. Code is available here. Deployment steps: Security users can simply clone repo, update variables.tf as per their infra and run workflow which will bring entire infrastructure in few mins. They can login to the F5 XC console and explore the functionality of Client-Side Defense in an interactive way. Users can use this as a plugin to demonstrate CSD feature. Conclusion: This article demonstrated how we can leverage the power of CI/CD to create or upgrade our existing infrastructure and maintain the testing scope of Client Side Defense feature. For further information check the links below: F5 Distributed Cloud Platform (Link) F5 Distributed Cloud Client-Side Defense Overview (Link) F5 Distributed Cloud Client-Side Defense Docs (Link)1.2KViews6likes0CommentsAutomation of Malicious User detection/mitigation using F5 Distributed Cloud Platform
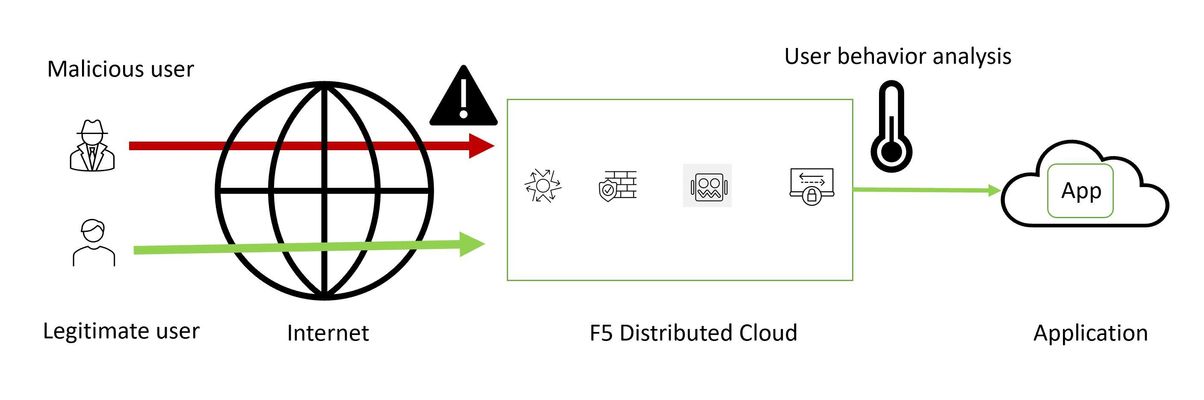
Introduction: In today’s modern world where attackers are leveraging the benefits of readily available automated attack tools it is highly recommended to go with security driven framework which helps in negating the impact of possible attack vectors used by these attackers. F5 Distributed Cloud (F5 XC) platform comes with a wide range of signature set for known attacks and has a machine learning capability to mitigate possible threats from malicious users by analyzing the user behavior. In this article, we have discussed the demo scenarios we are covering as part of the automation using GitHub Actions, Terraform and Python. For more information, please have a look at these articles: AI/ML detection of Malicious Users using F5 Distributed Cloud WAAP – Part I AI/ML detection of Malicious Users using F5 Distributed Cloud WAAP – Part II AI/ML detection of Malicious Users using F5 Distributed Cloud WAAP – Part III Demonstration: We’ve come up with automation scripts to build up the infrastructure for malicious user detection and mitigation in XC console and malicious events triggering script. You can use the github workflows to see how effectively XC WAAP can detect and mitigate malicious user events The repository consists of two workflows covering demo scenarios for malicious user detection and mitigation using XC WAAP: Single LB malicious user detection and default mitigation of high-risk IPs: In this scenario we are bringing up a HTTP load balancer and configure it to detect and mitigate malicious user events using default mitigation rule. In the second part of this demo, we will generate tor requests and fetch the logs from XC console to validate the detection and mitigation action Multi LB malicious user detection and custom mitigation of WAF security events: In this scenario we are bringing up a HTTPS load balancer with an app type enabling detection with custom app settings object, app firewall in blocking mode and custom malicious user mitigation policy. In the second part of this scenario, we are generating XSS attacks and validate the logs fetched from XC console. Repository Link: Automation demonstration for malicious user detection and mitigation feature of F5 XC Platform Conclusion: By using the repository, you will see F5 Distributed Cloud platform’s efficiency to detect users exhibiting suspicious behavior and perform mitigation actions on them safeguarding end application from possible attacks Hope you liked the demonstration. Please feel free to raise your concerns via GitHub. Thank you! For further information click the links below: F5 Distributed Cloud Platform F5 Distributed Cloud Services F5 Distributed Cloud WAAP2KViews4likes0CommentsAutomation of OWASP Injection mitigation using F5 Distributed Cloud Platform
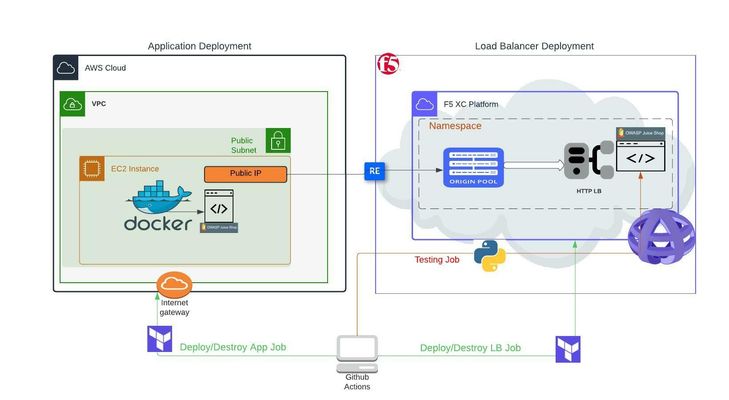
Objective: The purpose of this article is to automate F5 Distributed Cloud Platform (F5 XC) detection and mitigation of OWASP TOP 10 Injection attacks and integrating code in GitHub. This article shows how we can use Terraform, Python and Github workflow to provide the flexibility of updating existing infrastructure after every change using CI/CD event triggers. For more details about this feature please refer: Injection Attack Mitgation Article Introduction to Injection: An application is vulnerable to attack when: The data provided is not validated by the application User requested schema is not being analyzed before processing Data is used within search parameters to extract additional and sensitive records If a user tries to use Cross-site Scripting to get some unauthorized data Some of the common injections are SQL, NoSQL, OS command, Object Relational Mapping (ORM), Etc. In this automation article we are trying to bypass password validation in a demo application using SQL Injection code. Design: For the purpose of reusability, I have separated demo application and F5 XC resources deployments in 2 different flows as below. 1. First, we are deploying a demo application (Juice Shop) as a docker container in AWS EC2 machine (if customer already has their application running, they can skip this and use their application public IP directly in below flow) 2. Once the demo app is deployed, we are using application public IP to configure the origin pool, WAF and load balancer in F5 XC Once demo application and F5 XC resources are deployed successfully, python script is generating login request consisting of malicious SQL Injection. Once traffic is generated, F5 XC platform WAF will detect and block the malicious request. Finally, we are destroying the above resources using terraform Above workflow is integrated using GitHub Actions file which ensures dynamic deployment of the demo app and F5 XC load balancer which can be exposed using public domain name. Repo code URL:https://github.com/f5devcentral/owasp-injection-mitigation Conclusion: In this article we have showed how we can leverage power of CI/CD deployment to automate end to end verification of injection attacks mitigationusing GitHub Actions, Terraform and Python developed in a generic way where users can bring up the complete setup within a few clicks. For further information check the links below: F5 Distributed Cloud Platform (Link) F5 Distributed Cloud WAF Overview (Link) OWASP Injection Attacks (Link)1.9KViews2likes0Comments
Using CryptoNice as a Sanity-Checking Tool for Automated Application Deployments with Ansible
Any good automation pipeline should have some validation built in to perform sanity checks on what it should have done. This article describes how you can use CryptoNice as a simple and easy way of sanity checking the SSL/TLS configuration of your automated application deployments, by integrating CryptoNice into your pipeline directly after your automation solution has deployed the application. I am going to show a simple Ansible playbook that illustrates this point. The Ansible playbook deploys an application to a BIG-IP that resides in AWS, but it could be any BIG-IP on premises or in any cloud. After the deployment is complete, I use CryptoNice to validate that the application is reachable via TLS and that the deployed VIP is using best practices for SSL deployments. What Is CryptoNice? CryptoNice is both a command line tool and Python library that is developed by F5 Labs and is publicly available; it provides the ability to scan and report on the configuration of SSL/TLS for your internet or internal-facing web services. Built using the sslyze API and SSL, http-client, and DNS libraries, CryptoNice collects data on a given domain and performs a series of tests to check TLS configuration. You can get CryptoNice here:https://github.com/F5-Labs/cryptonice What Is Ansible? Ansible is an open-source software-provisioning, configuration-management, and application-deployment tool enabling infrastructure as code. It runs on many Unix-like systems, and can configure both Unix-like systems as well as Microsoft Windows and also F5 BIG-IPs. You can learn how to install Ansible here:https://docs.ansible.com/ansible/latest/installation_guide/intro_installation.html F5 publishes instructions on how to integrate the Ansible plugins here:https://clouddocs.f5.com/products/orchestration/ansible/devel/ In this article I use the published version 1 F5 Ansible plugin that uses the iControl REST API. If we take a look briefly under the hood here, this plugin is using an imperative API. As of today, F5 has a version 2 plugin in preview that focuses on managing F5 BIG-IP/BIG-IQ through declarative APIs such asAS3, DO, TS, and CFE. You can also check the version 2 plugin preview out on F5 Cloud Docs. I used a stock Ubuntu image as a basis for my Ansible server and followed the instructions for installing Ansible on Ubuntu, then followed the instructions for installing the F5 plugin for Ansible referenced above. You can take a look at the F5/Ansible 1.0 plugin that is published on the Ansible Galaxy Hub here:https://galaxy.ansible.com/f5networks/f5_modules For my demonstration, I also installed CryptoNice on the same server where Ansible and the F5 Ansible plugin are installed; at that point you are off to the races and you can build a simple Ansible script and begin to automate a BIG-IP. The F5 Ansible Module provides you with a great deal of programmability for the BIG-IP basic onboarding, WAF, APM, and LTM. The following is a great reference to give you an idea of the scope of capabilities with Ansible examples that this module provides. You can also automate the infrastructure creation if you so choose, meaning you could stand up a BIG-IP in AWS and then configure everything required to get the device onboarded, and then after that, configure traffic-management objects like VIPs/pools, etc. https://clouddocs.f5.com/products/orchestration/ansible/devel/modules/module_index.html For my test, I created a simple Ansible script that automates the creation of a VIP with an iRule to respond to http get requests. The example also associates a pool and pool members to the VIP to give you an idea of what a simple application deployment may look like. After that, I run a CryptoNice to test the quality of the SSL/TLS. My simple Ansible playbook looks like this: --- - name: Create a VIP, pool and pool members hosts: f5 connection: local vars: provider: password: notmypassword server: f5cove.me user: auser validate_certs: no server_port: 8443 tasks: - name: Create a pool bigip_pool: provider: "{{ provider }}" lb_method: ratio-member name: examplepool slow_ramp_time: 120 delegate_to: localhost - name: Add members to pool bigip_pool_member: provider: "{{ provider }}" description: "webserver {{ item.name }}" host: "{{ item.host }}" name: "{{ item.name }}" pool: examplepool port: '80' with_items: - host: 10.0.0.68 name: web01 - host: 10.0.0.67 name: web02 delegate_to: localhost - name: Create a VIP bigip_virtual_server: provider: "{{ provider }}" description: avip destination: 10.0.0.66 name: vip-1 irules: - responder pool: examplepool port: '443' snat: Automap profiles: - http - f5cove delegate_to: localhost - name: Create Ridirect bigip_virtual_server: provider: "{{ provider }}" description: avipredirect destination: 10.0.0.66 name: vip-1-redirect irules: - _sys_https_redirect port: '80' snat: None profiles: - http delegate_to: localhost - name: play cryptonice nicely hosts: 127.0.0.1 connection: local tasks: - pause: seconds: 30 - name: run cryptonice shell: "cryptonice f5cove.me" register: output - debug: var=output.stdout_lines My output from running the playbook looks like this: PLAY [Create a VIP, pool and pool members] ************************************************************************************************************************************************************************************************* TASK [Gathering Facts] ********************************************************************************************************************************************************************************************************************* ok: [1.2.3.4] TASK [Create a pool] *********************************************************************************************************************************************************************************************************************** ok: [1.2.3.4 -> localhost] TASK [Add members to pool] ***************************************************************************************************************************************************************************************************************** ok: [1.2.3.4 -> localhost] => (item={'host': '10.0.0.68', 'name': 'web01'}) ok: [1.2.3.4 -> localhost] => (item={'host': '10.0.0.67', 'name': 'web02'}) TASK [Create a VIP] ************************************************************************************************************************************************************************************************************************ changed: [1.2.3.4 -> localhost] TASK [Create Ridirect] ********************************************************************************************************************************************************************************************************************* ok: [1.2.3.4 -> localhost] PLAY [play cryptonice nicely] ************************************************************************************************************************************************************************************************************** TASK [Gathering Facts] ********************************************************************************************************************************************************************************************************************* ok: [localhost] TASK [pause] ******************************************************************************************************************************************************************************************************************************* Pausing for 30 seconds (ctrl+C then 'C' = continue early, ctrl+C then 'A' = abort) ok: [localhost] TASK [run cryptonice] ********************************************************************************************************************************************************************************************************************** changed: [localhost] TASK [debug] ******************************************************************************************************************************************************************************************************************************* ok: [localhost] => { "output.stdout_lines": [ "Pre-scan checks", "-------------------------------------", "Scanning f5cove.me on port 443...", "Analyzing DNS data for f5cove.me", "Fetching additional records for f5cove.me", "f5cove.me resolves to 34.217.132.104", "34.217.132.104:443: OPEN", "TLS is available: True", "Connecting to port 443 using HTTPS", "Queueing TLS scans (this might take a little while...)", "Looking for HTTP/2", "", "", "RESULTS", "-------------------------------------", "Hostname:\t\t\t f5cove.me", "", "Selected Cipher Suite:\t\t ECDHE-RSA-AES128-GCM-SHA256", "Selected TLS Version:\t\t TLS_1_2", "", "Supported protocols:", "TLS 1.2:\t\t\t Yes", "TLS 1.1:\t\t\t Yes", "TLS 1.0:\t\t\t Yes", "", "TLS fingerprint:\t\t 29d29d15d29d29d21c29d29d29d29d930c599f185259cdd20fafb488f63f34", "", "", "", "CERTIFICATE", "Common Name:\t\t\t f5cove.me", "Issuer Name:\t\t\t R3", "Public Key Algorithm:\t\t RSA", "Public Key Size:\t\t 2048", "Signature Algorithm:\t\t sha256", "", "Certificate is trusted:\t\t False (Mozilla not trusted)", "Hostname Validation:\t\t OK - Certificate matches server hostname", "Extended Validation:\t\t False", "Certificate is in date:\t\t True", "Days until expiry:\t\t 29", "Valid From:\t\t\t 2021-02-12 23:28:14", "Valid Until:\t\t\t 2021-05-13 23:28:14", "", "OCSP Response:\t\t\t Successful", "Must Staple Extension:\t\t False", "", "Subject Alternative Names:", "\t f5cove.me", "", "Vulnerability Tests:", "No vulnerability tests were run", "", "HTTP to HTTPS redirect:\t\t False", "None", "", "RECOMMENDATIONS", "-------------------------------------", "HIGH - TLSv1.0 Major browsers are disabling TLS 1.0 imminently. Carefully monitor if clients still use this protocol. ", "HIGH - TLSv1.1 Major browsers are disabling this TLS 1.1 immenently. Carefully monitor if clients still use this protocol. ", "Low - CAA Consider creating DNS CAA records to prevent accidental or malicious certificate issuance.", "", "Scans complete", "-------------------------------------", "Total run time: 0:00:05.688562" ] } Note that after the playbook is complete, CryptoNice is telling me that I need to improve the quality of my SSL profile on my BIG-IP. As a result, I create a second SSL profile and Disable TLS 1.0 and 1.1. Upgrade the certificate from a 2048 bit key to a 4096 bit key. Make sure that the certificate bundle is configured correctly to ensure that the certificate is properly trusted. Create a cipher rule and group and use the following cipher string to improve the quality of the SSL connections: !EXPORT:!DHE+AES-GCM:!DHE+AES:ECDHE+AES-GCM:ECDHE+AES:RSA+AES-GCM:RSA+AES:-MD5:-SSLv3:-RC4:!3DES I then alter the playbook to reference the new SSL profile, and then re-run the Ansible playbook. Here is the relevant playbook snippet: - name: Create a VIP bigip_virtual_server: provider: "{{ provider }}" description: avip destination: 10.0.0.66 name: vip-1 irules: - responder pool: examplepool port: '443' snat: Automap profiles: - http - f5cove <change this to the new SSL Profile> delegate_to: localhost The resulting output from CryptoNice after running the playbook again to switch the SSL profile addresses all of the HIGH recommendations. TASK [debug] ********************************************************************************************************************************************************************** ok: [localhost] => { "output.stdout_lines": [ "Pre-scan checks", "-------------------------------------", "Scanning f5cove.me on port 443...", "Analyzing DNS data for f5cove.me", "Fetching additional records for f5cove.me", "f5cove.me resolves to 34.217.132.104", "34.217.132.104:443: OPEN", "TLS is available: True", "Connecting to port 443 using HTTPS", "Queueing TLS scans (this might take a little while...)", "Looking for HTTP/2", "", "", "RESULTS", "-------------------------------------", "Hostname:\t\t\t f5cove.me", "", "Selected Cipher Suite:\t\t ECDHE-RSA-AES256-GCM-SHA384", "Selected TLS Version:\t\t TLS_1_2", "", "Supported protocols:", "TLS 1.2:\t\t\t Yes", "", "TLS fingerprint:\t\t 2ad2ad0002ad2ad0002ad2ad2ad2adcb09dd549309271837f87ac5dad15fa7", "", "", "HTTP/2 supported:\t\t False", "", "", "CERTIFICATE", "Common Name:\t\t\t f5cove.me", "Issuer Name:\t\t\t R3", "Public Key Algorithm:\t\t RSA", "Public Key Size:\t\t 4096", "Signature Algorithm:\t\t sha256", "", "Certificate is trusted:\t\t True (No errors)", "Hostname Validation:\t\t OK - Certificate matches server hostname", "Extended Validation:\t\t False", "Certificate is in date:\t\t True", "Days until expiry:\t\t 88", "Valid From:\t\t\t 2021-04-13 00:55:09", "Valid Until:\t\t\t 2021-07-12 00:55:09", "", "OCSP Response:\t\t\t Successful", "Must Staple Extension:\t\t False", "", "Subject Alternative Names:", "\t f5cove.me", "", "Vulnerability Tests:", "No vulnerability tests were run", "", "HTTP to HTTPS redirect:\t\t False", "None", "", "RECOMMENDATIONS", "-------------------------------------", "Low - CAA Consider creating DNS CAA records to prevent accidental or malicious certificate issuance.", "", "Scans complete", "-------------------------------------", "Total run time: 0:00:05.638186" ] } Now you can see in the CryptoNice output that There are no trust issues with the certificate/certificate bundle. I have upgraded from 2048 bits to 4096 bit key length. I have disabled TLS1.0 and TLS1.1. The connection is handshaking with a more secure cryptographic algorithm. I no longer have any HIGH recommendations for improvement to the quality of TLS connection. Conclusion It is always best practice to perform a sanity check on the services that you create in your automation pipelines. This article describes using CryptoNice as part of a simple Ansible playbook to run an SSL/TLS sanity check on the application in order to improve the security of your application-delivery automation. Ultimately you should not just be checking the SSL/TLS; another good idea would be to introduce application-vulnerability scanners too as part of the automation pipeline.1.3KViews2likes1CommentF5 Automation with Ansible Tips and Tricks
Getting Started with Ansible and F5 In this article we are going to provide you with a simple set of videos that demonstrate step by step how to implement automation with Ansible. In the last video, however we will demonstrate how telemetry and automation may be used in combination to address potential performance bottlenecks and ensure application availability. To start, we will provide you with details on how to get started with Ansible automation using the Ansible Automation Platform®: Backing up your F5 device Once a user has installed and configured Ansible Automation Platform, we will now transition to a basic maintenance function – an automated backup of a BIG-IP hardware device or Virtual Edition (VE). This is always recommended before major changes are made to our BIG-IP devices Configuring a Virtual Server Next, we will use Ansible to configure a Virtual Server, a task that is most frequently performed via manual functions via the BIG-IP. When changes to a BIG-IP are infrequent, manual intervention may not be so cumbersome. However large enterprise customers may need to perform these tasks hundreds of times: Replace an SSL Certificate The next video will demonstrate how to use Ansible to replace an SSL certificate on a BIG-IP. It is important to note that this video will show the certificate being applied on a BIG-IP and then validated by browsing to the application website: Configure and Deploy an iRule The next administrative function will demonstrate how to configure and push an iRule using the Ansible Automation Platform® onto a BIG-IP device. Again this is a standard administrative task that can be simply automated via Ansible: Delete the Existing Virtual Server Ok so now we have to delete the above configuration to roll back to a steady state. This is a common administrative task when an application is retired. We again demonstrate how Ansible automation may be used to perform these simple administrative tasks: Telemetry and Automation: Using Threshold Triggers to Automate Tasks and Fix Performance Bottlenecks Now you have a clear demonstration as to how to utilize Ansible automation to perform routine tasks on a BIG-IP platform. Once you have become proficient with more routine Ansible tasks, we can explore more high-level, sophisticated automation tasks. In the below demonstration we show how BIG-IP administrators using SSL Orchestrator® (SSLO) can combine telemetry with automation to address performance bottlenecks in an application environment: Resources: So that is a short series of tutorials on how to perform routine tasks using automation plus a preview of a more sophisticated use of automation based upon telemetry and automatic thresholds. For more detail on our partnership, please visit our F5/Ansible page or visit the Red Hat Automation Hub for information on the F5 Ansible certified collections. https://www.f5.com/ansible https://www.ansible.com/products/automation-hub https://galaxy.ansible.com/f5networks/f5_modules5.2KViews2likes1CommentThese Are Not The Scrapes You're Looking For - Session Anomalies
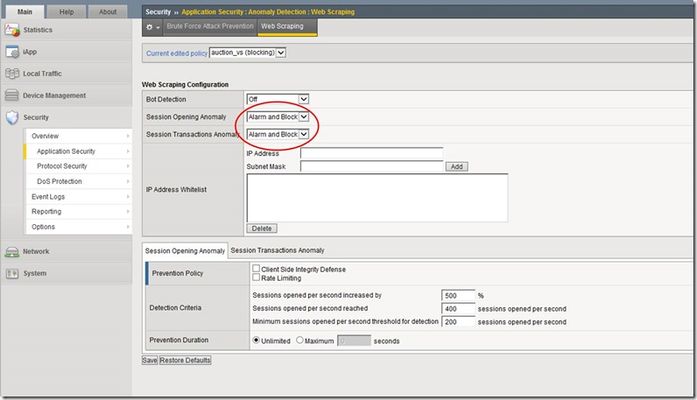
In my first article in this series, I discussed web scraping -- what it is, why people do it, and why it could be harmful. My second article outlined the details of bot detection and how the ASM blocks against these pesky little creatures. This last article in the series of web scraping will focus on the final part of the ASM defense against web scraping: session opening anomalies and session transaction anomalies. These two detection modes are new in v11.3, so if you're using v11.2 or earlier, then you should upgrade and take advantage of these great new features! ASM Configuration In case you missed it in the bot detection article, here's a quick screenshot that shows the location and settings of the Session Opening and Session Transactions Anomaly in the ASM. You'll find all the fun when you navigate to Security > Application Security > Anomaly Detection > Web Scraping. There are three different settings in the ASM for Session Anomaly: Off, Alarm, and Alarm and Block. (Note: these settings are configured independently...they don't have to be set at the same value) Obviously, if Session Anomaly is set to "Off" then the ASM does not check for anomalies at all. The "Alarm" setting will detect anomalies and record attack data, but it will allow the client to continue accessing the website. The "Alarm and Block" setting will detect anomalies, record the attack data, and block the suspicious requests. Session Opening Anomaly The first detection and prevention mode we'll discuss is Session Opening Anomaly. But before we get too deep into this, let's review what a session is. From a simple perspective, a session begins when a client visits a website, and it ends when the client leaves the site (or the client exceeds the session timeout value). Most clients will visit a website, surf around some links on the site, find the information they need, and then leave. When clients don't follow a typical browsing pattern, it makes you wonder what they are up to and if they are one of the bad guys trying to scrape your site. That's where Session Opening Anomaly defense comes in! Session Opening Anomaly defense checks for lots of abnormal activities like clients that don't accept cookies or process JavaScript, clients that don't scrape by surfing internal links in the application, and clients that create a one-time session for each resource they consume. These one-time sessions lead scrapers to open a large number of new sessions in order to complete their job quickly. What's Considered A New Session? Since we are discussing session anomalies, I figured we should spend a few sentences on describing how the ASM differentiates between a new or ongoing session for each client request. Each new client is assigned a "TS cookie" and this cookie is used by the ASM to identify future requests from the client with a known, ongoing session. If the ASM receives a client request and the request does not contain a TS cookie, then the ASM knows the request is for a new session. This will prove very important when calculating the values needed to determine whether or not a client is scraping your site. Detection There are two different methods used by the ASM to detect these anomalies. The first method compares a calculated value to a predetermined ceiling value for newly opened sessions. The second method considers the rate of increase of newly opened sessions. We'll dig into all that in just a minute. But first, let's look at the criteria used for detecting these anomalies. As you can see from the screenshot above, there are three detection criteria the ASM uses...they are: Sessions opened per second increased by: This specifies that the ASM considers client traffic to be an attack if the number of sessions opened per second increases by a given percentage. The default setting is 500 percent. Sessions opened per second reached: This specifies that the ASM considers client traffic to be an attack if the number of sessions opened per second is greater than or equal to this number. The default value is 400 sessions opened per second. Minimum sessions opened per second threshold for detection: This specifies that the ASM considers traffic to be an attack if the number of sessions opened per second is greater than or equal to the number specified. In addition, at least one of the "Sessions opened per second increased by" or "Sessions opened per second reached" numbers must also be reached. If the number of sessions opened per second is lower than the specified number, the ASM does not consider this traffic to be an attack even if one of the "Sessions opened per second increased by" or "Sessions opened per second" reached numbers was reached. The default value for this setting is 200 sessions opened per second. In addition, the ASM maintains two variables for each client IP address: a one-minute running average of new session opening rate, and a one-hour running average of new session opening rate. Both of these variables are recalculated every second. Now that we have all the basic building blocks. let's look at how the ASM determines if a client is scraping your site. First Method: Predefined Ceiling Value This method uses the user-defined "minimum sessions opened per second threshold for detection" value and compares it to the one-minute running average. If the one-minute average is less than this number, then nothing else happens because the minimum threshold has not been met. But, if the one-minute average is higher than this number, the ASM goes on to compare the one-minute average to the user-defined "sessions opened per second reached" value. If the one-minute average is less than this value, nothing happens. But, if the one-minute average is higher than this value, the ASM will declare the client a web scraper. The following flowchart provides a pictorial representation of this process. Second Method: Rate of Increase The second detection method uses several variables to compare the rate of increase of newly opened sessions against user-defined variables. Like the first method, this method first checks to make sure the minimum sessions opened per second threshold is met before doing anything else. If the minimum threshold has been met, the ASM will perform a few more calculations to determine if the client is a web scraper or not. The "sessions opened per second increased by" value (percentage) is multiplied by the one-hour running average and this value is compared to the one-minute running average. If the one-minute average is greater, then the ASM declares the client a web scraper. If the one-minute average is lower, then nothing happens. The following matrix shows a few examples of this detection method. Keep in mind that the one-minute and one-hour averages are recalculated every second, so these values will be very dynamic. Prevention The ASM provides several policies to prevent session opening anomalies. It begins with the first method that you enable in this list. If the system finds this method not effective enough to stop the attack, it uses the next method that you enable in this list. The following screenshots show the different options available for prevention. The "Drop IP Addresses with bad reputation" is tied to Rate Limiting, so it will not appear as an option unless you enable Rate Limiting. Note that IP Address Intelligence must be licensed and enabled. This feature is licensed separately from the other ASM web scraping options. Here's a quick breakdown of what each of these prevention policies do for you: Client Side Integrity Defense: The system determines whether the client is a legal browser or an illegal script by sending a JavaScript challenge to each new session request from the detected IP address, and waiting for a response. The JavaScript challenge will typically involve some sort of computational challenge. Legal browsers will respond with a TS cookie while illegal scripts will not. The default for this feature is disabled. Rate Limiting: The goal of Rate Limiting is to keep the volume of new sessions at a "non-attack" level. The system will drop sessions from suspicious IP addresses after the system determines that the client is an illegal script. The default for this feature is also disabled. Drop IP Addresses with bad reputation: The system drops requests from IP addresses that have a bad reputation according to the system’s IP Address Intelligence database (shown above). The ASM will drop all request from any "bad" IP addresses even if they respond with a TS cookie. IP addresses that do not have a bad reputation also undergo rate limiting. The default for this option is disabled. Keep in mind that this option is available only after Rate Limiting is enabled. In addition, this option is only enforced if at least one of the IP Address Intelligence Categories is set to Alarm mode. Prevention Duration Now that we have detected session opening anomalies and mitigated them using our prevention options, we must figure out how long to apply the prevention measures. This is where the Prevention Duration comes in. This setting specifies the length of time that the system will prevent an attack. The system prevents attacks by rejecting requests from the attacking IP address. There are two settings for Prevention Duration: Unlimited: This specifies that after the system detects and stops an attack, it performs attack prevention until it detects the end of the attack. This is the default setting. Maximum <number of> seconds: This specifies that after the system detects and stops an attack, it performs attack prevention for the amount of time indicated unless the system detects the end of the attack earlier. So, to finish up our Session Opening Anomaly part of this article, I wanted to share a quick scenario. I was recently reading several articles from some of the web scrapers around the block, and I found one guy's solution to work around web scraping defense. Here's what he said: "Since the service conducted rate-limiting based on IP address, my solution was to put the code that hit their service into some client-side JavaScript, and then send the results back to my server from each of the clients. This way, the requests would appear to come from thousands of different places, since each client would presumably have their own unique IP address, and none of them would individually be going over the rate limit." This guy is really smart! And, this would work great against a web scraping defense that only offered a Rate Limiting feature. Here's the pop quiz question: If a user were to deploy this same tactic against the ASM, what would you do to catch this guy? I'm thinking you would need to set your minimum threshold at an appropriate level (this will ensure the ASM kicks into gear when all these sessions are opened) and then the "sessions opened per second" or the "sessions opened per second increased by" should take care of the rest for you. As always, it's important to learn what each setting does and then test it on your own environment for a period of time to ensure you have everything tuned correctly. And, don't forget to revisit your settings from time to time...you will probably need to change them as your network environment changes. Session Transactions Anomaly The second detection and prevention mode is Session Transactions Anomaly. This mode specifies how the ASM reacts when it detects a large number of transactions per session as well as a large increase of session transactions. Keep in mind that web scrapers are designed to extract content from your website as quickly and efficiently as possible. So, web scrapers normally perform many more transactions than a typical application client. Even if a web scraper found a way around all the other defenses we've discussed, the Session Transaction Anomaly defense should be able to catch it based on the sheer number of transactions it performs during a given session. The ASM detects this activity by counting the number of transactions per session and comparing that number to a total average of transactions from all sessions. The following screenshot shows the detection and prevention criteria for Session Transactions Anomaly. Detection How does the ASM detect all this bad behavior? Well, since it's trying to find clients that surf your site much more than other clients, it tracks the number of transactions per client session (note: the ASM will drop a session from the table if no transactions are performed for 15 minutes). It also tracks the average number of transactions for all current sessions (note: the ASM calculates the average transaction value every minute). It can use these two figures to compare a specific client session to a reasonable baseline and figure out if the client is performing too many transactions. The ASM can automatically figure out the number of transactions per client, but it needs some user-defined thresholds to conduct the appropriate comparisons. These thresholds are as follows: Session transactions increased by: This specifies that the system considers traffic to be an attack if the number of transactions per session increased by the percentage listed. The default setting is 500 percent. Session transactions reached: This specifies that the system considers traffic to be an attack if the number of transactions per session is equal to or greater than this number. The default value is 400 transactions. Minimum session transactions threshold for detection: This specifies that the system considers traffic to be an attack if the number of transactions per session is equal to or greater than this number, and at least one of the "Sessions transactions increased by" or "Session transactions reached" numbers was reached. If the number of transactions per session is lower than this number, the system does not consider this traffic to be an attack even if one of the "Session transactions increased by" or "Session transaction reached" numbers was reached. The default value is 200 transactions. The following table shows an example of how the ASM calculates transaction values (averages and individual sessions). We would expect that a given client session would perform about the same number of transactions as the overall average number of transactions per session. But, if one of the sessions is performing a significantly higher number of transactions than the average, then we start to get suspicious. You can see that session 1 and session 3 have transaction values higher than the average, but that only tells part of the story. We need to consider a few more things before we decide if this client is a web scraper or not. By the way, if the ASM knows that a given session is malicious, it does not use that session's transaction numbers when it calculates the average. Now, let's roll in the threshold values that we discussed above. If the ASM is going to declare a client as a web scraper using the session transaction anomaly defense, the session transactions must first reach the minimum threshold. Using our default minimum threshold value of 200, the only session that exceeded the minimum threshold is session 3 (250 > 200). All other sessions look good so far...keep in mind that these numbers will change as the client performs additional transactions during the session, so more sessions may be considered as their transaction numbers increase. Since we have our eye on session 3 at this point, it's time to look at our two methods of detecting an attack. The first detection method is a simple comparison of the total session transaction value to our user-defined "session transactions reached" threshold. If the total session transactions is larger than the threshold, the ASM will declare the client a web scraper. Our example would look like this: Is session 3 transaction value > threshold value (250 > 400)? No, so the ASM does not declare this client as a web scraper. The second detection method uses the "transactions increased by" value along with the average transaction value for all sessions. The ASM multiplies the average transaction value with the "transactions increased by" percentage to calculate the value needed for comparison. Our example would look like this: 90 * 500% = 450 transactions Is session 3 transaction value > result (250 > 450)? No, so the ASM does not declare this client as a web scraper. By the way, only one of these detection methods needs to be met for the ASM to declare the client as a web scraper. You should be able to see how the user-defined thresholds are used in these calculations and comparisons. So, it's important to raise or lower these values as you need for your environment. Prevention Duration In order to save you a bunch of time reading about prevention duration, I'll just say that the Session Transactions Anomaly prevention duration works the same as the Session Opening Anomaly prevention duration (Unlimited vs Maximum <number of> seconds). See, that was easy! Conclusion Thanks for spending some time reading about session anomalies and web scraping defense. The ASM does a great job of detecting and preventing web scrapers from taking your valuable information. One more thing...for an informative anomaly discussion on the DevCentral Security Forum, check out this conversation. If you have any questions about web scraping or ASM configurations, let me know...you can fill out the comment section below or you can contact the DevCentral team at https://devcentral.f5.com/s/community/contact-us.918Views2likes2CommentsHow AI Will Automate Cybersecurity in the Post-COVID World
Widespread remote working is accelerating the trend of digitization in society and a derivative trend of this acceleration is our increased reliance on online applications - which also means cybercrime is becoming more lucrative. Over on F5 Labs, Shuman Ghosemajumder briefly introduces the problem space and links to an article on VentureBeat about how AI will Automate cybersecurity in a Post-Covid world. https://www.f5.com/labs/articles/bylines/how-ai-will-automate-cybersecurity-in-the-post-covid-world232Views1like0CommentsCloud Scaling without Native Cloud Scaling
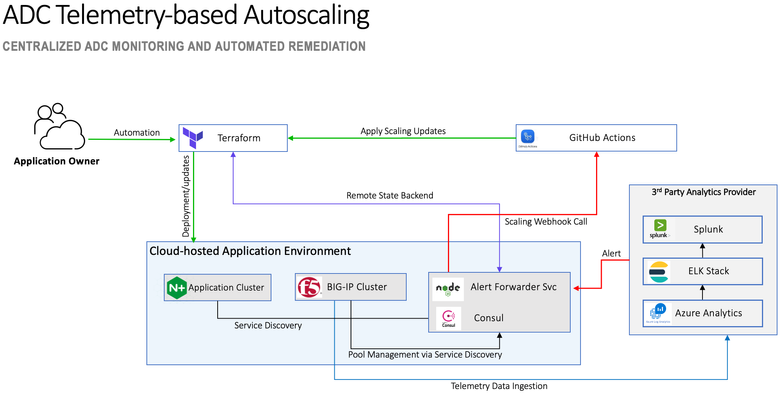
Planning and configuring scaling for a multi cloud-hosted application is not without its challenges and limitations.When I consider the unique approach each public cloud (AWS, Azure, GCP, etc.) has when it comes to scaling of VM instances, applying a consistent scaling policy across the application environment can be difficult. The difficulty level goes up even more when you want to automate your deployment. Aside from the inherent challenge of working with disparate cloud environments, my options with regard to scaling policies and the metrics used to trigger scaling events are limited when attempting to apply consistently across clouds. With the F5 BIG-IP and Telemetry Streaming I have the ability to send a variety of metrics to both CloudWatch and Azure Monitor. From there I could use custom metrics from each respective cloud. But now, I've only succeeded in complicating the solution, (as well as spraying logs all over the place). To address the challenges noted above allow me to introduce... The ADC Telemetry-based Autoscaling (ATA) solution, (see above) illustrates how F5's Automation Toolchain can integrate with third party analytics provider(s) to provide cloud-agnostic centralized application delivery monitoring and autoscaling. The solution utilizes various third-party open-source and proprietary technologies/services and the concept could easily be applied using a variety of vendor offerings. With that said, this solution utilizes the following: F5 BIG-IP(s) providing L4/L7 ADC Services F5 Declarative Onboarding, (DO) and Application Services 3 Extension, (AS3) to deploy to configure BIG-IP application services F5 Telemetry Streaming, (TS) to stream telemetry data to a third party analytics provider Hashicorp Terraform and Consul for infrastructure provisioning, service discovery and event logging GitHub Actions for workflow automation Azure and/or AWS public clouds for application hosting Third-party Analytics Provider, (integrated with BIG-IP(s) via TS) for monitoring and alerting Check it Out Rather than walk you through the entire solution in agonizing detail, how about a movie? Click on the link (image) below for a solution walkthrough. Try it Out Okay, so you watched the video and can't wait to try it in action; I get it. The GitHub solution repository contains guidance as well as the necessary files to deploy the solution. Have fun!489Views1like0CommentsMore Web Scraping - Bot Detection
In my last article, I discussed the issue of web scraping and why it could be a problem for many individuals and/or companies. In this article, we will dive into some of the technical details regarding bots and how the BIG-IP Application Security Manager (ASM) can detect them and block them from scraping your website. What Is A Bot? A bot is a software application that runs automated tasks and typically performs these tasks much faster than a human possibly could. In the context of web scraping, bots are used to extract data from websites, parse the data, and assemble it into a structured format where it can be presented in a useful form. Bots can perform many other actions as well, like submitting forms, setting up schedules, and connecting to databases. They can also do fun things like add friends to social networking sites like Twitter, Facebook, Google+, and others. A quick Internet search will show that many different bot tools are readily available for download free of charge. We won't go into the specifics of each vendor's bot application, but it's important to understand that they are out there and are very easy to use. Bot Detection So, now that we know what a bot is and what it does, how can we distinguish between malicious bot activity and harmless human activity? Well, the ASM is configured to check for some very specific activities that help it determine if the client source is a bot or a human. By the way, it's important to note that the ASM can accurately detect a human user only if clients have JavaScript enabled and support cookies. There are three different settings in the ASM for bot detection: Off, Alarm, and Alarm and Block. Obviously, if bot detection is set to "Off" then the ASM does not check for bot activity at all. The "Alarm" setting will detect bot activity and record attack data, but it will allow the client to continue accessing the website. The "Alarm and Block" setting will detect bot activity, record the attack data, and block the suspicious requests. These settings are shown in the screenshot below. Once you apply the setting for bot detection, you can then tune the ASM to begin checking for bots that are accessing your website. The bot detection utilizes four different techniques to detect and defend against bot activity. These include Rapid Surfing, Grace Interval, Unsafe Interval, and Safe Interval. Rapid Surfing detects bot activity by counting the client's page consumption speed. A page change is counted from the page load event to its unload event. The ASM configuration allows you to set a maximum number of page changes for a given time period (measured in milliseconds). If a page changes more than the maximum allowable times for the given time interval, the ASM will declare the client as a bot and perform the action that was set for bot detection (Off, Alarm, Alarm and Block). The default setting for Rapid Surfing is 5 page changes per second (or 1000 milliseconds). The Grace Interval setting specifies the maximum number of page requests the system reviews while it tries to detect whether the client is a human or a bot. As soon as the system makes the determination of human or bot it ends the Grace Interval and stops checking for bots. The default setting for the Grace Interval is 100 requests. Once the system determines that the client is valid, the system does not check the subsequent requests as specified in the Safe Interval setting. This setting allows for normal client activity to continue since the ASM has determined the client is safe (during the Grace Interval). Once the number of requests sent by the client reaches the value specified in the Safe Interval setting, the system reactivates the Grace Interval and begins the process again. The default setting for the Safe Interval is 2000 requests. This Safe Interval is nice because it lowers the processing overhead needed to constantly check every client request. If the system does not detect a valid client during the Grace Interval, the system issues and continues to issue the "Web Scraping Detected" violation until it reaches the number of requests specified in the Unsafe Interval setting. The Unsafe Interval setting specifies the number of requests that the ASM considers unsafe. Much like in the Safe Interval, after the client sends the number of requests specified in the Unsafe Interval setting, the system reactivates the Grace Interval and begins the process again. The default setting for the Unsafe Interval is 100 requests. The following figure shows the settings for Bot Detection and the values associated with each setting. Interval Timing The following picture shows a timeline of client requests and the intervals associated with each request. In the example, the first 100 client requests will fall into the Grace Interval, and during this interval the ASM will be determining whether or not the client is a bot. Let's say a bot is detected at client request 100. Then, the ASM will immediately invoke the Unsafe Interval and the next 100 requests will be issued a "Web Scraping Detected" violation. When the Unsafe Interval is complete, the ASM reverts back to the Grace Interval. If, during the Grace Interval, the system determines that the client is a human, it does not check the subsequent requests at all (during the Safe Interval). Once the Safe Interval is complete, the system moves back into the Grace Interval and the process continues. Notice that the ASM is able to detect a bot before the Grace Interval is complete (as shown in the latter part of the diagram below). As soon as the system detects a bot, it immediately moves into the Unsafe Interval...even if the Grace Interval has not reached its set threshold. Setting Thresholds As you can see from the timeline above, it's important to establish the correct thresholds for each interval setting. The longer you make the Grace Interval, the longer you give the ASM a chance to detect a bot, but keep in mind that the processing overhead can become expensive. Likewise, the Unsafe Interval setting is a great feature, but if you set it too high, your requesting clients will have to sit through a long period of violation notices before they can access your site again. Finally, the Safe Interval setting allows your users free and open access to your site. If you set this too low, you will force the system to cycle through the Grace Interval unnecessarily, but if you set it too high, a bot might have a chance to sneak past the ASM defense and scrape your site. Remember, the ASM does not check client requests at all during the Safe Interval. Also, remember the ASM does not perform web scraping detection on traffic from search engines that the system recognizes as being legitimate. If your web application has its own search engine, it's recommended that you add it to the system. Go to Security > Options > Application Security > Advanced Configuration > Search Engines and add it to the list (the ASM comes preconfigured with Ask, Bing, Google, and Yahoo already loaded). A Quick Test I loaded up a sample virtual web server (in this case it was a fictitious online auction site) and then configured the ASM to Alarm and Block bot activity on the site. Then, I fired up the iMacro plugin from Firefox to scrape the site. Using the iMacro plugin, I sent many client requests in a short amount of time. After several requests to the site, I received the response page shown below. You can see that the response page settings in the ASM are shown in the Firefox browser window when web scraping is detected. These settings can be adjusted in the ASM by navigating to Security > Application Security > Blocking > Response Pages. Well, thanks for coming back and reading about ASM bot detection. Be sure to swing by again for the final web scraping article where I will discuss session anomalies. I can't possibly think of anything that could be more fun than that!1.9KViews1like0Comments