active/active Support Declarative Onboarding
I tried to deploy a DO with a custom trafficGroup named traffic-group-2. This traffic Group is then referenced in the self-ip declaration.When sending the post request I get the answer: "errors": [ { "keyword": "enum", "dataPath": ".declaration.Common['DMZLAN_TG2_1'].trafficGroup", "schemaPath": "#/allOf/7/then/properties/trafficGroup/enum", "params": { "allowedValues": [ "traffic-group-local-only", "traffic-group-1" ] }, "message": "should be equal to one of the allowed values" }, Which makes sense because the appendix of self ip names only tg-1 & tg-local-only as possible values. But does that mean there is no way to create a active/active cluster with DO? If so why is the feature to define traffic-groups available in the first place?3Views0likes0Comments
Error while running ansible
I am getting the following error when I am trying to run ansible script on f5 instance through jumphost The full traceback is: Traceback (most recent call last): File "/Library/Frameworks/Python.framework/Versions/3.12/lib/python3.12/urllib/request.py", line 1344, in do_open h.request(req.get_method(), req.selector, req.data, headers, File "/Library/Frameworks/Python.framework/Versions/3.12/lib/python3.12/http/client.py", line 1336, in request self._send_request(method, url, body, headers, encode_chunked) File "/Library/Frameworks/Python.framework/Versions/3.12/lib/python3.12/http/client.py", line 1382, in _send_request self.endheaders(body, encode_chunked=encode_chunked) File "/Library/Frameworks/Python.framework/Versions/3.12/lib/python3.12/http/client.py", line 1331, in endheaders self._send_output(message_body, encode_chunked=encode_chunked) File "/Library/Frameworks/Python.framework/Versions/3.12/lib/python3.12/http/client.py", line 1091, in _send_output self.send(msg) File "/Library/Frameworks/Python.framework/Versions/3.12/lib/python3.12/http/client.py", line 1035, in send self.connect() File "/Library/Frameworks/Python.framework/Versions/3.12/lib/python3.12/http/client.py", line 1477, in connect self.sock = self._context.wrap_socket(self.sock, ^^^^^^^^^^^^^^^^^^^^^^^^^^^^^^^^^^^^ File "/Library/Frameworks/Python.framework/Versions/3.12/lib/python3.12/ssl.py", line 455, in wrap_socket return self.sslsocket_class._create( ^^^^^^^^^^^^^^^^^^^^^^^^^^^^^ File "/Library/Frameworks/Python.framework/Versions/3.12/lib/python3.12/ssl.py", line 1042, in _create self.do_handshake() File "/Library/Frameworks/Python.framework/Versions/3.12/lib/python3.12/ssl.py", line 1320, in do_handshake self._sslobj.do_handshake() ssl.SSLError: [SSL: WRONG_VERSION_NUMBER] wrong version number (_ssl.c:1000) During handling of the above exception, another exception occurred: Traceback (most recent call last): File "/Users/pranaychowd.pinapaka/.ansible/tmp/ansible-tmp-1714109490.0885582-73185-193526554178977/AnsiballZ_bigip_command.py", line 107, in <module> _ansiballz_main() File "/Users/pranaychowd.pinapaka/.ansible/tmp/ansible-tmp-1714109490.0885582-73185-193526554178977/AnsiballZ_bigip_command.py", line 99, in _ansiballz_main invoke_module(zipped_mod, temp_path, ANSIBALLZ_PARAMS) File "/Users/pranaychowd.pinapaka/.ansible/tmp/ansible-tmp-1714109490.0885582-73185-193526554178977/AnsiballZ_bigip_command.py", line 47, in invoke_module runpy.run_module(mod_name='ansible_collections.f5networks.f5_modules.plugins.modules.bigip_command', init_globals=dict(_module_fqn='ansible_collections.f5networks.f5_modules.plugins.modules.bigip_command', _modlib_path=modlib_path), File "<frozen runpy>", line 226, in run_module File "<frozen runpy>", line 98, in _run_module_code File "<frozen runpy>", line 88, in _run_code File "/var/folders/4c/dnty3w814gxd01c5lq6910nr0000gn/T/ansible_bigip_command_payload_rjjis8dv/ansible_bigip_command_payload.zip/ansible_collections/f5networks/f5_modules/plugins/modules/bigip_command.py", line 757, in <module> File "/var/folders/4c/dnty3w814gxd01c5lq6910nr0000gn/T/ansible_bigip_command_payload_rjjis8dv/ansible_bigip_command_payload.zip/ansible_collections/f5networks/f5_modules/plugins/modules/bigip_command.py", line 750, in main File "/var/folders/4c/dnty3w814gxd01c5lq6910nr0000gn/T/ansible_bigip_command_payload_rjjis8dv/ansible_bigip_command_payload.zip/ansible_collections/f5networks/f5_modules/plugins/modules/bigip_command.py", line 680, in exec_module File "/var/folders/4c/dnty3w814gxd01c5lq6910nr0000gn/T/ansible_bigip_command_payload_rjjis8dv/ansible_bigip_command_payload.zip/ansible_collections/f5networks/f5_modules/plugins/modules/bigip_command.py", line 631, in exec_module File "/var/folders/4c/dnty3w814gxd01c5lq6910nr0000gn/T/ansible_bigip_command_payload_rjjis8dv/ansible_bigip_command_payload.zip/ansible_collections/f5networks/f5_modules/plugins/module_utils/icontrol.py", line 551, in tmos_version File "/var/folders/4c/dnty3w814gxd01c5lq6910nr0000gn/T/ansible_bigip_command_payload_rjjis8dv/ansible_bigip_command_payload.zip/ansible_collections/f5networks/f5_modules/plugins/module_utils/bigip.py", line 31, in api File "/var/folders/4c/dnty3w814gxd01c5lq6910nr0000gn/T/ansible_bigip_command_payload_rjjis8dv/ansible_bigip_command_payload.zip/ansible_collections/f5networks/f5_modules/plugins/module_utils/bigip.py", line 52, in connect_via_token_auth File "/var/folders/4c/dnty3w814gxd01c5lq6910nr0000gn/T/ansible_bigip_command_payload_rjjis8dv/ansible_bigip_command_payload.zip/ansible_collections/f5networks/f5_modules/plugins/module_utils/icontrol.py", line 239, in post File "/var/folders/4c/dnty3w814gxd01c5lq6910nr0000gn/T/ansible_bigip_command_payload_rjjis8dv/ansible_bigip_command_payload.zip/ansible_collections/f5networks/f5_modules/plugins/module_utils/icontrol.py", line 194, in send File "/var/folders/4c/dnty3w814gxd01c5lq6910nr0000gn/T/ansible_bigip_command_payload_rjjis8dv/ansible_bigip_command_payload.zip/ansible/module_utils/urls.py", line 1578, in open File "/Library/Frameworks/Python.framework/Versions/3.12/lib/python3.12/urllib/request.py", line 215, in urlopen return opener.open(url, data, timeout) ^^^^^^^^^^^^^^^^^^^^^^^^^^^^^^^ File "/Library/Frameworks/Python.framework/Versions/3.12/lib/python3.12/urllib/request.py", line 515, in open response = self._open(req, data) ^^^^^^^^^^^^^^^^^^^^^ File "/Library/Frameworks/Python.framework/Versions/3.12/lib/python3.12/urllib/request.py", line 532, in _open result = self._call_chain(self.handle_open, protocol, protocol + ^^^^^^^^^^^^^^^^^^^^^^^^^^^^^^^^^^^^^^^^^^^^^^^^^^^^^^^ File "/Library/Frameworks/Python.framework/Versions/3.12/lib/python3.12/urllib/request.py", line 492, in _call_chain result = func(*args) ^^^^^^^^^^^ File "/var/folders/4c/dnty3w814gxd01c5lq6910nr0000gn/T/ansible_bigip_command_payload_rjjis8dv/ansible_bigip_command_payload.zip/ansible/module_utils/urls.py", line 605, in https_open File "/Library/Frameworks/Python.framework/Versions/3.12/lib/python3.12/urllib/request.py", line 1347, in do_open raise URLError(err) urllib.error.URLError: <urlopen error [SSL: WRONG_VERSION_NUMBER] wrong version number (_ssl.c:1000)> fatal: [hostip ]: FAILED! => { "changed": false, "module_stderr": "Traceback (most recent call last):\n File \"/Library/Frameworks/Python.framework/Versions/3.12/lib/python3.12/urllib/request.py\", line 1344, in do_open\n h.request(req.get_method(), req.selector, req.data, headers,\n File \"/Library/Frameworks/Python.framework/Versions/3.12/lib/python3.12/http/client.py\", line 1336, in request\n .. . . . payload.zip/ansible_collections/f5networks/f5_modules/plugins/module_utils/bigip.py\", line 52, in connect_via_token_auth\n File \"/var/folders/4c/dnty3w814gxd01c5lq6910nr0000gn/T/ansible_bigip_command_payload_rjjis8dv/ansible_bigip_command_payload.zip/ansible_collections/f5networks/f5_modules/plugins/module_utils/icontrol.py\", line 239, in post\n File \"/var/folders/4c/dnty3w814gxd01c5lq6910nr0000gn/T/ansible_bigip_command_payload_rjjis8dv/ansible_bigip_command_payload.zip/ansible_collections/f5networks/f5_modules/plugins/module_utils/icontrol.py\", line 194, in send\n File \"/var/folders/4c/dnty3w814gxd01c5lq6910nr0000gn/T/ansible_bigip_command_payload_rjjis8dv/ansible_bigip_command_payload.zip/ansible/module_utils/urls.py\", line 1578, in open\n File \"/Library/Frameworks/Python.framework/Versions/3.12/lib/python3.12/urllib/request.py\", line 215, in urlopen\n return opener.open(url, data, timeout)\n ^^^^^^^^^^^^^^^^^^^^^^^^^^^^^^^\n File \"/Library/Frameworks/Python.framework/Versions/3.12/lib/python3.12/urllib/request.py\", line 515, in open\n response = self._open(req, data)\n ^^^^^^^^^^^^^^^^^^^^^\n File \"/Library/Frameworks/Python.framework/Versions/3.12/lib/python3.12/urllib/request.py\", line 532, in _open\n result = self._call_chain(self.handle_open, protocol, protocol +\n ^^^^^^^^^^^^^^^^^^^^^^^^^^^^^^^^^^^^^^^^^^^^^^^^^^^^^^^\n File \"/Library/Frameworks/Python.framework/Versions/3.12/lib/python3.12/urllib/request.py\", line 492, in _call_chain\n result = func(*args)\n ^^^^^^^^^^^\n File \"/var/folders/4c/dnty3w814gxd01c5lq6910nr0000gn/T/ansible_bigip_command_payload_rjjis8dv/ansible_bigip_command_payload.zip/ansible/module_utils/urls.py\", line 605, in https_open\n File \"/Library/Frameworks/Python.framework/Versions/3.12/lib/python3.12/urllib/request.py\", line 1347, in do_open\n raise URLError(err)\nurllib.error.URLError: <urlopen error [SSL: WRONG_VERSION_NUMBER] wrong version number (_ssl.c:1000)>\n", "module_stdout": "", "msg": "MODULE FAILURE\nSee stdout/stderr for the exact error", "rc": 1 }26Views0likes1CommentConverting config to DO
Is it possible to convert a existing ucs file or bigip_base.conf into a DO-Declaration? I have tried using the Docker-ACC but from the base.conf I only get a very small ammount of data back and when using the ucs file as input I get lots of output as expected but its normal config (vs, pools ...), not things like DNS, Network Interfaces or NTP Settings. I used docker run --rm -v "$PWD":/app/data f5devcentral/f5-automation-config-converter –declarative-onboarding -o data/do-adc1.json -c data/bigip_base.conf -as3-not-converted docker run --rm -v "$PWD":/app/data f5devcentral/f5-automation-config-converter -o data/do-wafi1.json -u data/waf1.ucs –declarative-onboarding --log convert.log31Views0likes1CommentScalable AI Deployment: Harnessing OpenVINO and NGINX Plus for Efficient Inference
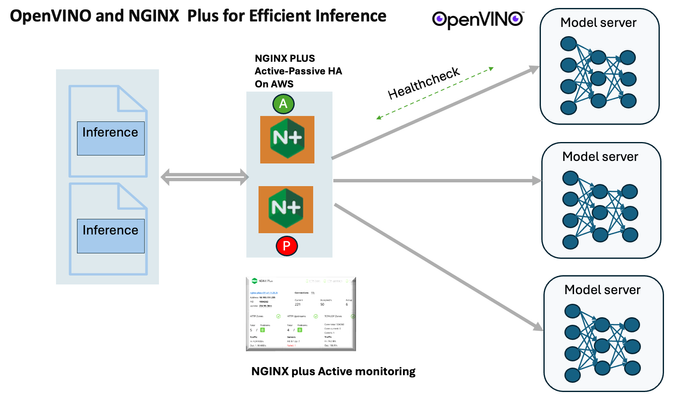
Introduction In the realm of artificial intelligence (AI) and machine learning (ML), the need for scalable and efficient AI inference solutions is paramount. As organizations deploy increasingly complex AI models to solve real-world problems, ensuring that these models can handle high volumes of inference requests becomes critical. NGINX Plus serves as a powerful ally in managing incoming traffic efficiently. As a high-performance web server and reverse proxy server, NGINX Plus is adept at load balancing and routing incoming HTTP and TCP traffic across multiple instances of AI model serving environments. The OpenVINO Model Server, powered by Intel's OpenVINO toolkit, is a versatile inference server supporting various deep learning frameworks and hardware acceleration technologies. It allows developers to deploy and serve AI models efficiently, optimizing performance and resource utilization. When combined with NGINX Plus capabilities, developers can create resilient and scalable AI inference solutions capable of handling high loads and ensuring high availability. Health checks allow NGINX Plus to continuously monitor the health of the upstream OVMS instances. If an OVMS instance becomes unhealthy or unresponsive, NGINX Plus can automatically route traffic away from it, ensuring that inference requests are processed only by healthy OVMS instances. Health checks provide real-time insights into the health status of OVMS instances. Administrators can monitor key metrics such as response time, error rate, and availability, allowing them to identify and address issues proactively before they impact service performance. In this article, we'll delve into the symbiotic relationship between the OpenVINO Model Server, and NGINX Plus to construct a robust and scalable AI inference solution. We'll explore setting up the environment, configuring the model server, harnessing NGINX Plus for load balancing, and conducting testing. By the end, readers will gain insights into how to leverage Docker, the OpenVINO Model Server, and NGINX Plus to build scalable AI inference systems tailored to their specific needs. Flow explanation: Now, let's walk through the flow of a typical inference request. When a user submits an image of a zebra for inference, the request first hits the NGINX load balancer. The load balancer then forwards the request to one of the available OpenVINO Model Server containers, distributing the workload evenly across multiple containers. The selected container processes the image using the optimized deep-learning model and returns the inference results to the user. In this case, the object is named zebra. OpenVINO™ Model Server is a scalable, high-performance solution for serving machine learning models optimized for Intel® architectures. The server provides an inference service via gRPC, REST API, or C API -- making it easy to deploy new algorithms and AI experiments. You can visit https://hub.docker.com/u/openvino for reference. Setting up: We'll begin by deploying model servers within containers. For this use case, I'm deploying the model server on a virtual machine (VM). Let's outline the steps to accomplish this: Get the docker image for OpenVINO ONNX run time docker pull openvino/onnxruntime_ep_ubuntu20 You can also visit https://docs.openvino.ai/nightly/ovms_docs_deploying_server.html for OpenVINO model server deployment in a container environment. Begin by creating a docker-compose file following the structure below: https://raw.githubusercontent.com/f5businessdevelopment/F5openVino/main/docker-compose.yml version: '3' services: resnet1: image: openvino/model_server:latest command: > --model_name=resnet --model_path=/models/resnet50 --layout=NHWC:NCHW --port=9001 volumes: - ./models:/models ports: - "9001:9001" resnet2: image: openvino/model_server:latest command: > --model_name=resnet --model_path=/models/resnet50 --layout=NHWC:NCHW --port=9002 volumes: - ./models:/models ports: - "9002:9002" # Add more services for additional containers resnet3: image: openvino/model_server:latest command: > --model_name=resnet --model_path=/models/resnet50 --layout=NHWC:NCHW --port=9003 volumes: - ./models:/models ports: - "9003:9003" resnet4: image: openvino/model_server:latest command: > --model_name=resnet --model_path=/models/resnet50 --layout=NHWC:NCHW --port=9004 volumes: - ./models:/models ports: - "9004:9004" resnet5: image: openvino/model_server:latest command: > --model_name=resnet --model_path=/models/resnet50 --layout=NHWC:NCHW --port=9005 volumes: - ./models:/models ports: - "9005:9005" resnet6: image: openvino/model_server:latest command: > --model_name=resnet --model_path=/models/resnet50 --layout=NHWC:NCHW --port=9006 volumes: - ./models:/models ports: - "9006:9006" resnet7: image: openvino/model_server:latest command: > --model_name=resnet --model_path=/models/resnet50 --layout=NHWC:NCHW --port=9007 volumes: - ./models:/models ports: - "9007:9007" resnet8: image: openvino/model_server:latest command: > --model_name=resnet --model_path=/models/resnet50 --layout=NHWC:NCHW --port=9008 volumes: - ./models:/models ports: - "9008:9008" Make sure you have Docker and Docker Compose installed on your system. Place your model files in the `./models/resnet50` directory on your local machine. Save the provided Docker Compose configuration to a file named `docker-compose.yml`. Run the following command in the directory containing the `docker-compose.yml` file to start the services: docker-compose up -d You can now access the OpenVINO Model Server instances using the specified ports (e.g., `http://localhost:9001` for `resnet1` and `http://localhost:9002` for `resnet2`). - Ensure that the model files are correctly placed in the `./models/resnet50` directory before starting the services. Set up an NGINX Plus proxy server. You can refer to https://docs.nginx.com/nginx/admin-guide/installing-nginx/installing-nginx-plus/ for NGINX Plus installation also You have the option to configure VMs with NGINX Plus on AWS by either: Utilizing the link provided below, which guides you through setting up NGINX Plus on AWS via the AWS Marketplace: NGINX Plus on AWS Marketplace or Following the instructions available on GitHub at the provided repository link. This repository facilitates spinning up VMs using Terraform on AWS and deploying VMs with NGINX Plus under the GitHub repository - F5 OpenVINO The NGINX Plus proxy server functions as a proxy for upstream model servers. Within the upstream block, backend servers (model_servers) are defined along with their respective IP addresses and ports. In the server block, NGINX listens on port 80 to handle incoming HTTP/2 requests targeting the specified server name or IP address. Requests directed to the root location (/) are then forwarded to the upstream model servers utilizing the gRPC protocol. The proxy_set_header directives are employed to maintain client information integrity while passing requests to the backend servers. Ensure to adjust the IP addresses, ports, and server names according to your specific setup. Here is an example configuration that is also available at GitHubhttps://github.com/f5businessdevelopment/F5openVino upstream model_servers { server 172.17.0.1:9001; server 172.17.0.1:9002; server 172.17.0.1:9003; server 172.17.0.1:9004; server 172.17.0.1:9005; server 172.17.0.1:9006; server 172.17.0.1:9007; server 172.17.0.1:9008; zone model_servers 64k; } server { listen 80 http2; server_name 10.0.0.19; # Replace with your domain or public IP location / { grpc_pass grpc://model_servers; health_check type=grpc grpc_status=12; # 12=unimplemented proxy_set_header Host $host; proxy_set_header X-Real-IP $remote_addr; proxy_set_header X-Forwarded-For $proxy_add_x_forwarded_for; } } If you are using gRPC with SSL please refer to the detailed configuration at NGINX Plus SSL Configuration Here is the explanation: upstream model_servers { server 172.17.0.1:9001; # Docker bridge network IP and port for your container server 172.17.0.1:9002; # Docker bridge network IP and port for your container .... .... } This section defines an upstream block named model_servers, which represents a group of backend servers. In this case, there are two backend servers defined, each with its IP address and port. These servers are typically the endpoints that NGINX will proxy requests to. server { listen 80 http2; server_name 10.1.1.7; # Replace with your domain or public IP This part starts with the main server block. It specifies that NGINX should listen for incoming connections on port 80 using the HTTP/2 protocol (http2), and it binds the server to the IP address 10.1.1.7. Replace this IP address with your domain name or public IP address. location / { grpc_pass grpc://model_servers; health_check type=grpc grpc_status=12; # 12=unimplemented proxy_set_header Host $host; proxy_set_header X-Real-IP $remote_addr; proxy_set_header X-Forwarded-For $proxy_add_x_forwarded_for; } Within the location/block, NGINX defines how to handle requests to the root location. In this case, it's using gRPC (grpc_pass grpc://model_servers;) to pass the requests to the upstream servers defined in the model_servers block. The proxy_set_header directives are used to set headers that preserve client information when passing requests to the backend servers. These headers include Host, X-Real-IP, and X-Forwarded-For. Health checks with type=grpc enable granular monitoring of individual gRPC services and endpoints. You can verify the health of specific gRPC methods or functionalities, ensuring each service component is functioning correctly. In summary, this NGINX configuration sets up a reverse proxy server that listens for HTTP/2 requests on port 80 and forwards them to backend servers (model_servers) using the gRPC protocol. It's commonly used for load balancing or routing requests to multiple backend servers. Inference Testing: This is how you can conduct testing. On the client side, we utilize a script named predict.py. Below is the script for reference # Import necessary libraries import numpy as np from classes import imagenet_classes from ovmsclient import make_grpc_client # Create a gRPC client to communicate with the server # Replace "10.1.1.7:80" with the IP address and port of your server client = make_grpc_client("10.1.1.7:80") # Open the image file "zebra.jpeg" in binary read mode with open("zebra.jpeg", "rb") as f: img = f.read() # Send the image data to the server for prediction using the "resnet" model output = client.predict({"0": img}, "resnet") # Extract the index of the predicted class with the highest probability result_index = np.argmax(output[0]) # Print the predicted class label using the imagenet_classes dictionary print(imagenet_classes[result_index]) This script imports necessary libraries, establishes a connection to the server at the specified IP address and port, reads an image file named "zebra.jpeg," sends the image data to the server for prediction using the "resnet" model, retrieves the predicted class index with the highest probability, and prints the corresponding class label. Results: Execute the following command from the client machine. Here, we are transmitting this image of Zebra to the model server. python3 predict.py zebra.jpg #run the Inference traffic zebra. The prediction output is 'zebra'. Let's now examine the NGINX Plus logs cat /var/log/nginx/access.log 10.1.1.7 - - [13/Apr/2024:00:18:52 +0000] "POST /tensorflow.serving.PredictionService/Predict HTTP/2.0" 200 4033 "-" "grpc-python/1.62.1 grpc-c/39.0.0 (linux; chttp2)" This log entry shows that a POST request was made to the NGINX server at the specified timestamp, and the server responded with a success status code (200). The request was made using gRPC, as indicated by the user agent string. Conclusion: Using NGINX Plus, organizations can achieve a scalable and efficient AI inference solution. NGINX Plus can address disruptions caused by connection timeouts/errors, sudden spikes in request rates, or changes in network topology. OpenVINO Model Server optimizes model performance and inference speed, utilizing Intel hardware acceleration for enhanced efficiency. NGINX Plus acts as a high-performance load balancer, distributing incoming requests across multiple model server instances for improved scalability and reliability. Together, this enables seamless scaling of AI inference workloads, ensuring optimal performance and resource utilization. You can look at this video for reference: https://youtu.be/Sd99woO9FmQ References: https://hub.docker.com/u/openvino https://docs.nginx.com/nginx/deployment-guides/amazon-web-services/high-availability-keepalived/ https://www.nginx.com/blog/nginx-1-13-10-grpc/ https://github.com/f5businessdevelopment/F5openVino.git https://docs.openvino.ai/nightly/ovms_docs_deploying_server.html287Views0likes0Comments
Rundeck ansible F5 errors
We use rundeck to deploy some code and within that code we take advantage of the ansible to remove hosts in and out of the respective pool in the F5. Recently we upgraded to a new version of rundeck and the latest version of ansible. I've seen other posts where someone took out the delegate_to: line and that fixed it. I can do that or install a legacy version of ansible. Here is debug output from the failed task: TASK [f5_modify : Disable from pool -Test-API-8080] ********* fatal: [hostname.example.com -> localhost]: FAILED! => {"changed": false, "msg": "argument 'server_port' is of type <class 'NoneType'> found in 'provider'. and we were unable to convert to int: <class 'NoneType'> cannot be converted to an int"} PLAY RECAP ********************************************************************* hostname.example.com : ok=1 changed=0 unreachable=0 failed=1 skipped=0 rescued=0 ignored=0 ansible code: --- - name: "Disable from pool {{ pool_name }}" bigip_pool_member: provider: server: "{{ f5_ipaddress }}" user: "{{ f5_user }}" password: "{{ f5_pwd }}" validate_certs: "no" transport: "rest" state: forced_offline pool: "{{ pool_name }}" partition: "Common" host: "{{ansible_default_ipv4.address}}" port: "{{ pool_member_port }}" delegate_to: localhost when: action == "disable" tags: f5_manage # Enable pool member again if the deploy type is rolling, or the env is not prod - name: "Enable in pool {{ pool_name }}" bigip_pool_member: provider: server: "{{ f5_ipaddress }}" user: "{{ f5_user }}" password: "{{ f5_pwd }}" validate_certs: "no" transport: "rest" state: enabled pool: "{{ pool_name }}" partition: "Common" host: "{{ansible_default_ipv4.address}}" port: "{{ pool_member_port }}" delegate_to: localhost when: action == "enable" tags: f5_manage - name: Wait for clients to gracefully bleed off the server wait_for: host: "{{ansible_default_ipv4.address}}" port: "{{ pool_member_port }}" delay: 5 timeout: 120 state: drained ignore_errors: True when: - action == "disable" - deploy_type == "rolling" tags: f5_manage30Views0likes1Comment
Getting Started with iRules LX, Part 4: NPM & Best Practices
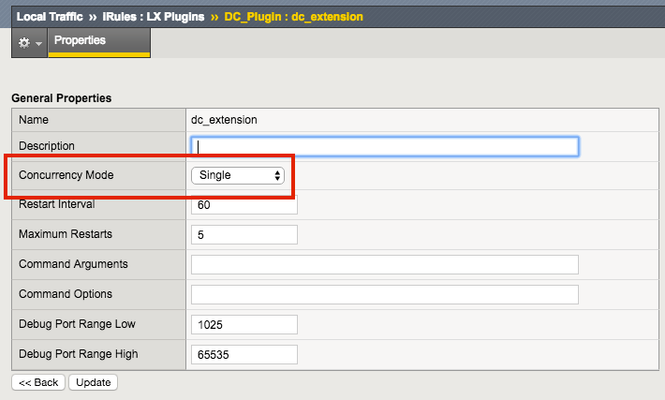
So far in this series we've covered basic nomenclature and concepts, and in the last article actually dug into the code that makes it all work. At this point, I'm sure the wheels of possibilities are turning in your minds, cooking up all the nefarious interesting ways to extend your iRules repertoire. The great thing about iRules LX, as we'll discuss in the onset of this article, is that a lot of the heavy lifting has probably already been done for you. The Node.js package manager, or NPM, is a living, breathing, repository of 280,000+ modules you won't have to write yourself should you need them! Sooner or later you will find a deep desire or maybe even a need to install packages from NPM to help fulfill a use case. Installing packages with NPM NPM on BIG-IP works much of the same way you use it on a server. We recommend that you not install modules globally because when you export the workspace to another BIG-IP, a module installed globally won't be included in the workspace package. To install an NPM module, you will need to access the Bash shell of your BIG-IP. First, change directory to the extension directory that you need to install a module in. Note: F5 Development DOES NOT host any packages or provide any support for NPM packages in any way, nor do they provide security verification, code reviews, functionality checks, or installation guarantees for specific packages. They provide ONLY core Node.JS, which currently, is confined only to versions 0.12.15 and 6.9.1. The extension directory will be at /var/ilx/workspaces/<partition_name>/<workspace_name>/extensions/<extension_name>/ . Once there you can run NPM commands to install the modules as shown by this example (with a few ls commands to help make it more clear) - [root@test-ve:Active:Standalone] config # cd /var/ilx/workspaces/Common/DevCentralRocks/extensions/dc_extension/ [root@test-ve:Active:Standalone] dc_extension # ls index.js node_modules package.json [root@test-ve:Active:Standalone] dc_extension # npm install validator --save validator@5.3.0 node_modules/validator [root@test-ve:Active:Standalone] dc_extension # ls node_modules/ f5-nodejs validator The one caveat to installing NPM modules on the BIG-IP is that you can not install native modules. These are modules written in C++ and need to be complied. For obvious security reasons, TMOS does not have a complier. Best Practices Node Processes It would be great if you could spin up an unlimited amount of Node.js processes, but in reality there is a limit to what we want to run on the control plane of our BIG-IP. We recommend that you run no more than 50 active Node processes on your BIG-IP at one time (per appliance or per blade). Therefore you should size the usage of Node.js accordingly. In the settings for an extension of a LX plugin, you will notice there is one called concurrency - There are 2 possible concurrency settings that we will go over. Dedicated Mode This is the default mode for all extensions running in a LX Plugin. In this mode there is one Node.js process per TMM per extension in the plugin. Each process will be "dedicated" to a TMM. To know how many TMMs your BIG-IP has, you can run the following TMSH command - root@(test-ve)(cfg-sync Standalone)(Active)(/Common)(tmos) # show sys tmm-info | grep Sys::TMM Sys::TMM: 0.0 Sys::TMM: 0.1 This shows us we have 2 TMMs. As an example, if this BIG-IP had a LX plugin with 3 extensions, I would have a total of 6 Node.js processes. This mode is best for any type of CPU intensive operations, such as heavy parsing data or doing some type of lookup on every request, an application with massive traffic, etc. Single Mode In this mode, there is one Node.js process per extension in the plugin and all TMMs share this "single" process. For example, one LX plugin with 3 extensions will be 3 Node.js processes. This mode is ideal for light weight processes where you might have a low traffic application, only do a data lookup on the first connection and cache the result, etc. Node.js Process Information The best way to find out information about the Node.js processes on your BIG-IP is with the TMSH command show ilx plugin . Using this command you should be able to choose the best mode for your extension based upon the resource usage. Here is an example of the output - root@(test-ve)(cfg-sync Standalone)(Active)(/Common)(tmos) # show ilx plugin DC_Plugin --------------------------------- ILX::Plugin: DC_Plugin --------------------------------- State enabled Log Publisher local-db-publisher ------------------------------- | Extension: dc_extension ------------------------------- | Status running | CPU Utilization (%) 0 | Memory (bytes) | Total Virtual Size 1.1G | Resident Set Size 7.7K | Connections | Active 0 | Total 0 | RPC Info | Total 0 | Notifies 0 | Timeouts 0 | Errors 0 | Octets In 0 | Octets Out 0 | Average Latency 0 | Max Latency 0 | Restarts 0 | Failures 0 --------------------------------- | Extension Process: dc_extension --------------------------------- | Status running | PID 16139 | TMM 0 | CPU Utilization (%) 0 | Debug Port 1025 | Memory (bytes) | Total Virtual Size 607.1M | Resident Set Size 3.8K | Connections | Active 0 | Total 0 | RPC Info | Total 0 | Notifies 0 | Timeouts 0 | Errors 0 | Octets In 0 | Octets Out 0 | Average Latency 0 | Max Latency 0 From this you can get quite a bit of information, including which TMM the process is assigned to, PID, CPU, memory and connection stats. If you wanted to know the total number of Node.js processes, that same command will show you every process and it could get quite long. You can use this quick one-liner from the bash shell (not TMSH) to count the Node.js processes - [root@test-ve:Active:Standalone] config # tmsh show ilx plugin | grep PID | wc -l 16 File System Read/Writes Since Node.js on BIG-IP is pretty much stock Node, file system read/writes are possible but not recommended. If you would like to know more about this and other properties of Node.js on BIG-IP, please see AskF5 Solution ArticleSOL16221101. Note:NPMs with symlinks will no longer work in 14.1.0+ due to SELinux changes In the next article in this series we will cover troubleshooting and debugging.2.5KViews1like4CommentsDisk space full - what files, folders are safe to delete?
Hi I've searched Dev Central for help with clearing disk space. I am happy to use bash as I have now figured out how to display files within var/log directory and use the "rm" command to remove files. I can see the files within the var/log I have read articles about maintaining disk space. I have deleted ucs, software images. These files are at ".1 or .2.gz" 0 or not even on any of the F5 var/log directories /dev/mapper/vg--db--vda-dat.log 2.9G 2.9G 0 100% /var/log /dev/mapper/vg--db--vda-dat.share 15G 5.4G 8.5G 39% So far I have the above. What files are safe to delete from the /var/log or any other directories? Or can I delete file contents silently without affecting performance or service? What would be good bash commands to rm or clear files/ folders?61Views0likes4CommentsThe App Delivery Fabric with Secure Multicloud Networking
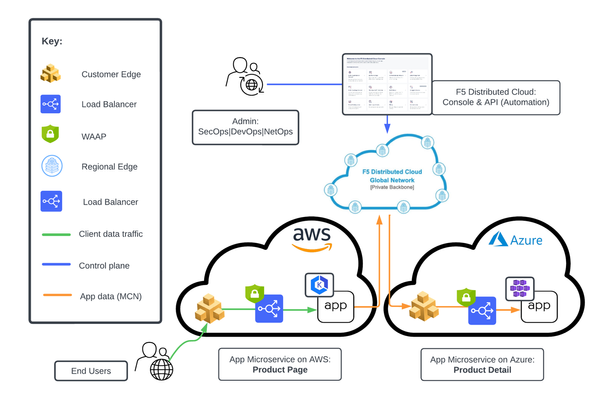
This tutorial with accompanying workflow guide deploys customer edge sites and uses Distributed Cloud Multicloud Networking App Connect to establish a Secure MCN App Delivery Fabric, enabling only Layer7 app connectivity between two cloud sites. Manual and automation workflows show how to make this NetOps and DevOps task come to life.152Views1like0CommentsUsing Distributed Application Security Policies in Secure Multicloud Networking Customer Edge Sites
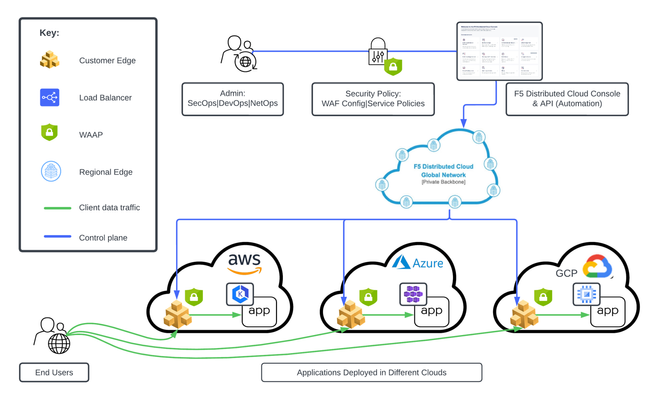
This tutorial and workflow guide deploys and uses F5 Distributed Cloud App Security policies with apps at local customer edge sites. Deploy a policy in any customer edge site regardless of location in the cloud or on-prem. Manual and automation workflows show how to make this NetOps and DevOps friendly solution come to life.220Views0likes0Comments