Let's Encrypt
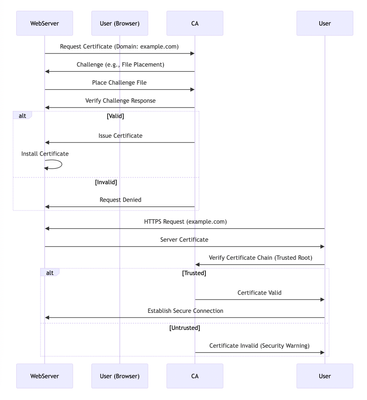
Let's Encrypt has revolutionized the way website owners implement HTTPS by offering free and automated SSL certificates, making secure connections accessible to everyone. This article delves into the technical aspects of Let's Encrypt, explaining how it establishes trust and secures your website. Before diving into Let's Encrypt, it's essential to understand the role of a Certificate Authority (CA). CAs are trusted entities that verify domain ownership and issue SSL certificates. They form the foundation of the Public Key Infrastructure (PKI) that enables secure communication on the internet. The Role of a Certificate Authority (CA): The process begins when a web server requests a certificate from the CA, specifying the domain name. The CA sends a challenge to validate the server's control over the domain. Upon successful validation, the CA issues an X.509/SSL/TLS certificate, which the server installs. When a user visits the website, their browser verifies the certificate's authenticity by checking the chain of trust back to a trusted root certificate. If the chain is valid, a secure connection is established. A critical role in this ecosystem is played by Certificate Authorities (CAs). CAs are trusted third-party entities responsible for: Domain Validation:CAs employ various mechanisms to validate the ownership or control of a domain name by the entity requesting the certificate. This validation process helps mitigate phishing attacks and ensures certificates are issued to legitimate entities. Public Key Infrastructure (PKI) Management:CAs operate within a Public Key Infrastructure (PKI) framework. They maintain a repository of trusted root certificates and issue intermediate certificates signed by a trusted root. Website administrators generate a public/private key pair, and the CA signs a certificate binding the public key to the validated domain identity. This signed certificate, containing the public key and domain information, is then installed on the web server. Trust Chain Establishment:Web browsers and operating systems come pre-loaded with a set of trusted root certificates issued by well-known CAs. When a user visits a website with a valid SSL/TLS certificate, the browser can verify the certificate's authenticity by chaining it back to a trusted root certificate, establishing a secure connection. This sequence below shows the role of a CA in the certificate issuance and validation process: Traditionally, obtaining certificates from CAs involved a manual enrollment process and significant costs. Let's Encrypt disrupted this model by offering free certificates through an automated process using the Automated Certificate Management Environment (ACME) protocol. ACME streamlines communication between web servers and the CA, automating the entire certificate lifecycle, including issuance and renewal. Let's Encrypt certificates have a short 90-day validity period to enhance security, and the automation ensures seamless renewal before expiration. This sequence shows the steps involved in obtaining a Let's Encrypt SSL/TLS certificate for a web server. Here's a breakdown: Requesting a Certificate:The web server software initiates the process by sending a request to Let's Encrypt CA, asking for a certificate. Challenge for Validation:Let's Encrypt CA responds by sending the web server a challenge. This challenge is designed to verify that the software requesting the certificate actually controls the domain name. A common challenge involves placing a specific file on the web server's directory. Responding to the Challenge:The web server software must complete the challenge. In this example, it would place the specific file in the designated directory on the server. Verification by Let's Encrypt:Once the web server software completes the challenge, Let's Encrypt CA verifies the response. Two Possible Outcomes: Success:If the challenge response is valid, Let's Encrypt CA issues a new SSL/TLS certificate for the web server's domain name. The web server software then downloads the certificate from Let's Encrypt CA. The downloaded certificate is installed on the web server. Finally, the web server is configured to enable HTTPS, which encrypts communication between the website and visitors. Failure:If the challenge response is invalid (e.g., the file wasn't placed correctly), Let's Encrypt CA informs the web server of the failure. In this case, the web server software would likely retry the entire process by requesting a new certificate again. Let's Encrypt and Key Pinning Let's Encrypt recently introduced new intermediate certificates to replace older ones that are nearing expiration. These new certificates are designed to be more secure and efficient. One of the goals is to discourage the use of an outdated practice known as key pinning. Key pinning refers to a security practice where software applications are configured to trust only a specific set of cryptographic keys issued by a certificate authority (CA). In the context of Let's Encrypt, this would involve an application trusting only a particular intermediate certificate used by Let's Encrypt to sign website certificates. There are a few reasons why Let's Encrypt discourages key pinning: Manual Updates:Key pinning typically requires manual updates whenever a certificate authority changes its certificates, which can be a cumbersome and error-prone process. Reduced Flexibility:Pinned keys limit your ability to benefit from security improvements or optimizations introduced by the CA's newer certificates. Potential Outages:If a pinned certificate expires or becomes invalid, applications that rely on it may malfunction or fail entirely, potentially leading to outages. Let's Encrypt argues that trusting the built-in trust store of your operating system or web browser is a more secure and flexible approach. These trust stores are automatically updated to reflect changes made by certificate authorities, reducing the risk of errors and outages. However, there are some niche cases where key pinning might still be considered justified. For instance, an organization might pin a key if they have a specific security requirement to strictly limit trusted certificates. Overall, Let's Encrypt's move to new intermediate certificates aims to improve security and efficiency while promoting a more automated and flexible approach to certificate trust management.425Views0likes0CommentsSSL Orchestrator Advanced Use Cases: Outbound SNAT Persistence
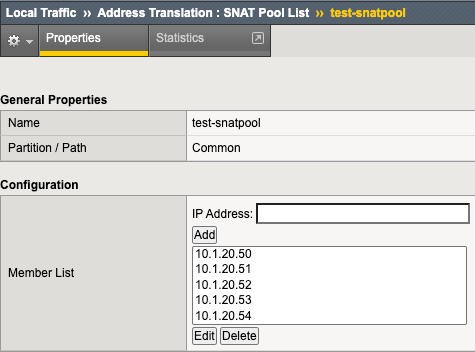
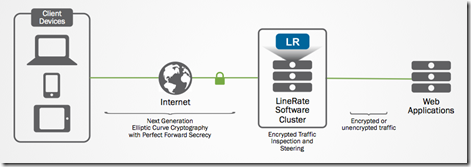
Introduction F5 BIG-IP is synonymous with "flexibility". You likely have few other devices in your architecture that provide the breadth of capabilities that come native with the BIG-IP platform. And for each and every BIG-IP product module, the opportunities to expand functionality are almost limitless. In this article series we examine the flexibility options of the F5 SSL Orchestrator in a set of "advanced" use cases. If you haven't noticed, the world has been steadily moving toward encrypted communications. Everything from web, email, voice, video, chat, and IoT is now wrapped in TLS, and that's a good thing. The problem is, malware - that thing that creates havoc in your organization, that exfiltrates personnel records to the Dark Web - isn't stopped by encryption. TLS 1.3 and multi-factor authentication don't eradicate malware. The only reasonable way to defend against it is to catch it in the act, and an entire industry of security products are designed for just this task. But ironically, encryption makes this hard. You can't protect against what you can't see. F5 SSL Orchestrator simplifies traffic decryption and malware inspection, and dynamically orchestrates traffic to your security stack. But it does much more than that. SSL Orchestrator is built on top of F5's BIG-IP platform, and as stated earlier, is abound with flexibility. SSL Orchestrator Use Case: Outbound SNAT Persistence It may not be the most obvious thing to think about persistence in the vein of outbound traffic. We are all groomed to accept that any given load balancer can handle persistence (or "affinity", or "stickiness") to backend servers. This is an important characteristic for sure. But in an outbound scenario, you don't load balance remote servers, so why on Earth would you need persistence? Well, I'm glad you asked. There indeed happens to be a somewhat unique, albeit infrequent use case where two different servers need to persist on YOUR IP address. The classic example is a site that requires federated authentication, where the service provider (SP) generates a token (perhaps a SAML auth request) and inside of that request the SP has embedded the client IP. The client receives this message and is redirected to the IdP to authenticate. But in this case the client is talking to the outside world through a forward proxy, and outbound source NAT (SNAT) could be required in this environment. That means there's a potential that the client IP address as seen from the two remote servers could be different. So if the IdP needs to verify the client IP based on what's embedded in the authentication request token, that could possibly fail. The good news here is that federated authentication doesn't normally require client IP verification, and there aren't many other similar use cases, but it can happen. The F5 BIG-IP, as with ANY proxy server, load balancer, or ADC device, clearly supports server affinity, and in a highly flexible way. But, as with ANY proxy server, load balancer, or ADC device, that doesn't apply to SNAT addresses. Nevertheless, the F5 BIG-IP can be configured to do this, which is exactly what this article is about. We're going to flex some BIG-IP muscle to derive a unique and innovative way to enable outbound SNAT persistence. What we're basically talking about is ensuring that a single internal client persists a single outbound SNAT IP address, when and where needed, and as long as possible. It's important to note here that we're not really talking about persistence in the same way you think about load balanced server affinity. With affinity, you're stapling a single (remote) client "session" to a single load balanced server. With SNAT persistence, you're stapling a single outbound SNAT IP to a single internal client so that all remote servers see that same source address. Same-same but different-different. To do this we'll need a SNAT pool and an iRule. We need the SNAT pool to define the SNAT addresses we can use. And since SNAT pools don't provide a persistence option like regular pools do, we'll use an iRule to provide the stickiness. It's also worth noting here, again since we're not really talking about load balancing stickiness, that the IP persistence mechanism in the iRule may not (likely will not) evenly distribute the IPs in the SNAT pool. Your best bet is to provide as many SNAT pool IPs as possible and reasonable. The good news here is that, because you're using a BIG-IP, you can define exactly how you assert that IP stickiness. In most cases, you'll probably just want to persist on the internal client IP, but you could also persist on: Client source address and remote server port Client source address and remote destination addresses Client source, day of the week, the year+month+day % mod 2, a hash of the word-of-the-day...and hopefully you get the idea. Lot's of options. To make this work, let's start with the SNAT pool. Navigate to Local Traffic -> Address Translation -> SNAT Pool List in the BIG-IP and click Create. In the Member List section, add as many SNAT IPs as you can afford. Remember, these are going to be IPs on your outbound VLAN, so in the same subnet as your outbound VLAN self-IP. Figure: SNAT pool list You don't need to assign the SNAT pool to anything directly. The iRule will handle that. And now onto the iRule. Navigate to Local Traffic -> iRules -> iRule List in the BIG-IP, and click Create. Copy the following into the iRule editor: when RULE_INIT { ## This iRule should be applied to your SSLO intercaption rule ending with in-t-4. catch { unset -nocomplain static::snat_ips } ## For each SNAT IP needed define the IP versus dynamically looking it up. ## These need to be in the real SNAT pool as well so ARP works. set static::snat_ips(1) 10.1.20.50 set static::snat_ips(2) 10.1.20.51 set static::snat_ips(3) 10.1.20.52 set static::snat_ips(4) 10.1.20.53 set static::snat_ips(5) 10.1.20.54 ## Set to how many SNAT IPs were added set static::array_size 5 } when CLIENT_ACCEPTED priority 100 { ## Select and uncomment only ONE of the below SNAT persistence options ## Persist SNAT based on client address only snat $static::snat_ips([expr {[crc32 [IP::client_addr]] % $static::array_size}]) ## Persist SNAT based on client address and remote port #snat $static::snat_ips([expr {[crc32 [IP::client_addr] [TCP::remote_port]] % $static::array_size}]) ## Persist SNAT based on client address and remote address #snat $static::snat_ips([expr {[crc32 [IP::client_addr] [IP::local_addr]] % $static::array_size}]) } Let's take a moment to explain what this iRule is actually doing, and it is fairly straightforward. In RULE_INIT, which fires ONCE when you update the iRule, the members of the defined SNAT pool are read into an array. Then a second static variable is created to store the size of the array. These values are stored as static, global variables. In CLIENT_ACCEPTED we set a priority of 100 to control the order of execution under SSL Orchestrator as there is already a CLIENT_ACCEPTED iRule event on the topology (we want our new event to run first). Below that you're provided with three choices for persistence: persist on source IP only, source IP and destination port, or source IP and destination IP. You'll want to uncomment only ONE of these. Each basically performs a quick CRC hash on the selected value, then calculates a modulus based on the array size. This returns a number within the size of the array, that is then applied as the index to the array to extract one of the array values. This calculation is always the same for the same input value(s), so effectively persisting on that value. The selected SNAT IP is then fed to the 'snat' command, and there you have it. As stated, you're probably only going to need the source-only persistence option. Using either of the others will pin a SNAT IP to a client IP and protocol port (ex. client IP:443 or client IP:80), or pin a SNAT IP to a specific host (ex. client IP:www.example.com), respectively. At the end of the day, you can insert any reasonable expression that will result in the selection of one of the values in the SNAT pool array, so the sky is really the limit here. The last step is easiest of all. You need to attach this iRule to your SSL Orchestrator topology. To do that. navigate to SSL Orchestrator -> Configuration in the UI, select the Interception Rules tab, and click to edit the respective outbound interception rule. Scroll to the bottom of this page, and under Resources, add the new iRule to the Selected column. The order doesn't matter. Click Deploy to complete the change, and you're done. You can do a packet capture on your outbound VLAN to see what is happening. tcpdump -lnni [outbound vlan] host 93.184.216.34 And then access https://www.example.com to test. For your IP address you should see a consistent outgoing SNAT IP. If you have access to a Linux client, you can add multiple IP addresses to an interface and test with each: ifconfig eth0:1 10.1.10.51 ifconfig eth0:2 10.1.10.52 ifconfig eth0:3 10.1.10.53 ifconfig eth0:4 10.1.10.54 ifconfig eth0:5 10.1.10.55 curl -vk https://www.example.com --interface 10.1.10.51 curl -vk https://www.example.com --interface 10.1.10.52 curl -vk https://www.example.com --interface 10.1.10.53 curl -vk https://www.example.com --interface 10.1.10.54 curl -vk https://www.example.com --interface 10.1.10.55 And again there you have it. In just a few steps you've been able to enable outbound SNAT persistence, and along the way you have hopefully recognized the immense flexibility at your command.1.7KViews1like5Comments
Understanding the Authenticate Name Option on Server SSL profile on BIG-IP
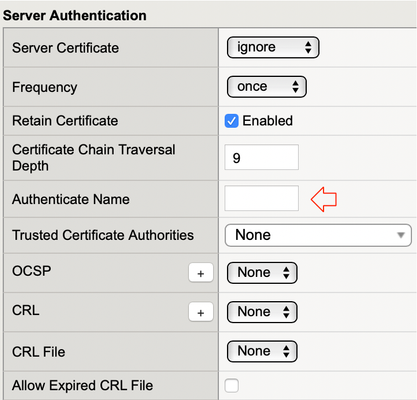
Quick Intro Have you ever wondered what this little option on Server SSL profile really does in practice? This is what this article is all about. If you're only interested about what I learnt during my lab tests, please feel free to read just Lab Test Results section. Otherwise, enjoy the lab walkthrough :) Lab Test Results In case you just want to know what it is, this setting looks at bothcommonNameandsubjectAltNameextension and if whatever name set on Authenticate Name doesn't match the name in any of these 2 fields I mentioned, certificate authentication fails and BIG-IP resets connection. Note: for Authenticate Name to work, Server Certificate has to be set to Require, i.e. BIG-IP should be configured to check the validity of Server Side certificate. On top of that,ca-file(Trusted Certificate Authorities in the GUI) is also required to be set, otherwise BIG-IP has no trusted Root CA list to validate server's certificate. What it is This is like another layer of authentication. When server sends us a Certificate andpeer-cert-modeis set to require, BIG-IP looks up Root CA present in ca-file and confirms that server's certificate is trusted. Then, whenauthenticate-nameis also set, BIG-IP checkssubjectAltNameextension andcommonNamefor a match of what we've typed in this field. If no match is found, certificate authentication fails and we do not trust certificate. Otherwise, certificate is trusted and we proceed with handshake. Lab Test When Authenticate Name does not match Certificate's commonName or subjectAltName I created an end-entity X.509v3 TLS Certificate and set commonName (CN) toserver1.rodrigoandsubjectAltNameextension toserver01.rodrigoas seen below: I set Server Certificate (peer-cert-mode in tmsh) to require, added the Root CA that signed back-end server's certificate to BIG-IP's Trusted Certificate Authorities (ca-file in tmsh) and authentication-name tofail.rodrigo: On Wireshark,we see that authentication fails as soon as we receiveCertificatemessage from server: Note: If we want BIG-IP to display the specific alert such as unknown_ca above, we need to disable generic-alert on Server SSL settings. It fails because fail.rodrigo is neither inCNnor insubjectAltName. I had set server1.rodrigo instead, remember? Let's break it down into more details: back-end server sends Certificate message to BIG-IP because peer-cert-mode is set to require, BIG-IP looks up the Root CA list in ca-file (root-ca.crt here) BIG-IP answers the following question: was back-end certificate signed by any of the certificates listed in root-ca.crt? If not, authentication fails immediately and we never get to use authenticate-name In this case it was, so BIG-IP moves on to check if fail.rodrigo is in either commonName or subjectAltName fields of back-end's X.509v3 certificate Because fail.rodrigo doesn't match server1.rodrigo, authentication fails and BIG-IP resets connection. When Authenticate Name matches Certificate's commonName or subjectAltName I've now set authenticate-name to server1.rodrigo and TLS handshake suceeds: Let's break it down into more details: back-end server sends Certificate message to BIG-IP because peer-cert-mode is set to require, BIG-IP looks up the Root CA list in ca-file (root-ca.crt here) BIG-IP answers the following question: was back-end certificate signed by any of the certificates listed in root-ca.crt? If not, authentication fails immediately and we never get to use authenticate-name In this case it was, so BIG-IP moves on to check if server1.rodrigo is in either commonName or subjectAltName fields of back-end's X.509v3 certificate Because server1.rodrigo matches server1.rodrigo in both commonName and SubjectAltName fields, authentication succeeds and TLS handshake proceeds If you ever wondered where to find commonName and SubjectAltName on TLS headers, here's where they are: The above snippet is from back-end's Certificate message that is sent to BIG-IP as part of TLS handshake. Hope that's helpful.1.7KViews3likes15CommentsHandling HTTP Requests on an HTTPS Virtual Server
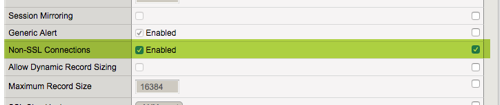
There are scenarios where it might be prudent to support HTTP request redirection on a single port, and thus, a single virtual server. Yes, this can be done with the alias port zero, but that locks all other ports down unless you plan to build out a pretty extensive iRule to support the various services required for each port. This latter option is less than ideal. So what can be done? TL;DR - only two steps required. First, check the Non-SSL Connections box in the SSL profile. Second, create an iRule to redirect non-SSL connections to SSL. The Details I have a test virtual server, appropriately called testvip, and on that testvip I have no iRules and a clientssl profile attached with only my certificate key chain changed from the parent profile. ltm virtual testvip { destination 192.168.102.50:https ip-protocol tcp mask 255.255.255.255 pool testpool profiles { cssl { context clientside } http { } tcp { } } source 0.0.0.0/0 source-address-translation { type automap } translate-address enabled translate-port enabled vs-index 50 } ltm profile client-ssl cssl { app-service none cert myssl.crt cert-key-chain { myssl { cert myssl.crt key myssl.key } } chain none defaults-from clientssl inherit-certkeychain false key myssl.key passphrase none } In this configuration, I expect that normal HTTPS requests will work just fine, and HTTP requests will fail. Let's take a look with curl, first with the working HTTPS and then the failing HTTP: (leaving curl details out for brevity here) ### HTTPS ### MY-MAC:~ rahm$ curl -v -s -k https://test.test.local/ 1> /dev/null -> HTTP/1.1 200 OK ### HTTP ### MY-MAC:~ rahm$ curl -v -s -k http://test.test.local:443 1> /dev/null -> Empty reply from server Now that we have confirmed that the regular HTTP request is not working, let's enable non-SSL connections. Again, that's done with the checkbox in the clientssl profile: Now let's try that second test again. ### HTTP ### MY-MAC:~ rahm$ curl -v -s -k http://test.test.local:443 1> /dev/null -> HTTP/1.1 200 OK That's pretty cool, we successfully made an HTTP request on the HTTPS single-port virtual server! But that's not the endgame, and is most certainly not a desired state. Let's take the final step with the iRule to capture any non-SSL connections and redirect them. Here's the iRule: when CLIENTSSL_HANDSHAKE { set https_state 1 } when HTTP_REQUEST { if { ![info exists https_state] } { HTTP::redirect https://[HTTP::host][HTTP::uri] } } This is optimized slightly from the original iRule from gasch that inspired this article. First, we look at the CLIENTSSL_HANDSHAKE event and set a variable to true to capture that this connection is indeed an SSL connection. Then in the HTTP_REQUEST event, if that variable doesn't exist, we know that the connection is not SSL and we take the redirect action. Simple and sleek! Now, with that iRule applied, let's test again: ### HTTP ### MY-MAC:~ rahm$ curl -v -s -k http://test.test.local:443 1> /dev/null * Rebuilt URL to: http://test.test.local:443/ * Trying 192.168.102.50... * TCP_NODELAY set * Connected to test.test.local (192.168.102.50) port 443 (#0) > GET / HTTP/1.1 > Host: test.test.local:443 > User-Agent: curl/7.54.0 > Accept: */* > * HTTP 1.0, assume close after body < HTTP/1.0 302 Found < Location: https://test.test.local:443/ < Server: BigIP * HTTP/1.0 connection set to keep alive! < Connection: Keep-Alive < Content-Length: 0 < * Connection #0 to host test.test.local left intact And there it is! You can see the HTTP request is accepted as previously, but instead of the 200 OK status, you get the 302 Found redirect. Sometimes things like this are solutions looking for problems, but conserving ports, IP space, configuration objects, etc, could all be factors.6.3KViews3likes9Comments
Implementing ECC+PFS on LineRate (Part 1/3): Choosing ECC Curves and Preparing SSL Certificates
(Editors note: the LineRate product has been discontinued for several years. 09/2023) --- Overview In case you missed it,Why ECC and PFS Matter: SSL offloading with LineRatedetails some of the reasons why ECC-based SSL has advantages over RSA cryptography for both performance and security. This article will generate all the necessary ECC certificates with the secp384r1 curve so that they may be used to configure an LineRate System for SSL Offload. Getting Started with LineRate In order to appreciate the advantages of SSL/TLS Offload available via LineRate as discussed in this article, let's take a closer look at how to configure SSL/TLS Offloading on a LineRate system. This example will implement Elliptical Curve Cryptography and Perfect Forward Secrecy. SSL Offloading will be added to an existing LineRate System that has one public-facing Virtual IP (10.10.11.11) that proxies web requests to a Real Server on an internal network (10.10.10.1). The following diagram demonstrates this configuration: Figure 1: A high-level implementation of SSL Offload Overall, these steps will be completed in order to enable SSL Offloading on the LineRate System: Generate a private key specifying the secp384r1 elliptic curve Obtain a certificate from a CA Configure an SSL profile and attach it to the Virtual IP Note that this implementation will enable only ECDHE cipher suites. ECDH cipher suites are available, but these do not implement the PFS feature. Further, in production deployments, considerations to implement additional types of SSL cryptography might be needed in order to allow backward compatibility for older clients. Generating a private key for Elliptical Curve Cryptography When considering the ECC curve to use for your environment, you may choose one from the currently available curves list in the LineRate documentation. It is important to be cognizant of the curve support for the browsers or applications your application targets using. Generally, the NIST P-256, P-384, and P-521 curves have the widest support. This example will use the secp384r1 (NIST P-384) curve, which provides an RSA equivalent key of 7680-bits. Supported curves with OpenSSL can be found by running the openssl ecparam -list_curves command, which may be important depending on which curve is chosen for your SSL/TLS deployment. Using OpenSSL, a private key is generated for use with ssloffload.lineratesystems.com. The ECC SECP curve over a 384-bit prime field (secp384r1) is specified: openssl ecparam -genkey -name secp384r1 -out ssloffload.lineratesystems.com.key.pem This command results in the following private key: -----BEGIN EC PARAMETERS----- BgUrgQQAIg== -----END EC PARAMETERS----- -----BEGIN EC PRIVATE KEY----- MIGkAgEBBDD1Kx9hghSGCTujAaqlnU2hs/spEOhfpKY9EO3mYTtDmKqkuJLKtv1P 1/QINzAU7JigBwYFK4EEACKhZANiAASLp1bvf/VJBJn4kgUFundwvBv03Q7c3tlX kh6Jfdo3lpP2Mf/K09bpt+4RlDKQynajq6qAJ1tJ6Wz79EepLB2U40fC/3OBDFQx 5gSjRp8Y6aq8c+H8gs0RKAL+I0c8xDo= -----END EC PRIVATE KEY----- Generating a Certificate Request (CSR) to provide the Certificate Authority (CA) After the primary key is obtained, a certificate request (CSR) can be created. Using OpenSSL again, the following command is issued filling out all relevant information in the successive prompts: openssl req -new -key ssloffload.lineratesystems.com.key.pem -out ssloffload.lineratesystems.com.csr.pem This results in the following CSR: -----BEGIN CERTIFICATE REQUEST----- MIIB3jCCAWQCAQAwga8xCzAJBgNVBAYTAlVTMREwDwYDVQQIEwhDb2xvcmFkbzET MBEGA1UEBxMKTG91aXN2aWxsZTEUMBIGA1UEChMLRjUgTmV0d29ya3MxGTAXBgNV BAsTEExpbmVSYXRlIFN5c3RlbXMxJzAlBgNVBAMTHnNzbG9mZmxvYWQubGluZXJh dGVzeXN0ZW1zLmNvbTEeMBwGCSqGSIb3DQEJARYPYS5yYWdvbmVAZjUuY29tMHYw EAYHKoZIzj0CAQYFK4EEACIDYgAEi6dW73/1SQSZ+JIFBbp3cLwb9N0O3N7ZV5Ie iX3aN5aT9jH/ytPW6bfuEZQykMp2o6uqgCdbSels+/RHqSwdlONHwv9zgQxUMeYE o0afGOmqvHPh/ILNESgC/iNHPMQ6oDUwFwYJKoZIhvcNAQkHMQoTCGNpc2NvMTIz MBoGCSqGSIb3DQEJAjENEwtGNSBOZXR3b3JrczAJBgcqhkjOPQQBA2kAMGYCMQCn h1NHGzigooYsohQBzf5P5KO3Z0/H24Z7w8nFZ/iGTEHa0+tmtGK/gNGFaSH1ULcC MQCcFea3plRPm45l2hjsB/CusdNo0DJUPMubLRZ5mgeThS/N6Eb0AHJSjBJlE1fI a4s= -----END CERTIFICATE REQUEST----- Obtaining a Certificate from a Certificate Authority (CA) Rather than using a self-signed certificate, a test certificate is obtained from Entrust. Upon completing the certificate request and receiving it from Entrust, a simple conversion needs to be done to PEM format. This can be done with the following OpenSSL command: openssl x509 -inform der -in ssloffload.lineratesystems.com.cer -out ssloffload.lineratesystems.com.cer.pem This results in the following certificate: -----BEGIN CERTIFICATE----- MIIC5jCCAm2gAwIBAgIETUKHWzAKBggqhkjOPQQDAzBtMQswCQYDVQQGEwJVUzEW MBQGA1UEChMNRW50cnVzdCwgSW5jLjEfMB0GA1UECxMWRm9yIFRlc3QgUHVycG9z ZXMgT25seTElMCMGA1UEAxMcRW50cnVzdCBFQ0MgRGVtb25zdHJhdGlvbiBDQTAe Fw0xNDA4MTExODQ3MTZaFw0xNDEwMTAxOTE3MTZaMGkxHzAdBgNVBAsTFkZvciBU ZXN0IFB1cnBvc2VzIE9ubHkxHTAbBgNVBAsTFFBlcnNvbmEgTm90IFZlcmlmaWVk MScwJQYDVQQDEx5zc2xvZmZsb2FkLmxpbmVyYXRlc3lzdGVtcy5jb20wdjAQBgcq hkjOPQIBBgUrgQQAIgNiAASLp1bvf/VJBJn4kgUFundwvBv03Q7c3tlXkh6Jfdo3 lpP2Mf/K09bpt+4RlDKQynajq6qAJ1tJ6Wz79EepLB2U40fC/3OBDFQx5gSjRp8Y 6aq8c+H8gs0RKAL+I0c8xDqjgeEwgd4wDgYDVR0PAQH/BAQDAgeAMB0GA1UdJQQW MBQGCCsGAQUFBwMBBggrBgEFBQcDAjA3BgNVHR8EMDAuMCygKqAohiZodHRwOi8v Y3JsLmVudHJ1c3QuY29tL0NSTC9lY2NkZW1vLmNybDApBgNVHREEIjAggh5zc2xv ZmZsb2FkLmxpbmVyYXRlc3lzdGVtcy5jb20wHwYDVR0jBBgwFoAUJAVL4WSCGvgJ zPt4eSH6cOaTMuowHQYDVR0OBBYEFESqK6HoSFIYkItcfekqqozX+z++MAkGA1Ud EwQCMAAwCgYIKoZIzj0EAwMDZwAwZAIwXWvK2++3500EVaPbwvJ39zp2IIQ98f66 /7fgroRGZ2WoKLBzKHRljVd1Gyrl2E3BAjBG9yPQqTNuhPKk8mBSUYEi/CS7Z5xt dXY/e7ivGEwi65z6iFCWuliHI55iLnXq7OU= -----END CERTIFICATE----- Note that the certificate generation process is very familiar with Elliptical Curve Cryptography versus traditional cryptographic algorithms like RSA. Only a few differences are found in the generation of the primary key where an ECC curve is specified. Continue the Configuration Now that the certificates needed to configure Elliptical Curve Cryptography have been created, it is now time to configure SSL Offloading on LineRate. Part 2: Configuring SSL Offload on LineRate continues the demonstration of SSL Offloading by importing the certificate information generated in this article and getting the system up and running. In case you missed it,Why ECC and PFS Matter: SSL offloading with LineRatedetails some of the reasons why ECC-based SSL has advantages over RSA cryptography for both performance and security. (Editors note: the LineRate product has been discontinued for several years. 09/2023) Stay Tuned! Next week a demonstration on how to verify a correct implementation of SSL with ECC+PFS on LineRate will make a debut on DevCentral. The article will detail how to check for ECC SSL on the wire via WireShark and in the browser. In the meantime, take some time to download LineRate and test out its SSL Offloading capabilities. In case you missed any content, or would like to reference it again, here are the articles related to implementing SSL Offload with ECC and PFS on LineRate: Why ECC and PFS Matter: SSL offloading with LineRate Implementing ECC+PFS on LineRate (Part 1/3): Choosing ECC Curves and Preparing SSL Certificates Implementing ECC+PFS on LineRate (Part 2/3): Configuring SSL Offload on LineRate Implementing ECC+PFS on LineRate (Part 3/3): Confirming the Operation of SSL Offloading385Views0likes0CommentsAutomate Let's Encrypt Certificates on BIG-IP
To quote the evil emperor Zurg: "We meet again, for the last time!" It's hard to believe it's been six years since my first rodeo with Let's Encrypt and BIG-IP, but (uncompromised) timestamps don't lie. And maybe this won't be my last look at Let's Encrypt, but it will likely be the last time I do so as a standalone effort, which I'll come back to at the end of this article. The first project was a compilation of shell scripts and python scripts and config files and well, this is no different. But it's all updated to meet the acme protocol version requirements for Let's Encrypt. Here's a quick table to connect all the dots: Description What's Out What's In acme client letsencrypt.sh dehydrated python library f5-common-python bigrest BIG-IP functionality creating the SSL profile utilizing an iRule for the HTTP challenge The f5-common-python library has not been maintained or enhanced for at least a year now, and I have an affinity for the good work Leo did with bigrest and I enjoy using it. I opted not to carry the SSL profile configuration forward because that functionality is more app-specific than the certificates themselves. And finally, whereas my initial project used the DNS challenge with the name.com API, in this proof of concept I chose to use an iRule on the BIG-IP to serve the challenge for Let's Encrypt to perform validation against. Whereas my solution is new, the way Let's Encrypt works has not changed, so I've carried forward the process from my previous article that I've now archived. I'll defer to their how it works page for details, but basically the steps are: Define a list of domains you want to secure Your client reaches out to the Let’s Encrypt servers to initiate a challenge for those domains. The servers will issue an http or dns challenge based on your request You need to place a file on your web server or a txt record in the dns zone file with that challenge information The servers will validate your challenge information and notify you You will clean up your challenge files or txt records The servers will issue the certificate and certificate chain to you You now have the key, cert, and chain, and can deploy to your web servers or in our case, to the BIG-IP Before kicking off a validation and generation event, the client registers your account based on your settings in the config file. The files in this project are as follows: /etc/dehydrated/config # Dehydrated configuration file /etc/dehydrated/domains.txt # Domains to sign and generate certs for /etc/dehydrated/dehydrated # acme client /etc/dehydrated/challenge.irule # iRule configured and deployed to BIG-IP by the hook script /etc/dehydrated/hook_script.py # Python script called by dehydrated for special steps in the cert generation process # Environment Variables export F5_HOST=x.x.x.x export F5_USER=admin export F5_PASS=admin You add your domains to the domains.txt file (more work likely if signing a lot of domains, I tested the one I have access to). The dehydrated client, of course is required, and then the hook script that dehydrated interacts with to deploy challenges and certificates. I aptly named that hook_script.py. For my hook, I'm deploying a challenge iRule to be applied only during the challenge; it is modified each time specific to the challenge supplied from the Let's Encrypt service and is cleaned up after the challenge is tested. And finally, there are a few environment variables I set so the information is not in text files. You could also move these into a credential vault. So to recap, you first register your client, then you can kick off a challenge to generate and deploy certificates. On the client side, it looks like this: ./dehydrated --register --accept-terms ./dehydrated -c Now, for testing, make sure you use the Let's Encrypt staging service instead of production. And since I want to force action every request while testing, I run the second command a little differently: ./dehydrated -c --force --force-validation Depicted graphically, here are the moving parts for the http challenge issued by Let's Encrypt at the request of the dehydrated client, deployed to the F5 BIG-IP, and validated by the Let's Encrypt servers. The Let's Encrypt servers then generate and return certs to the dehydrated client, which then, via the hook script, deploys the certs and keys to the F5 BIG-IP to complete the process. And here's the output of the dehydrated client and hook script in action from the CLI: # ./dehydrated -c --force --force-validation # INFO: Using main config file /etc/dehydrated/config Processing example.com + Checking expire date of existing cert... + Valid till Jun 20 02:03:26 2022 GMT (Longer than 30 days). Ignoring because renew was forced! + Signing domains... + Generating private key... + Generating signing request... + Requesting new certificate order from CA... + Received 1 authorizations URLs from the CA + Handling authorization for example.com + A valid authorization has been found but will be ignored + 1 pending challenge(s) + Deploying challenge tokens... + (hook) Deploying Challenge + (hook) Challenge rule added to virtual. + Responding to challenge for example.com authorization... + Challenge is valid! + Cleaning challenge tokens... + (hook) Cleaning Challenge + (hook) Challenge rule removed from virtual. + Requesting certificate... + Checking certificate... + Done! + Creating fullchain.pem... + (hook) Deploying Certs + (hook) Existing Cert/Key updated in transaction. + Done! This results in a deployed certificate/key pair on the F5 BIG-IP, and is modified in a transaction for future updates. This proof of concept is on github in the f5devcentral org if you'd like to take a look. Before closing, however, I'd like to mention a couple things: This is an update to an existing solution from years ago. It works, but probably isn't the best way to automate today if you're just getting started and have already started pursuing a more modern approach to automation. A better path would be something like Ansible. On that note, there are several solutions you can take a look at, posted below in resources. Resources https://github.com/EquateTechnologies/dehydrated-bigip-ansible https://github.com/f5devcentral/ansible-bigip-letsencrypt-http01 https://github.com/s-archer/acme-ansible-f5 https://github.com/s-archer/terraform-modular/tree/master/lets_encrypt_module(Terraform instead of Ansible) https://community.f5.com/t5/technical-forum/let-s-encrypt-with-cloudflare-dns-and-f5-rest-api/m-p/292943(Similar solution to mine, only slightly more robust with OCSP stapling, the DNS instead of HTTP challenge, and with bash instead of python)20KViews6likes18Comments
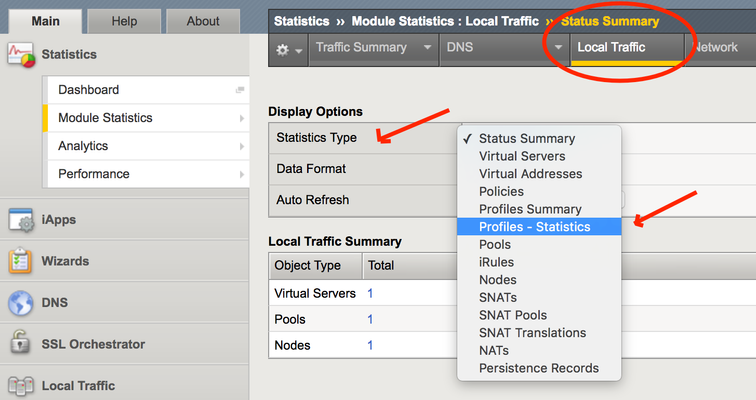
Bleichenbacher vs. Forward Secrecy: How much of your TLS is still RSA?
The RSA algorithm has been the go-to public key algorithm for the last fifteen years. But, perhaps like RC4, MD5 and Al Franken, it’s time forRSA to retire. TLS 1.3, the upcoming version of the de facto web encryption protocol, does not even include RSA among its allowed key exchange algorithms. The world is moving toward “Forward Secret” ciphers which use ephemeral keys, exchanged with either elliptic curve or straight-up Diffie-Hellman cryptography. These forward secret ciphers are typically noted as ECDHE or DHE. The former is vastly preferred these days; there are nearly 20 ECDHE servers for every DHE server. Of immediate concern to F5 users is the recent issuance of CVE-2017-6168, a series of Bleichenbacher-style attacks against F5 RSA key exchanges from version 11.6 to version 13. Patches have been issued for the vulnerable versions, but some customers have complicated patching schedules. They’re wondering if they can simply disable the RSA protocol on their F5 virtual servers and offer only forward secret ciphers. The general answer is “very probably.” All modern browsers prefer forward secret ciphers, so most modern human end-users already use it. A small but statistically significant number of F5 deployments offer no forward secrecy because they rely on passive TLS monitoring. If that is you, then may I suggest that instead of reading this article, you watch this ten-minute light-board video made specially for you. It's about how to do passive monitoring even with TLS 1.3. SSL Visibility: The Ultimate Passive Inspection Architecture But back to the task at hand. Let's assume that you aren't currently disabling forward secrecy, and we're back to thequestion “can you disable RSA?” That depends on how many of your users are still using it. Maybe your application has a bunch of automated queries from bespoke legacy software that only uses RSA. Or maybe your Jet Li fan site, which is still somehow in Alexa’s top 8 billion list, still receives a lot visitors running Windows XP in Guangdong Province, using TLS v 1.0, RSA and RC4. How would you know? Getting the TLS Statistics You can see what percentage of your customers are still using RSA instead of ECDHE with either F5 graphical user interface (GUI) or via command line (CLI). I’ll give examples of both methods using version 13.0 but these statistics have been available in the same methods since before germs. In the GUI, From the Main tab on the left, select the Statistics control at the top of the list. Then select the Module Statistics menu and from that, the Local Traffic menu. When the screen refreshes, you’ll see a selector under Display Options titled Statistics Type. Click it and choose Profiles Summary. You’ll see a giant list of profile types. When you click the View… link next to the “Client SSL” a giant, juicy list of crypto stats will appear. You’ll be interested in one group in particular; the one named “Key Exchange Method”. Very likely most of the key exchange types will have 0 entries (no one should be using anonymous Diffie-Hellman for example). But three in the middle include the two forward secrecy algorithms, ephemeral Diffie-Hellman (DHE) and ephemeral elliptic curve Diffie-Hellman (ECDHE). Sandwiched between them is the RSA cipher. Here’s a sample: Add the values of the two forward secret ciphers and compare that sum to the RSA. In this example, there are 99 forward secret key exchanges and only 5 RSA key exchanges, for a rate of just under 5%. You can get these same statistics from the command line with the simple tmsh command: (tmos)# show ltm profile client-ssl This command shows the profile statistics individually and you may have to add them together to get the global numbers. Or maybe you wanted them broken down by specific profile in the first place. Having the RSA percentage at hand can help you decide whether or not you want to disable the RSA key exchange. If your F5 has a really long uptime, then the counts will include RSA key exchanges from months or years ago when forward secrecy wasn’t so popular, and that might distort your decision. You could get more timely numbers by hitting the “clear statistics” button at the top of the page and then watching for a period of hours or days to see the mix of ECDHE vs RSA key exchanges. I would record or screen shot the old numbers before you do, just in case. Disabling RSA Key Exchanges If you are a good enough administrator that you’re already using F5’s TMOS version 13, you can associate the “f5-ecc” cipher group to your client ssl profile and get only forward secret ciphers. Or you could use the cipher builder from the Local Traffic | Ciphers main tab to build a cipher group that excludes RSA. If you’re using a version prior to 13.0, then see knowledge base article K21905460 associated to CVE-2017-6168 for some good cipher string recommendations. Or, read the cipher string primer in my award-winning F5 SSL Recommended Practices guide. Note that using RSA certificates with forward secrecy is still okay. As long as each cipher in the cipher list includes ECDHE or DHE you’ll be safe from Bleichenbachers. Hopefully this information was of some use to you, dear reader, and can help you make the decision about how to treat your cryptographic key exchanges now, and in the future.747Views0likes0CommentsAutomate import of SSL Certificate, Key & CRL from BIG-IP to BIG-IQ
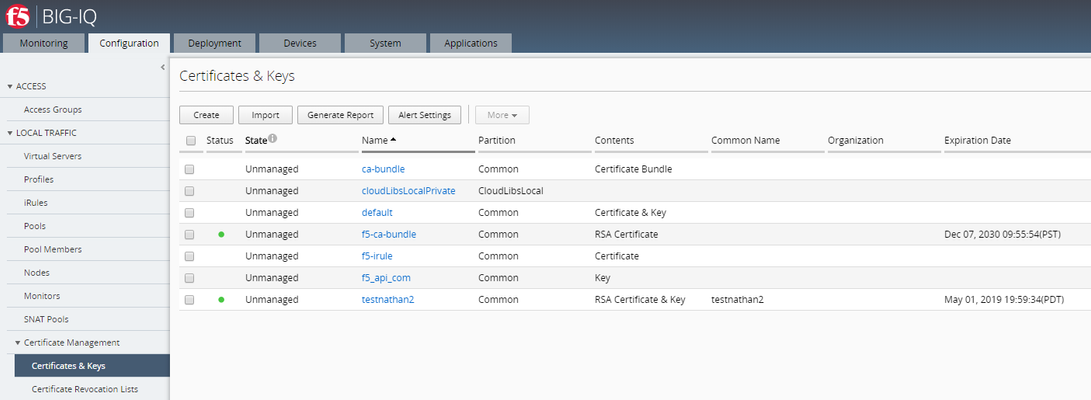
The functionality to automate the import of SSL cert & key from BIG-IP to BIG-IQ is available in the product starting BIG-IQ 7.0 and above. This script should not be used on BIG-IQ 7.0+ as it has not been tested on those versions. This script will import all supported SSL Certificate, Key & CRL that exist as unmanaged objects on this BIG-IQ which can be found on the target BIG-IP. Steps performed by the script: Gather certificateand key metadata (including cache-path) from BIG-IPs Download certificate and key file datafrom BIG-IPs Upload certificateand key file data to BIG-IQ Prerequisite:Discover and import LTM services before using this script.The target BIG-IP will be accessed over ssh using the BIG-IP root account. Installation:The script mustbe installed in BIG-IQ under /shared/scripts: # mkdir /shared/scripts# chmod +x /shared/scripts/import-bigip-cert-key-crl.py Command example: # ./import-bigip-cert-key-crl.py <big-ip IP address> Enter the root user's password if prompted. Allowed command line options:-h show this help message and exit-l LOG_FILE,log to the given file name--log-level {debug,info,warning,error,critical},set logging to the given level (default: info)-p PORT BIG-IPssh port (default: 22) Result:Configuration > Certificate Management > Certificates & Keys Before running the script: After running the script: Location of the scriptson GitHub:https://github.com/f5devcentral/f5-big-iq-pm-team In case you BIG-IQ is running on Hardware: Step 1: Install packages using pip, targeting a location of your choice # mkdir py-modules# pip install --target py-modules requests argparse Step 2: Run using python2.7, adding py-modules to the python path # PYTHONPATH=py-modules python2.7 import-bigip-cert-key-crl.py <big-ip IP address>4.9KViews1like43CommentsTLS Stateful vs Stateless Session Resumption
1. Preliminary Information TLS Session Resumption allows caching of TLS session information. There are 2 kinds: stateful and stateless. In stateful session resumption, BIG-IP stores TLS session information locally. In stateless session resumption, such job is delegated to the client. BIG-IP supports both stateful and stateless TLS session resumption. Enabling stateful or stateless session resumption is just a matter of ticking/unticking a tickbox on LTM's Client SSL profile: In this article, I'm going to walk through how session resumption works by performing a lab test. Here's my topology: Do not confuseSession Reuse/Resumption withRenegotiation. Renegotiation uses the same TCP connection to renegotiate security parameters which does not involved Session ID or Session Tickets. For more information please refer to SSL Legacy Renegotiation Secure Renegotiation. 2. How Stateful Session Resumption works Capture used:ssl-sample-session-ticket-disabled.pcap 2.1 New session Statefulmeans BIG-IP will keep storing session information from as many clients its cache allows and TLS handshake will proceed as follows: We can see above that Client sends an empty Session ID field and BIG-IP replies with a new Session ID (filter used:tcp.stream eq 0). After that, full handshake proceeds normally where Certificate and Client Key Exchange are sent and there is also the additional cost CPU-wise to compute the keys: 2.2 Reusing Previous Session Now both Client and Server have Session ID 56bcf9f6ea40ac1bbf05ff7fd209d423da9f96404103226c7f927ad7a2992433 stored in their TLS session cache. The good thing about it is that in the next TLS connection request, client won't need to go through the full TLS handshake again. Here's what we see: Client just sends Session ID (56bcf9f6ea40ac1bbf05ff7fd209d423da9f96404103226c7f927ad7a2992433) it previously learnt from BIG-IP (via Server Hello from previous connection) on its Client Hello message. BIG-IP then confirms this session ID is in its SSL Session cache and they both go through what is known as abbreviated TLS handshake. No certificate or key information is exchanged during abbreviated TLS handshake and previously negotiated keys are re-used. 3. How Stateless Session Resumption works Capture used:ssl-sample-session-ticket-enabled-2.pcap 3.1 New Session Because of the burden on BIG-IP that has to store one session per client,RFC5077suggested a new way of doing session Resumption that offloads the burden of keeping all TLS session information to client and nothing else needs to be stored on BIG-IP. Let's see the magic! Client first signals it supports stateless session resumption by adding SessionTickets TLS extension to its Client Hello message (in green): BIG-IP also signals back to client (in red) it supports SessionTicket TLS by adding empty SessionTicket TLS extension.Notice thatSession IDis NOT used here! The TLS handshake proceeds normally just like in stateful session resumption. However, just before handshake is completed (with Finished message), BIG-IP sends a new TLS message calledNew Session Ticketwhich consists of encrypted session information (e.g. master secret, cipher used, etc) where BIG-IP is able to decrypt later using a unique key it generates only for this purpose: From this point on, client (10.199.3.135) keeps session ticket in its TLS cache until next time it needs to connect to the same server (assuming session ticket did not expire). 3.2 Reusing Previous Session Now, when the same client wants to re-use previous session,it forwards the same session ticket aboveinSessionTicket TLS extensionon its Client Hello message as seen below: As we've noticed, Client also creates a new Session ID used for the following purpose: Server replies back with same session ID: BIG-IP accepted Session Ticket and is going to reuse the session. Server replies with empty/different Session ID: BIG-IP decided to go through full handshake either because Session Ticket expired or it is falling back to stateful session resumption. PS: Such session ID is NOT stored on BIG-IP otherwise it would defeat the purpose of stateless session reuse. It is a one-off usage just to confirm to client BIG-IP accepted session ticket they sent and we're not going to generate new session keys. In our example, BIG-IP successfully accepted and reused TLS session. We can confirm that an abbreviated TLS handshake took place and on Server Hello message BIG-IP replied back with same session ID client sent (to BIG-IP): Now, client This is session resumption in action and BIG-IP doesn't even have to store session information locally, making it a more scalable option when compared to stateful session resumption.5.9KViews6likes4CommentsSSL Profiles Part 6: SSL Renegotiation
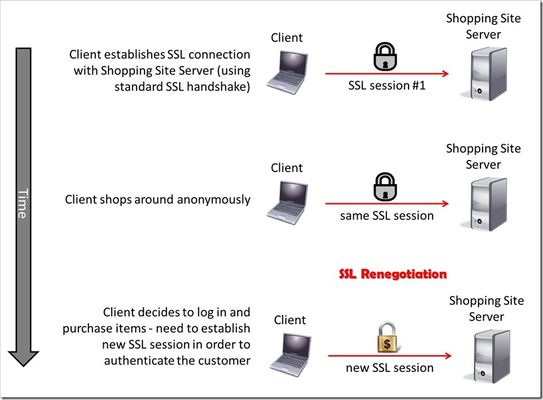
This is the sixth article in a series of Tech Tips that highlight SSL Profiles on the BIG-IP LTM. SSL Overview and Handshake SSL Certificates Certificate Chain Implementation Cipher Suites SSL Options SSL Renegotiation Server Name Indication Client Authentication Server Authentication All the "Little" Options This article will discuss SSL renegotiation, some OpenSSL features, some of the attack vectors against SSL renegotiation, and then how the BIG-IP is configured to handle this feature. What Is SSL Renegotiation? Before we get into the details of SSL renegotiation, let me start by outlining a quick scenario. Let's say a user visits an online shopping site that is SSL encrypted. Initially, the user shops around anonymously, but after some time on the site, the user decides to log in and make a purchase. The user will need to authenticate to the site before making the purchase, so the SSL connection will need to be adjusted to allow the authentication. Ideally, all the information the user collected as an anonymous visitor will be maintained and protected after the status change to an authenticated customer. This basic (yet frequent) scenario outlines the need for SSL renegotiation. The figure below shows a representation of this scenario and shows that a new SSL session must be established in order to authenticate the user. This new session completes the full handshake, but it does it using the security of the already-established SSL connection. SSL renegotiation messages (including types of ciphers and encryption keys) are encrypted and then sent over the existing SSL connection. This feature is nice because it can create a secure SSL session based on the fact that a secure connection is already established. SSL renegotiation is useful in several situations where an ordinary SSL session is already established. Here are a few examples: Client authentication is required A different set of encryption and decryption keys are needed A different set of encryption and hashing algorithms are used The client or the server can request renegotiation at any time. For the client to request renegotiation, the client sends a "Client Hello" message in the already-established encrypted channel and the server responds with a "Server Hello" and then the negotiation follows the normal handshake process. The server can initiate the renegotiation by sending the client a Hello Request message. When the client receives the request, the client sends the "Client Hello" message and the handshake process takes place. One quick note of clarification: the client and server can also complete a session resumption vice a session renegotiation. A session resumption basically resumes a previous session (using a previous session ID), and it saves the client and server the computing work of generating new encryption keys. Renegotiation is a process by which the full handshake process takes place over an already existing SSL connection. A Fly In The Ointment... Life would be much easier if the bad guys weren't out there doing their thing, but I guess it would also be less interesting. Nonetheless, some pretty smart guys were working with SSL renegotiation back in the old days (circa 2009) and found out that they could exploit a vulnerability in its design. The Common Vulnerabilities and Exposures (CVE) database outlines the details behind this SSL renegotiation vulnerability in CVE-2009-3555. You can read the details for yourself, but here's what the CVE basically says: TLS and SSLv3 do not properly associate renegotiation handshakes with an existing connection, and this allows attackers to insert data into existing sessions by sending an unauthenticated request that is processed retroactively by a server in a post-renegotiation context related to a "plaintext injection" attack. Essentially, this means that bad guys can hijack the SSL session and start using your "secure" communications on your behalf. Houston, we have a problem. Fortunately, the good folks at the Internet Engineering Task Force (IETF) found out about this problem, and they responded with a little magic of their own. It's outlined in Request for Comments (RFC) 5746. Here's what they had to say: "Secure Socket Layer (SSL) and Transport Layer Security (TLS) renegotiation are vulnerable to an attack in which the attacker forms a TLS connection with the target server, injects content of his choice, and then splices in a new TLS connection from a client. The server treats the client's initial TLS handshake as a renegotiation and thus believes that the initial data transmitted by the attacker is from the same entity as the subsequent client data. This specification defines a TLS extension to cryptographically tie renegotiations to the TLS connections they are being performed over, thus preventing this attack." Well, take that bad guys!! A Few Notes About OpenSSL Now that we have a basic understanding of RFC 5746, let's spend some time on OpenSSL and how it relates to F5's BIG-IP. After all, how can you have an article on SSL and not talk about OpenSSL? This stuff is free (Apache style) and it's awesome! The BIG-IP supports the popular OpenSSL toolkit, and it even has a built-in OpenSSL utility. It's important to understand how OpenSSL handles the behavior of clients and servers regarding the feature of SSL renegotiation. OpenSSL 0.9.8m and later always attempts to use secure renegotiation as described in RFC 5746. On the BIG-IP side of the house, versions prior to 10.2.3 do not support this RFC. However, beginning in version 10.2.3 and 11.x, the BIG-IP SSL profiles do support it. So, pause for a few minutes from reading this article and upgrade your BIG-IP! Patching When describing SSL implementations, systems that support secure renegotiation (per RFC 5746) are referred to as "patched" and systems that do not support secure renegotiation are referred to as "unpatched." If a client and server are both patched, connections and renegotiation are always permitted by OpenSSL implementations. If a server is patched but the client is unpatched, the initial connection will succeed but client renegotiation will be denied by the server with a no_renegotiation warning alert if TLS v1.0 is used or a fatal handshake_failure alert if SSL v3.0 is used. If the patched server attempts to renegotiate with the unpatched client, a fatal handshake_failure alert is sent. This is because the server code may be unaware of the unpatched nature of the client. Here's what happens if a client is patched but the server is unpatched. If the option "SSL_OP_LEGACY_SERVER_CONNECT" or "SSL_OP_ALLOW_UNSAFE_LEGACY_RENEGOTIATION" is set then initial connections as well as all renegotiations between patched clients and unpatched servers will succeed. However, if neither option is set then initial connections to unpatched servers will fail. (note: the option "SSL_OP_LEGACY_SERVER_CONNECT" is currently set by default, but as more servers become patched, this option will not be set by default in future versions of OpenSSL). Renegotiation Attacks Speaking of highly broken...let's spend a little time on SSL renegotiation attacks before we dive into the BIG-IP configurations. Here are two fairly well known attacks that are targeted at the SSL renegotiation feature. And, guess what? I'm starting with the..."Man in the Middle" (sung to Michael Jackson's hit song) Man In The Middle Since we discussed RFC 5746 earlier, why not go over the details of what it fixed? As we've discussed, SSL allows both servers and clients to initiate a complete renegotiation of the encryption parameters used for SSL connections. However, the design of the initial handshake and the renegotiation process had a gap that could allow an attacker to send a “Client Hello” and insert content into a client’s SSL session and then intercept secure communications between the server and the client. The following illustration shows how a bad guy could exploit the Man in the Middle vulnerability. In this example, the client sends a "Client Hello" to start an SSL session with his bank's server. The bad guy temporarily blocks the "Client Hello" and then creates an SSL connection of his own with the server. After the SSL session is created between the bad guy and the bank server, the bad guy asks for a money transfer. The bank server needs to authenticate the user, so it requests a renegotiation by sending a "Hello Request" to the bad guy...which is exactly what he wanted. This is where the bad guy sends the client's initial "Client Hello" to the server. The client thinks he is beginning a new SSL session, and the server thinks an SSL renegotiation has just taken place. But, nonetheless, all parties are happy with everything...especially the bad guy! See, now you know why you should be using a "patched" system! Denial of Service Last year, the IETF posted a paper that outlines a Denial of Service (DoS) attack against a server using the SSL renegotiation feature. The DoS attack is based on the fact that an SSL handshake requires up to 10 times more processing power on the server than on the client. Therein lies the problem...and the ability to exploit it! When SSL renegotiation is enabled on the server, a user is allowed to send a renegotiation request any time he wants...and this request initiates a new handshake. Since it takes much fewer resources for a client to perform a handshake than a server, the client can request multiple handshakes per second and cause a DoS on the server side SSL interface. Therefore, if a malicious user requests multiple renegotiation requests it will exhaust the server’s resources and not allow any other user to establish a connection. This attack is different than a Distributed Denial of Service (DDoS) as it does not require a large amounts of network volume to exhaust the network connection. Instead, it exhausts the server resources from a single host requiring only a single TCP/IP socket. A single server can perform between 150-300 handshakes per second while a single client can request up to 1,000 handshakes per second. By the way, Openssl doesn't consider this DoS exploit an actual vulnerability (which is why they haven't done anything about it in their latest releases). Their response is that this exploit is a way of DoS'ing a server by requesting lots of expensive crypto operations. Any app that allows an operation like SSL renegotiation to an untrusted host is subject to resource exhaustion. They would say the correct answer is to restrict hosts if this is an issue. Note also that if the OS firewall is not enabled, any OS is subject to a DoS through resource exhaustion, even if it's just TCP port exhaustion. For more information on a great SSL renegotiation DoS countermeasure, see this DevCentral article. David Holmes and Jason Rahm teamed up to talk about the DoS vulnerability, and then they wrote an iRule that elegantly defeats the attack...really cool and useful stuff!! In addition, here's a quick video clip that talks about the same issue...F5 knocks it out of the park with this iRule stuff! F5 Security Vignette: SSL Renegotiation BIG-IP Configuration Now that we've talked through this SSL renegotiation thing, let's finish up with the features of the BIG-IP and how it handles SSL renegotiation. The following screenshot shows the different options for SSL renegotiation on the BIG-IP. You can find this screen by navigating to Local Traffic > Profiles > SSL > Client | Server. Notice that you can either enable or disable SSL renegotiation altogether. By default, it is enabled. Renegotiation controls (on a per-connection basis) how the BIG-IP responds to mid-stream SSL reconnection requests. When enabled, the system processes mid-stream SSL renegotiation requests. When disabled, the system terminates the connection, or ignores the request, depending on system configuration. The Renegotiate Period setting specifies the number of seconds from the initial connect time that the system renegotiates an SSL session. The options are "Specify" (in seconds) and "Indefinite" with "Indefinite" being the default. The "Indefinite" setting means that you never want the system to force an SSL renegotiation. The system will renegotiate the session after the specified period of time...that's why the "Indefinite" setting never forces a renegotiation. For example, setting the renegotiate period to 3600 seconds triggers session renegotiation at least once an hour. The Renegotiate Size setting forces the BIG-IP to renegotiate an SSL session after a specified number of megabytes of application data have been transmitted over the secure channel. The values for this setting are "Indefinite" and "Specify" (in megabytes) with "Indefinite" being the default. This setting follows the same premise as the Renegotiate Period but it uses data size to determine when it will force a renegotiation vice a period of time. The Renegotiate Max Record Delay setting forces the BIG-IP to terminate an SSL session after receiving the specified maximum number of SSL records. The number of records are counted while the BIG-IP system waits for the client to initiate a renegotiation. If the BIG-IP system receives more than the maximum number of SSL records, it closes the connection. The values for this setting are "Indefinite" and "Specify" (number of records). The default setting is "Specify" 10 records. Secure Renegotiation is a fairly new feature in the BIG-IP (not available prior to v10.2.3). This setting handles the RFC 5746 problem, and it allows the user to specify the method of secure renegotiation for SSL connections. The values for this setting are "Request," "Require," and "Require Strict" with "Require" being the default value for the Client-side SSL profile. The default value for the Server-side SSL profile depends on the BIG-IP version: in v10.2.3 and v10.2.4, the default value for the Server-side SSL profile is "Require" and the default value in v11.x is "Require Strict." The "Request" value specifies that the system simply requests secure renegotiation of SSL connections. The "Require" value specifies that the system requires secure renegotiation of SSL connections. In this mode, the system permits initial SSL handshakes from clients, but terminates renegotiations from unpatched clients. The "Require Strict" value specifies that the system requires strict secure renegotiation of SSL connections. In this mode, the system does not accept new SSL connections from unpatched clients. Within the context of the Server-side SSL profile, there is no behavioral difference between "Require" and "Require Strict." In either mode, initial SSL connections from the BIG-IP to unpatched servers will fail. Conclusion Well, I think that about does it for SSL Renegotiation. Come back for more great SSL discussion in our next article that will feature Server Name Indication (SNI). As always, if you have any questions (about SSL, iRules, or any other F5 technology), feel free to comment here or contact the DevCentral team directly. See you soon!17KViews3likes7Comments