Intro to Load Balancing for Developers – The Algorithms
If you’re new to this series, you can find the complete list of articles in the series on my personal page here If you are writing applications to sit behind a Load Balancer, it behooves you to at least have a clue what the algorithm your load balancer uses is about. We’re taking this week’s installment to just chat about the most common algorithms and give a plain- programmer description of how they work. While historically the algorithm chosen is both beyond the developers’ control, you’re the one that has to deal with performance problems, so you should know what is happening in the application’s ecosystem, not just in the application. Anything that can slow your application down or introduce errors is something worth having reviewed. For algorithms supported by the BIG-IP, the text here is paraphrased/modified versions of the help text associated with the Pool Member tab of the BIG-IP UI. If they wrote a good description and all I needed to do was programmer-ize it, then I used it. For algorithms not supported by the BIG-IP I wrote from scratch. Note that there are many, many more algorithms out there, but as you read through here you’ll see why these (or minor variants of them) are the ones you’ll see the most. Plain Programmer Description: Is not intended to say anything about the way any particular dev team at F5 or any other company writes these algorithms, they’re just an attempt to put the process into terms that are easier for someone with a programming background to understand. Hopefully a successful attempt. Interestingly enough, I’ve pared down what BIG-IP supports to a subset. That means that F5 employees and aficionados will be going “But you didn’t mention…!” and non-F5 employees will likely say “But there’s the Chi-Squared Algorithm…!” (no, chi-squared is theoretical distribution method I know of because it was presented as a proof for testing the randomness of a 20 sided die, ages ago in Dragon Magazine). The point being that I tried to stick to a group that builds on each other in some connected fashion. So send me hate mail… I’m good. Unless you can say more than 2-5% of the world’s load balancers are running the algorithm, I won’t consider that I missed something important. The point is to give developers and software architects a familiarity with core algorithms, not to build the worlds most complete lexicon of algorithms. Random: This load balancing method randomly distributes load across the servers available, picking one via random number generation and sending the current connection to it. While it is available on many load balancing products, its usefulness is questionable except where uptime is concerned – and then only if you detect down machines. Plain Programmer Description: The system builds an array of Servers being load balanced, and uses the random number generator to determine who gets the next connection… Far from an elegant solution, and most often found in large software packages that have thrown load balancing in as a feature. Round Robin: Round Robin passes each new connection request to the next server in line, eventually distributing connections evenly across the array of machines being load balanced. Round Robin works well in most configurations, but could be better if the equipment that you are load balancing is not roughly equal in processing speed, connection speed, and/or memory. Plain Programmer Description: The system builds a standard circular queue and walks through it, sending one request to each machine before getting to the start of the queue and doing it again. While I’ve never seen the code (or actual load balancer code for any of these for that matter), we’ve all written this queue with the modulus function before. In school if nowhere else. Weighted Round Robin (called Ratio on the BIG-IP): With this method, the number of connections that each machine receives over time is proportionate to a ratio weight you define for each machine. This is an improvement over Round Robin because you can say “Machine 3 can handle 2x the load of machines 1 and 2”, and the load balancer will send two requests to machine #3 for each request to the others. Plain Programmer Description: The simplest way to explain for this one is that the system makes multiple entries in the Round Robin circular queue for servers with larger ratios. So if you set ratios at 3:2:1:1 for your four servers, that’s what the queue would look like – 3 entries for the first server, two for the second, one each for the third and fourth. In this version, the weights are set when the load balancing is configured for your application and never change, so the system will just keep looping through that circular queue. Different vendors use different weighting systems – whole numbers, decimals that must total 1.0 (100%), etc. but this is an implementation detail, they all end up in a circular queue style layout with more entries for larger ratings. Dynamic Round Robin (Called Dynamic Ratio on the BIG-IP): is similar to Weighted Round Robin, however, weights are based on continuous monitoring of the servers and are therefore continually changing. This is a dynamic load balancing method, distributing connections based on various aspects of real-time server performance analysis, such as the current number of connections per node or the fastest node response time. This Application Delivery Controller method is rarely available in a simple load balancer. Plain Programmer Description: If you think of Weighted Round Robin where the circular queue is rebuilt with new (dynamic) weights whenever it has been fully traversed, you’ll be dead-on. Fastest: The Fastest method passes a new connection based on the fastest response time of all servers. This method may be particularly useful in environments where servers are distributed across different logical networks. On the BIG-IP, only servers that are active will be selected. Plain Programmer Description: The load balancer looks at the response time of each attached server and chooses the one with the best response time. This is pretty straight-forward, but can lead to congestion because response time right now won’t necessarily be response time in 1 second or two seconds. Since connections are generally going through the load balancer, this algorithm is a lot easier to implement than you might think, as long as the numbers are kept up to date whenever a response comes through. These next three I use the BIG-IP name for. They are variants of a generalized algorithm sometimes called Long Term Resource Monitoring. Least Connections: With this method, the system passes a new connection to the server that has the least number of current connections. Least Connections methods work best in environments where the servers or other equipment you are load balancing have similar capabilities. This is a dynamic load balancing method, distributing connections based on various aspects of real-time server performance analysis, such as the current number of connections per node or the fastest node response time. This Application Delivery Controller method is rarely available in a simple load balancer. Plain Programmer Description: This algorithm just keeps track of the number of connections attached to each server, and selects the one with the smallest number to receive the connection. Like fastest, this can cause congestion when the connections are all of different durations – like if one is loading a plain HTML page and another is running a JSP with a ton of database lookups. Connection counting just doesn’t account for that scenario very well. Observed: The Observed method uses a combination of the logic used in the Least Connections and Fastest algorithms to load balance connections to servers being load-balanced. With this method, servers are ranked based on a combination of the number of current connections and the response time. Servers that have a better balance of fewest connections and fastest response time receive a greater proportion of the connections. This Application Delivery Controller method is rarely available in a simple load balancer. Plain Programmer Description: This algorithm tries to merge Fastest and Least Connections, which does make it more appealing than either one of the above than alone. In this case, an array is built with the information indicated (how weighting is done will vary, and I don’t know even for F5, let alone our competitors), and the element with the highest value is chosen to receive the connection. This somewhat counters the weaknesses of both of the original algorithms, but does not account for when a server is about to be overloaded – like when three requests to that query-heavy JSP have just been submitted, but not yet hit the heavy work. Predictive: The Predictive method uses the ranking method used by the Observed method, however, with the Predictive method, the system analyzes the trend of the ranking over time, determining whether a servers performance is currently improving or declining. The servers in the specified pool with better performance rankings that are currently improving, rather than declining, receive a higher proportion of the connections. The Predictive methods work well in any environment. This Application Delivery Controller method is rarely available in a simple load balancer. Plain Programmer Description: This method attempts to fix the one problem with Observed by watching what is happening with the server. If its response time has started going down, it is less likely to receive the packet. Again, no idea what the weightings are, but an array is built and the most desirable is chosen. You can see with some of these algorithms that persistent connections would cause problems. Like Round Robin, if the connections persist to a server for as long as the user session is working, some servers will build a backlog of persistent connections that slow their response time. The Long Term Resource Monitoring algorithms are the best choice if you have a significant number of persistent connections. Fastest works okay in this scenario also if you don’t have access to any of the dynamic solutions. That’s it for this week, next week we’ll start talking specifically about Application Delivery Controllers and what they offer – which is a whole lot – that can help your application in a variety of ways. Until then! Don.19KViews1like9Comments
snat vs automap, whats the difference?
I'm trying to see the difference between the snat and automap for the Source Address Translation option. Currently I have traffic coming in to the F5 using automap. What though specifically does that mean? And why wouldn't I use SNAT? All the nodes, (servers in our lan), are not configured to have the F5 as its default gateway. I have a lot of virtual servers configured and I'm not sure how the self-ip plays a role in the nating or snating if at all. From what I understand (but could be wrong) an external client request is directed to the vip ip (since our firewall nats it there) and the destination IP is that of the vip. The F5 then translates the destination IP to that of the IP of the pool member. Then on the way back out the source is translated to the of the vip. But what about the selfip? Can someone please explain all this? Thanks!14KViews0likes8Comments
Display LTM connections??
I am very new to F5 Big IP, mainly worked with Cisco CSMs and Citrix NetScaler load balancers in the past.....what I am trying to find is how to display what hosts are connected to a particular virtual server, what pool member it's getting routed to and what SNAT address the source is being assigned, etc. WHat I have is a pair of F5 Big IP 4200s set up in a HA configuration. Thanks for any help...JeffSolved13KViews0likes16CommentsX-Forwarded-For Log Filter for Windows Servers
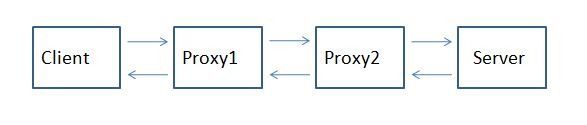
For those that don't know what X-Forwarded-For is, then you might as well close your browser because this post likely will mean nothing to you… A Little Background Now, if you are still reading this, then you likely are having issues with determining the origin client connections to your web servers. When web requests are passed through proxies, load balancers, application delivery controllers, etc, the client no longer has a direct connection with the destination server and all traffic looks like it's coming from the last server in the chain. In the following diagram, Proxy2 is the last hop in the chain before the request hits the destination server. Relying on connection information alone, the server thinks that all connections come from Proxy2, not from the Client that initiated the connection. The only one in the chain here who knows who the client really is (as determined by it's client IP Address, is Proxy1. The problem is that application owners rely on source client information for many reasons ranging from analyzing client demographics to targeting Denial of Service attacks. That's where the X-Forwarded-For header comes in. It is non-RFC standard HTTP request header that is used for identifying the originating IP address of a client connecting to a web server through a proxy. The format of the header is: X-Forwarded-For: client, proxy1, proxy, … X-Forwarded-For header logging is supported in Apache (with mod_proxy) but Microsoft IIS does not have a direct way to support the translation of the X-Forwarded-For value into the client ip (c-ip) header value used in its webserver logging. Back in September, 2005 I wrote an ISAPI filter that can be installed within IIS to perform this transition. This was primarily for F5 customers but I figured that I might as well release it into the wild as others would find value out of it. Recently folks have asked for 64 bit versions (especially with the release of Windows 2008 Server). This gave me the opportunity to brush up on my C skills. In addition to building targets for 64 bit windows, I went ahead and added a few new features that have been asked for. Proxy Chain Support The original implementation did not correctly parse the "client, proxy1, proxy2,…" format and assumed that there was a single IP address following the X-Forwarded-For header. I've added code to tokenize the values and strip out all but the first token in the comma delimited chain for inclusion in the logs. Header Name Override Others have asked to be able to change the header name that the filter looked for from "X-Forwarded-For" to some customized value. In some cases they were using the X-Forwarded-For header for another reason and wanted to use iRules to create a new header that was to be used in the logs. I implemented this by adding a configuration file option for the filter. The filter will look for a file named F5XForwardedFor.ini in the same directory as the filter with the following format: [SETTINGS] HEADER=Alternate-Header-Name The value of "Alternate-Header-Name" can be changed to whatever header you would like to use. Download I've updated the original distribution file so that folks hitting my previous blog post would get the updates. The following zip file includes 32 and 64 bit release versions of the F5XForwardedFor.dll that you can install under IIS6 or IIS7. Installation Follow these steps to install the filter. Download and unzip the F5XForwardedFor.zip distribution. Copy the F5XForwardedFor.dll file from the x86\Release or x64\Release directory (depending on your platform) into a target directory on your system. Let's say C:\ISAPIFilters. Ensure that the containing directory and the F5XForwardedFor.dll file have read permissions by the IIS process. It's easiest to just give full read access to everyone. Open the IIS Admin utility and navigate to the web server you would like to apply it to. For IIS6, Right click on your web server and select Properties. Then select the "ISAPI Filters" tab. From there click the "Add" button and enter "F5XForwardedFor" for the Name and the path to the file "c:\ISAPIFilters\F5XForwardedFor.dll" to the Executable field and click OK enough times to exit the property dialogs. At this point the filter should be working for you. You can go back into the property dialog to determine whether the filter is active or an error occurred. For II7, you'll want to select your website and then double click on the "ISAPI Filters" icon that shows up in the Features View. In the Actions Pane on the right select the "Add" link and enter "F5XForwardedFor" for the name and "C:\ISAPIFilters\F5XForwardedFor.dll" for the Executable. Click OK and you are set to go. I'd love to hear feedback on this and if there are any other feature request, I'm wide open to suggestions. The source code is included in the download distribution so if you make any changes yourself, let me know! Good luck and happy filtering! -Joe13KViews0likes14Comments
tcpdump portrange option
Hi everyone, I'm trying to capture traffic directed to a certain range of tcp ports with tcpdump. When using the "portrange" expression I get a syntax error: tcpdump -i -s0 -w capture_file.trc portrange 8080-8082 tcpdump: syntax error in filter expression Is this expression supported on BIG-IP (1600 10.2.4 HF5)? Thanks in advance, Regards. moog67Solved11KViews0likes8Commentstcpdump command for multiple source hosts and destination hosts
The request that has been given me is to find any SOAP traffic from 2 sets of pools. Pool 1 172.17.30.100 172.17.30.101 172.17.30.102 Pool 2 172.17.31.200 172.17.31.201 172.17.31.202 cany anyone help me with a tcpdump command that will give me all 80 and 443 traffic from pool 1 to pool 2 bidirectionaly?9.2KViews0likes1Comment
URL rewrite through iRule
Hi Guys, i have one "Performance (HTTP)" virtual server on F5-1600 series, and i want to change the URL "http://www.abc.com" to "http://partner.abc.com/xyz". i have tried all below scripts : 1- when HTTP_REQUEST { if {([string tolower [HTTP::host]] equals "http://www.abc.com")}{ HTTP::header replace Host "http://partner.abc.com/xyz" } } 2- when HTTP_REQUEST { if { not ([HTTP::uri] starts_with "/xyz") } { HTTP::uri /xyz[HTTP::uri] } } 3- when HTTP_REQUEST { if {[HTTP::uri] equals {http://www.abc.com}} {HTTP::uri {http://partner.abc.com/xyz} } } but i wasn't successful! can anyone help me how can i do this through iRule ?Solved8.4KViews0likes27Comments
F5 Automated Backups - The Right Way
Hi all, Often I've been scouring the devcentral fora and codeshares to find that one piece of handywork that will drastically simplify my automated backup needs on F5 devices. Based on the works of Jason Rahm in his post "Third Time's the Charm: BIG-IP Backups Simplified with iCall" on the 26th of June 2013, I went ahead and created my own iApp that pretty much provides the answers for all my backup-needs. Here's a feature list of this iApp: It allows you to choose between both UCS or SCF as backup-types. (whilst providing ample warnings about SCF not being a very good restore-option due to the incompleteness in some cases) It allows you to provide a passphrase for the UCS archives (the standard GUI also does this, so the iApp should too) It allows you to not include the private keys (same thing: standard GUI does it, so the iApp does it too) It allows you to set a Backup Schedule for every X minutes/hours/days/weeks/months or a custom selection of days in the week It allows you to set the exact time, minute of the hour, day of the week or day of the month when the backup should be performed (depending on the usefulness with regards to the schedule type) It allows you to transfer the backup files to external devices using 4 different protocols, next to providing local storage on the device itself SCP (username/private key without password) SFTP (username/private key without password) FTP (username/password) SMB (using smbclient, with username/password) Local Storage (/var/local/ucs or /var/local/scf) It stores all passwords and private keys in a secure fashion: encrypted by the master key of the unit (f5mku), rendering it safe to store the backups, including the credentials off-box It has a configurable automatic pruning function for the Local Storage option, so the disk doesn't fill up (i.e. keep last X backup files) It allows you to configure the filename using the date/time wildcards from the tcl [clock] command, as well as providing a variable to include the hostname It requires only the WebGUI to establish the configuration you desire It allows you to disable the processes for automated backup, without you having to remove the Application Service or losing any previously entered settings For the external shellscripts it automatically generates, the credentials are stored in encrypted form (using the master key) It allows you to no longer be required to make modifications on the linux command line to get your automated backups running after an RMA or restore operation It cleans up after itself, which means there are no extraneous shellscripts or status files lingering around after the scripts execute I wasn't able to upload the iApp template to this article, so I threw it on pastebin: http://pastebin.com/YbDj3eMN Enjoy! Thomas Schockaert8.4KViews0likes79CommentsTwo-Factor Authentication With Google Authenticator And LDAP
Introduction Earlier this year Google released their time-based one-time password (TOTP) solution named Google Authenticator. A TOTP is a single-use code with a finite lifetime that can be calculated by two parties (client and server) using a shared secret and a synchronized clock (see RFC 4226 for additional information). In the case of Google Authenticator, the TOTP are generated using a software (soft) token on a mobile device. Google currently offers applications for the Apple iPhone, Android-based devices, and Blackberry handsets. A user authenticating with a Google Authenticator-enabled service will require the possession of this software token. In order for the token to be effective, it must not be able to be duplicated and the shared secret should be closely guarded. Google Authenticator’s soft token solution offer a number of advantages over other commercially available solutions. It is free to use (all applications are free to download), the TOTP algorithm is open source, well-known, and well-tested, and finally it does not require a dedicated server for processing tokens. While certain potential weakness in SHA-1 have been identified, none of them can be exploited within the 30-second timeframe of the TOTP’s usability. For all intents and purposes, SHA-1 is reasonably secure, well-tested, and purpose-appropriate for this application. The algorithm however is only as secure as the users and administrators are at protecting the shared secret used in token processing. Calculating The Google Authenticator TOTP The Google Authenticator TOTP is calculated by generating an HMAC-SHA1 token, which uses a 10-byte base32-encoded shared secret as a key and Unix time (epoch) divided into a 30 second interval as inputs. The resulting 80-byte token is converted to a 40-character hexadecimal string, the least significant (last) hex digit is then used to calculate a 0-15 offset. The offset is then used to read the next 8 hex digits from the offset. The resulting 8 hex digits are then AND’d with 0x7FFFFFFF (2,147,483,647), then the modulo of the resultant integer and 1,000,000 is calculated, which produces the correct code for that 30 seconds period. Base32 encoding and decoding were covered in my previous Tech Tip titled Base32 Encoding And Decoding With iRules . The Tech Tip details the process for decoding a user’s base32-encoded key to binary as well as converting a binary key to base32. The HMAC-SHA256 token calculation iRule was originally submitted by Nat to the Codeshare on DevCentral. The iRule was slightly modified to support the SHA-1 algorithm, but is otherwise taken directly from the pseudocode outlined in RFC 2104. These two pieces of code contribute the bulk of the processing of the Google Authenticator code. The rest is done with simple bitwise and arithmetic functions. Google Authenticator Two-Factor Authentication Process Installing Google Authenticator Two-Factor Authentication The installation of Google Authenticator two-factor authentication on your BIG-IP is divided into six sections: creating an LDAP authentication configuration, configuring an LDAP (Active Directory) authentication profile, testing your authentication profile, adding the Google Authenticator iRule and “user_to_google_auth” mapping data group, attaching iRule to the authentication profile, and finally generating soft tokens for your users. The process is broken out into steps as trying to complete all the sections in tandem can be difficult to troubleshoot. Creating An LDAP (Active Directory) Authentication Configuration The LDAP profile we will configure will be extremely basic: no SSL, no Active Directory, etc. A detailed walkthrough for more advanced deployments can be found in our best practices guide: Configuring LDAP remote authentication for Active Directory . 1. Login to your BIG-IP using administrator credentials 2. Navigate to Local Traffic > Profiles > Authentication > Configurations 3. Click “Create” in the upper right-hand corner 4. Select “LDAP” from the “Type” drop-down menu 5. Now fill in the fields with your environment-specific values: Name: ldap.f5test.local Type: LDAP Remote LDAP Tree: dc=f5test, dc=local Host(s): <IP address(es) of LDAP server(s)> Service Port: 389 (default) LDAP Version: 3 (default) Bind DN: cn=ldap_bind_acct, dc=f5test, dc=local (if your LDAP server allows anonymous binds you may not need this option) Bind Password: <admin password> Confirm Bind Password: <admin password> 6. Click “Finished” to save the configuration Configuring An LDAP (Active Directory) Authentication Profile 1. Navigate to Local Traffic > Profiles > Authentication > Profiles 2. Click “Create” in the upper right-hand corner 3. Select “LDAP” from the “Type” drop-down menu 4. Fill in fields with appropriate values: Name: ldap.f5test.local Type: LDAP Configuation: ldap.f5test.local (select previously named configuration from drop-down) Rule: (leave this unchecked and not enabled for now, but this is where we will enable the Google Authenticator iRule shortly) 5. Click “Finished” Test Your Authentication Profile 1. Create a basic HTTP virtual server with your LDAP authentication profile enabled on the virtual 2. Access your virtual from a web browser and you should be prompted with an HTTP Basic Authentication credential form 3. Test with known-working credentials, if everything works you’re good to go, if not you’ll need to troubleshoot the authentication issue Adding the Google Authenticator iRule 1. Go to the DevCentral Codeshare and download the Google Authenticator iRule 2. Navigate to Local Traffic > iRules > iRule List 3. Click “Create” in the upper right-hand corner 4. Name your iRule “google_authenticator_plus_ldap_two_factor” and paste the iRule into “Definition” section 5. Click “Finished” when you’re done Attaching The Google Authenticator iRule To Your Authentication Profile 1. Go back to the “Authentication Profile” section by browsing to Local Traffic > Profiles > Authentication > Profiles 2. Select your LDAP profile from the list 3. Now attach select the “google_authenticator_plus_ldap_two_factor” iRule from the “Rule” drop-down 4. Click “Finished” Generating Software Tokens For Users In addition to the Google Authenticator iRule we also wrote a Google Authenticator Soft Token Generator iRule that will generate soft tokens for your users. The iRule can be added directly to an HTTP virtual server without a a pool and accessed directly to create tokens. There are a few available fields in the generator: account, pre-defined secret, and a QR code option. The “account” field defines how to label the soft token within the user’s mobile device and can be useful if the user has multiple soft token on the same device (I have 3 and need to label them to keep them straight). A 10-byte string can be used as a pre-defined secret for conversion to a base32-encoded key. We will advise you against using a pre-defined key because a key known to the user is something they know (as opposed to something they have) and could be potentially regenerate out-of-band thereby nullifying the benefits of two-factor authentication. Lastly, there is an option to generate a QR code by sending an HTTPS request to Google and returning the QR code as an image. While this is convenient, this could be seen as insecure since it may wind up in Google’s logs somewhere. You’ll have to decide if that is a risk you’re willing to take for the convenience it provides. Once the token has been generated, it will need to be added to a data group on the BIG-IP: 1. Navigate to Local Traffic > iRules > Data Group Lists 2. Select “Create” from the upper right-hand corner if the data group does not yet exist. If it exists, just select it from the list. 3. Name the data group “user_to_google_auth” (data group name can be changed in the RULE_INIT section of the Google Authenticator iRule) 4. The type of data group will be “string” 5. Type the “username” into the “string” field and paste the “Google Authenticator key” into the “value” field 6. Click “Add” and you the username/key pair should appear in the list as such: user := ONSWG4TFOQYTEMZU 7. Click “Finished” when all your username/key pairs have been added. Your user can scan the QR code or type it into their device manually. After they scan the QR code, the account name should appear along with the TOTP for the account. The image below is how the soft token appears in the Google Authenticator iPhone application: Once again, do not let the user leave with a copy of the plain text key. Knowing their key value will negate the value of having the token in the first place. Once the key has been added to the BIG-IP, the user’s device, and they’ve tested their access, destroy any reference to the key outside the BIG-IPs data group.If you’re worried about having the keys in plain text on the BIG-IP, they can be encrypted with AES or stored off-box in LDAP and only queried via secure connection. This is beyond the scope of this article, but doable with iRules. Testing and Troubleshooting There are a lot of moving pieces in this iRule so troubleshooting can be a bit daunting at first glance, but because all of the pieces can be separated into their constituents the problem is usually identified quickly. There are five pieces that make up this solution: the LDAP service, the BIG-IP LDAP profile, the Google Authenticator iRule, the “user_to_google_auth” mapping data group, and finally the soft token. Try to separate them from each other to expedite the troubleshooting process. Here are a few helpful hints in troubleshooting potential issues: 1. Are all the clocks synchronized? The BIG-IP and LDAP server can be tested from the command line by running ‘ntpdate –q pool.ntp.org’. If the clocks are more than a few milliseconds off, they’ll need to be adjusted. An NTP server should be configured for all devices. Likewise the user’s mobile device must be configured to use network time or else the calculated value will always be wrong. Remember that timezones do not matter when using Unix time. 2. Is basic LDAP working without the iRule attached? Before ever touching any of the Google Authenticator related iRules, data groups, devices, etc. your LDAP configuration should be in working order. If you’re having problems finding the issue, enable “debug logging” at the bottom of the LDAP authentication configuration page on your BIG-IP and tail the logs on your LDAP server. Revisit the best practices guide if you are still unsure about any configuration options. 3. Turn on (or increase) logging for Google Authenticator iRule. In the RULE_INIT section of the Google Authenticator iRule, there is a debug logging option. Set it to ‘2’ and all actions from the iRule will be logged to /var/log/ltm. If you see one particular area that is consistently hanging, investigate it further. Conclusion With every passing day system security becomes a greater concern. Today’s attacks are far more sophisticated and costly than those of days past. With all the stories of stolen laptops and other devices in the field, it is a little easier to sleep as a systems administrator knowing that a tech-aware thief has one more hurdle to surpass in an effort to compromise your infrastructure. The implementation costs of deploying two-factor authentication with Google Authenticator in an existing F5 infrastructure are very low assuming your employees have company-issued mobile devices. The cost can be deduced to the man hours required to install this iRule and generate tokens for your users. The cost is almost certainly less than that of a single incident of a compromise account. Until next time, batten down the hatches and get that two-factor project underway that’s been on the backburner for two years. Code and References Google Authenticator iRule – Documentation and code for the iRule used in this Tech Tip Google Authenticator Soft Token Generator iRule – iRule for generating soft tokens for users RFC 4226 - HOTP: An HMAC-Based One-Time Password Algorithm RFC 2104 - HMAC: Keyed-Hashing for Message Authentication RFC 4648 - The Base16, Base32, and Base64 Data Encodings SOL11072 - Configuring LDAP remote authentication for Active Directory6.9KViews1like12Comments